Introduction
Welcome to VMS
The ProcureToPay Vendor Management Software (VMS) is designed to streamline how we interact with our valued suppliers and service providers. This platform provides a centralized, transparent, and efficient way to manage vendor information, issue purchase orders, track dispatches, submit and review invoices, and manage payments.
Key Benefits
- Centralized Vendor Data: All vendor information, contacts, and documents in one secure location.
- Branded Vendor Portal: Collaborate with your vendors directly on our company branded portal
- Efficient Purchase Orders: Create, manage, and track POs with integration to our product master.
- Transparent Dispatch & Delivery: Track shipments in detail and manage Proof of Delivery documents.
- Streamlined Invoicing: Vendors can easily submit invoices linked to POs; internal teams can quickly review and record payments.
- Improved Compliance: Keep track of vendor statuses and required documentation.
- Three way matching: Easily perform a 3-way match with all data on a single screen
Core Features
The ProcureToPay VMS focuses on core functionalities to get you started quickly:
- Vendor Profile Management (Internal & Self-Service)
- Product Master Management
- Purchase Order Creation & Tracking (Internal & Vendor-facing)
- Detailed Dispatch & Proof of Delivery Management
- Invoice Submission (Vendor-facing) & Review/Payment Recording (Internal)
Getting Started
- Write to us on sales@procuretopay.tech to get your own branded Vendor and Procurement Management System
Part 1: Administrator & Internal User Guide
This section is for internal staff of Your Company (Admin, Procurement, Accounts Payable).
Chapter 1: Dashboard & Navigation
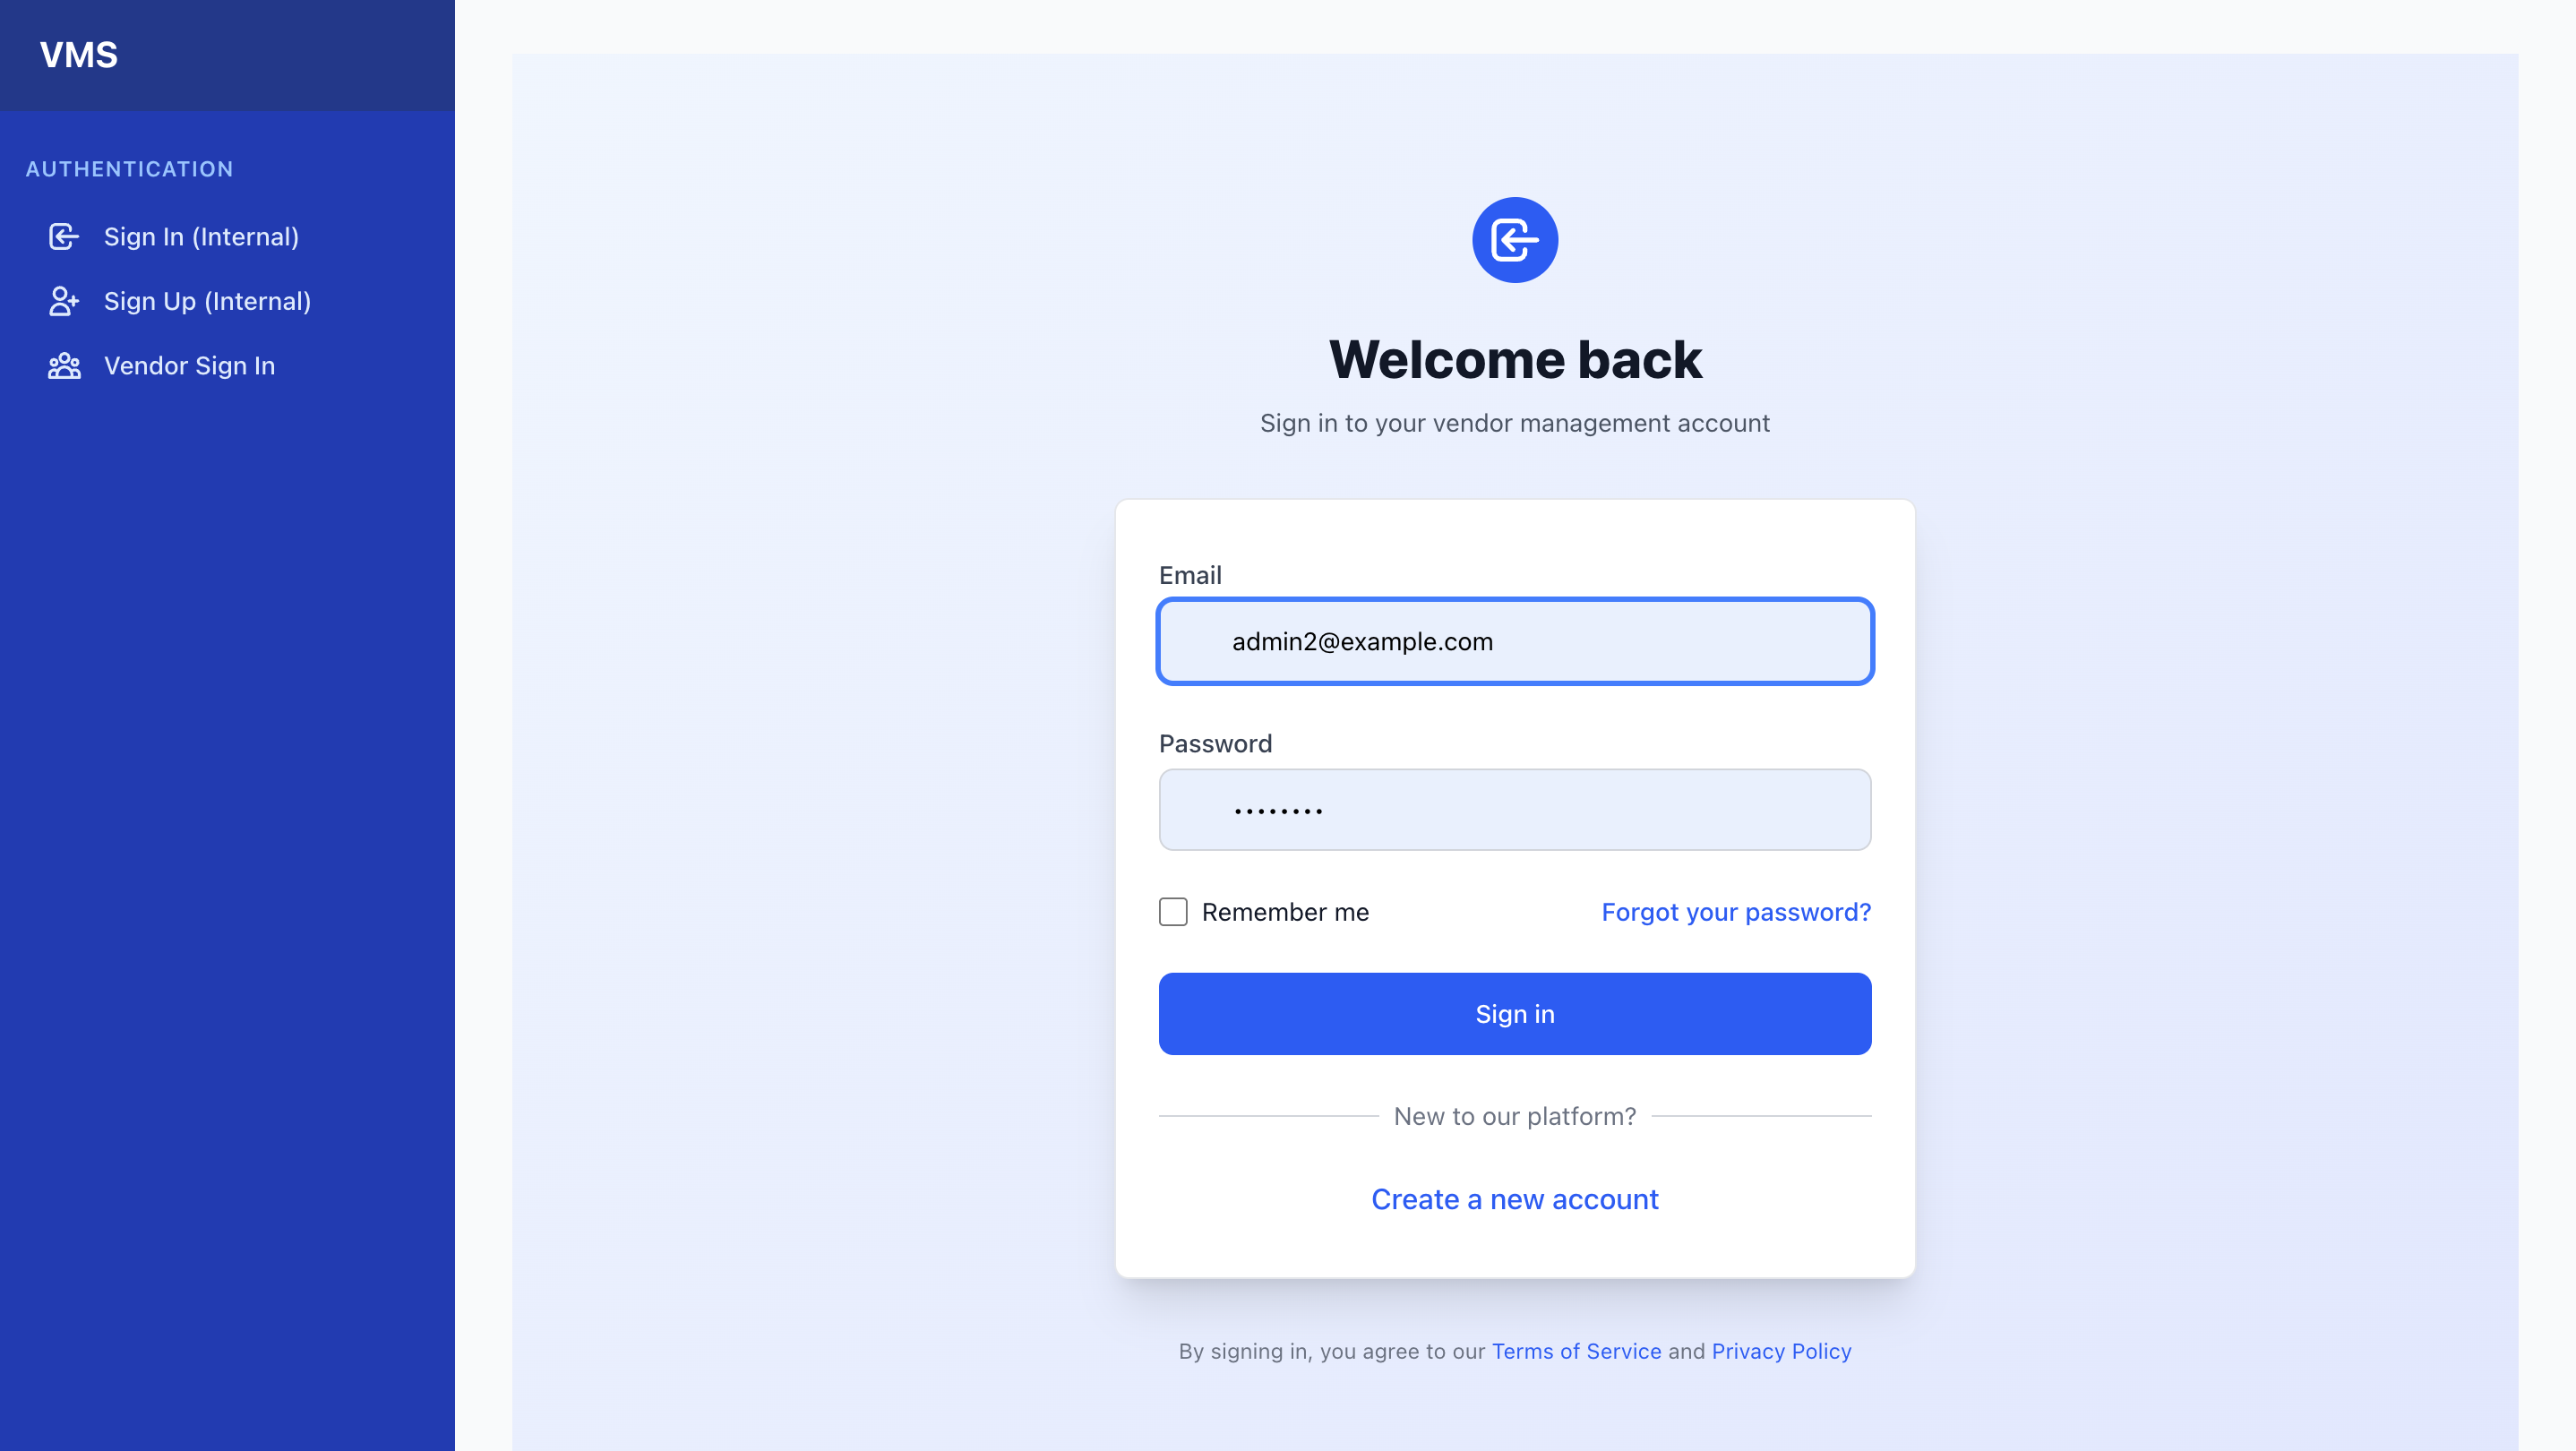
- Logging In:
- Navigate to the Admin/Internal Portal URL.
- Enter your
Email AddressandPassword. - Click "Sign In".
- If you do not have an account, contact your system administrator.
- Main Navigation:
Once logged in, the navigation bar at the top provides quick access to different modules. The links you see may vary based on your assigned user role.
- VMS: Returns to the home page.
- Vendors: Manage all vendor profiles and onboarding.
- Product Master: Manage the company's product catalog.
- Purchase Orders: View and create all Purchase Orders.
- Invoices: Review submitted invoices and manage their status.
- Proof of Deliveries: Review all uploaded Proof of Delivery documents.
- Payments: View a history of all recorded payments.
- (Your Name/Email): Displays your logged-in email and role.
- Sign out: Logs you out of the system.
- User Roles & Permissions:
The VMS uses a role-based access system to ensure data security and proper workflow segregation.
- Admin: Full access to all modules and actions, including user management, system configuration, and all vendor/PO/invoice/payment operations.
- Purchase Team: Can manage Vendors (add, view, edit), Product Master (view, add, edit), and Purchase Orders (view, add, edit details, update status). Cannot approve vendors, PODs, or invoices.
- Accounts Payable: Can view Vendors, Product Master, Purchase Orders, Invoices (view, approve for payment, reject), and Payments (view, record).
- Read-Only: Can view all information across Vendors, Product Master, Purchase Orders, Invoices, Proof of Deliveries, and Payments. Cannot make any changes or additions.
- Notifications:
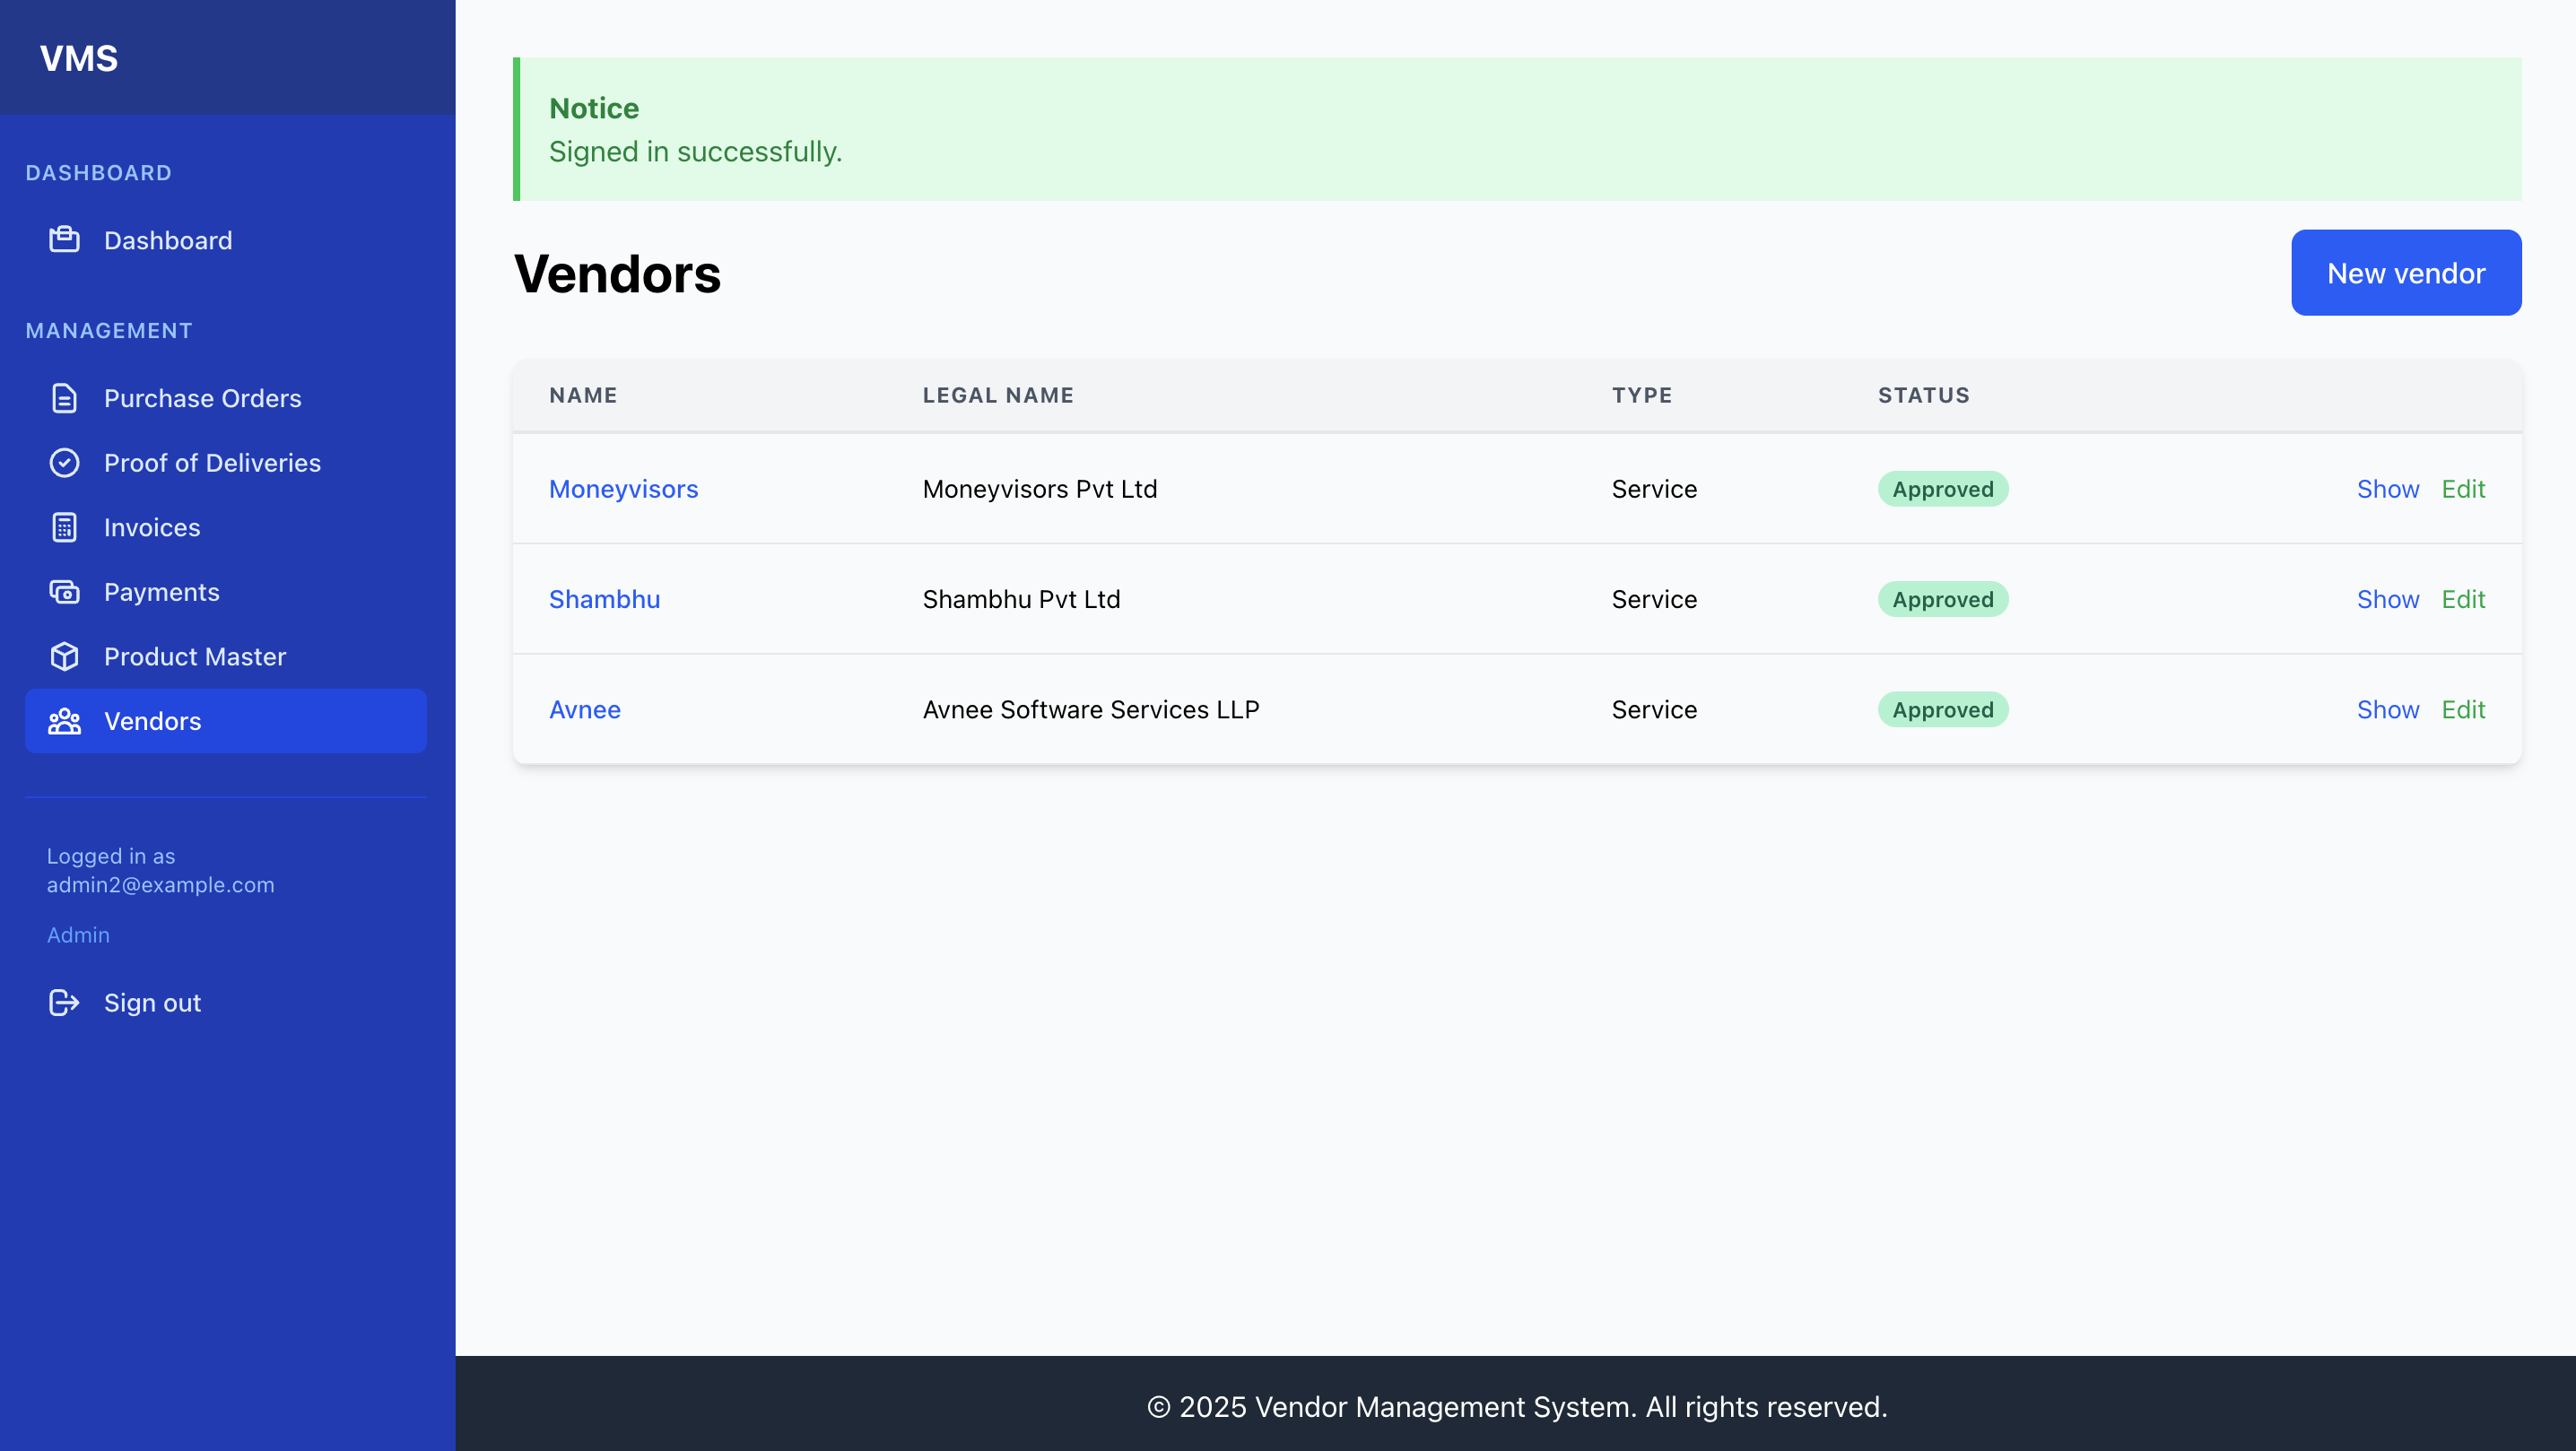
System notifications (e.g., "Vendor was successfully created") appear as green
Noticeor redAlertbanners at the top of the content area after an action. Review these messages for feedback on your actions.
Chapter 2: Vendor Management
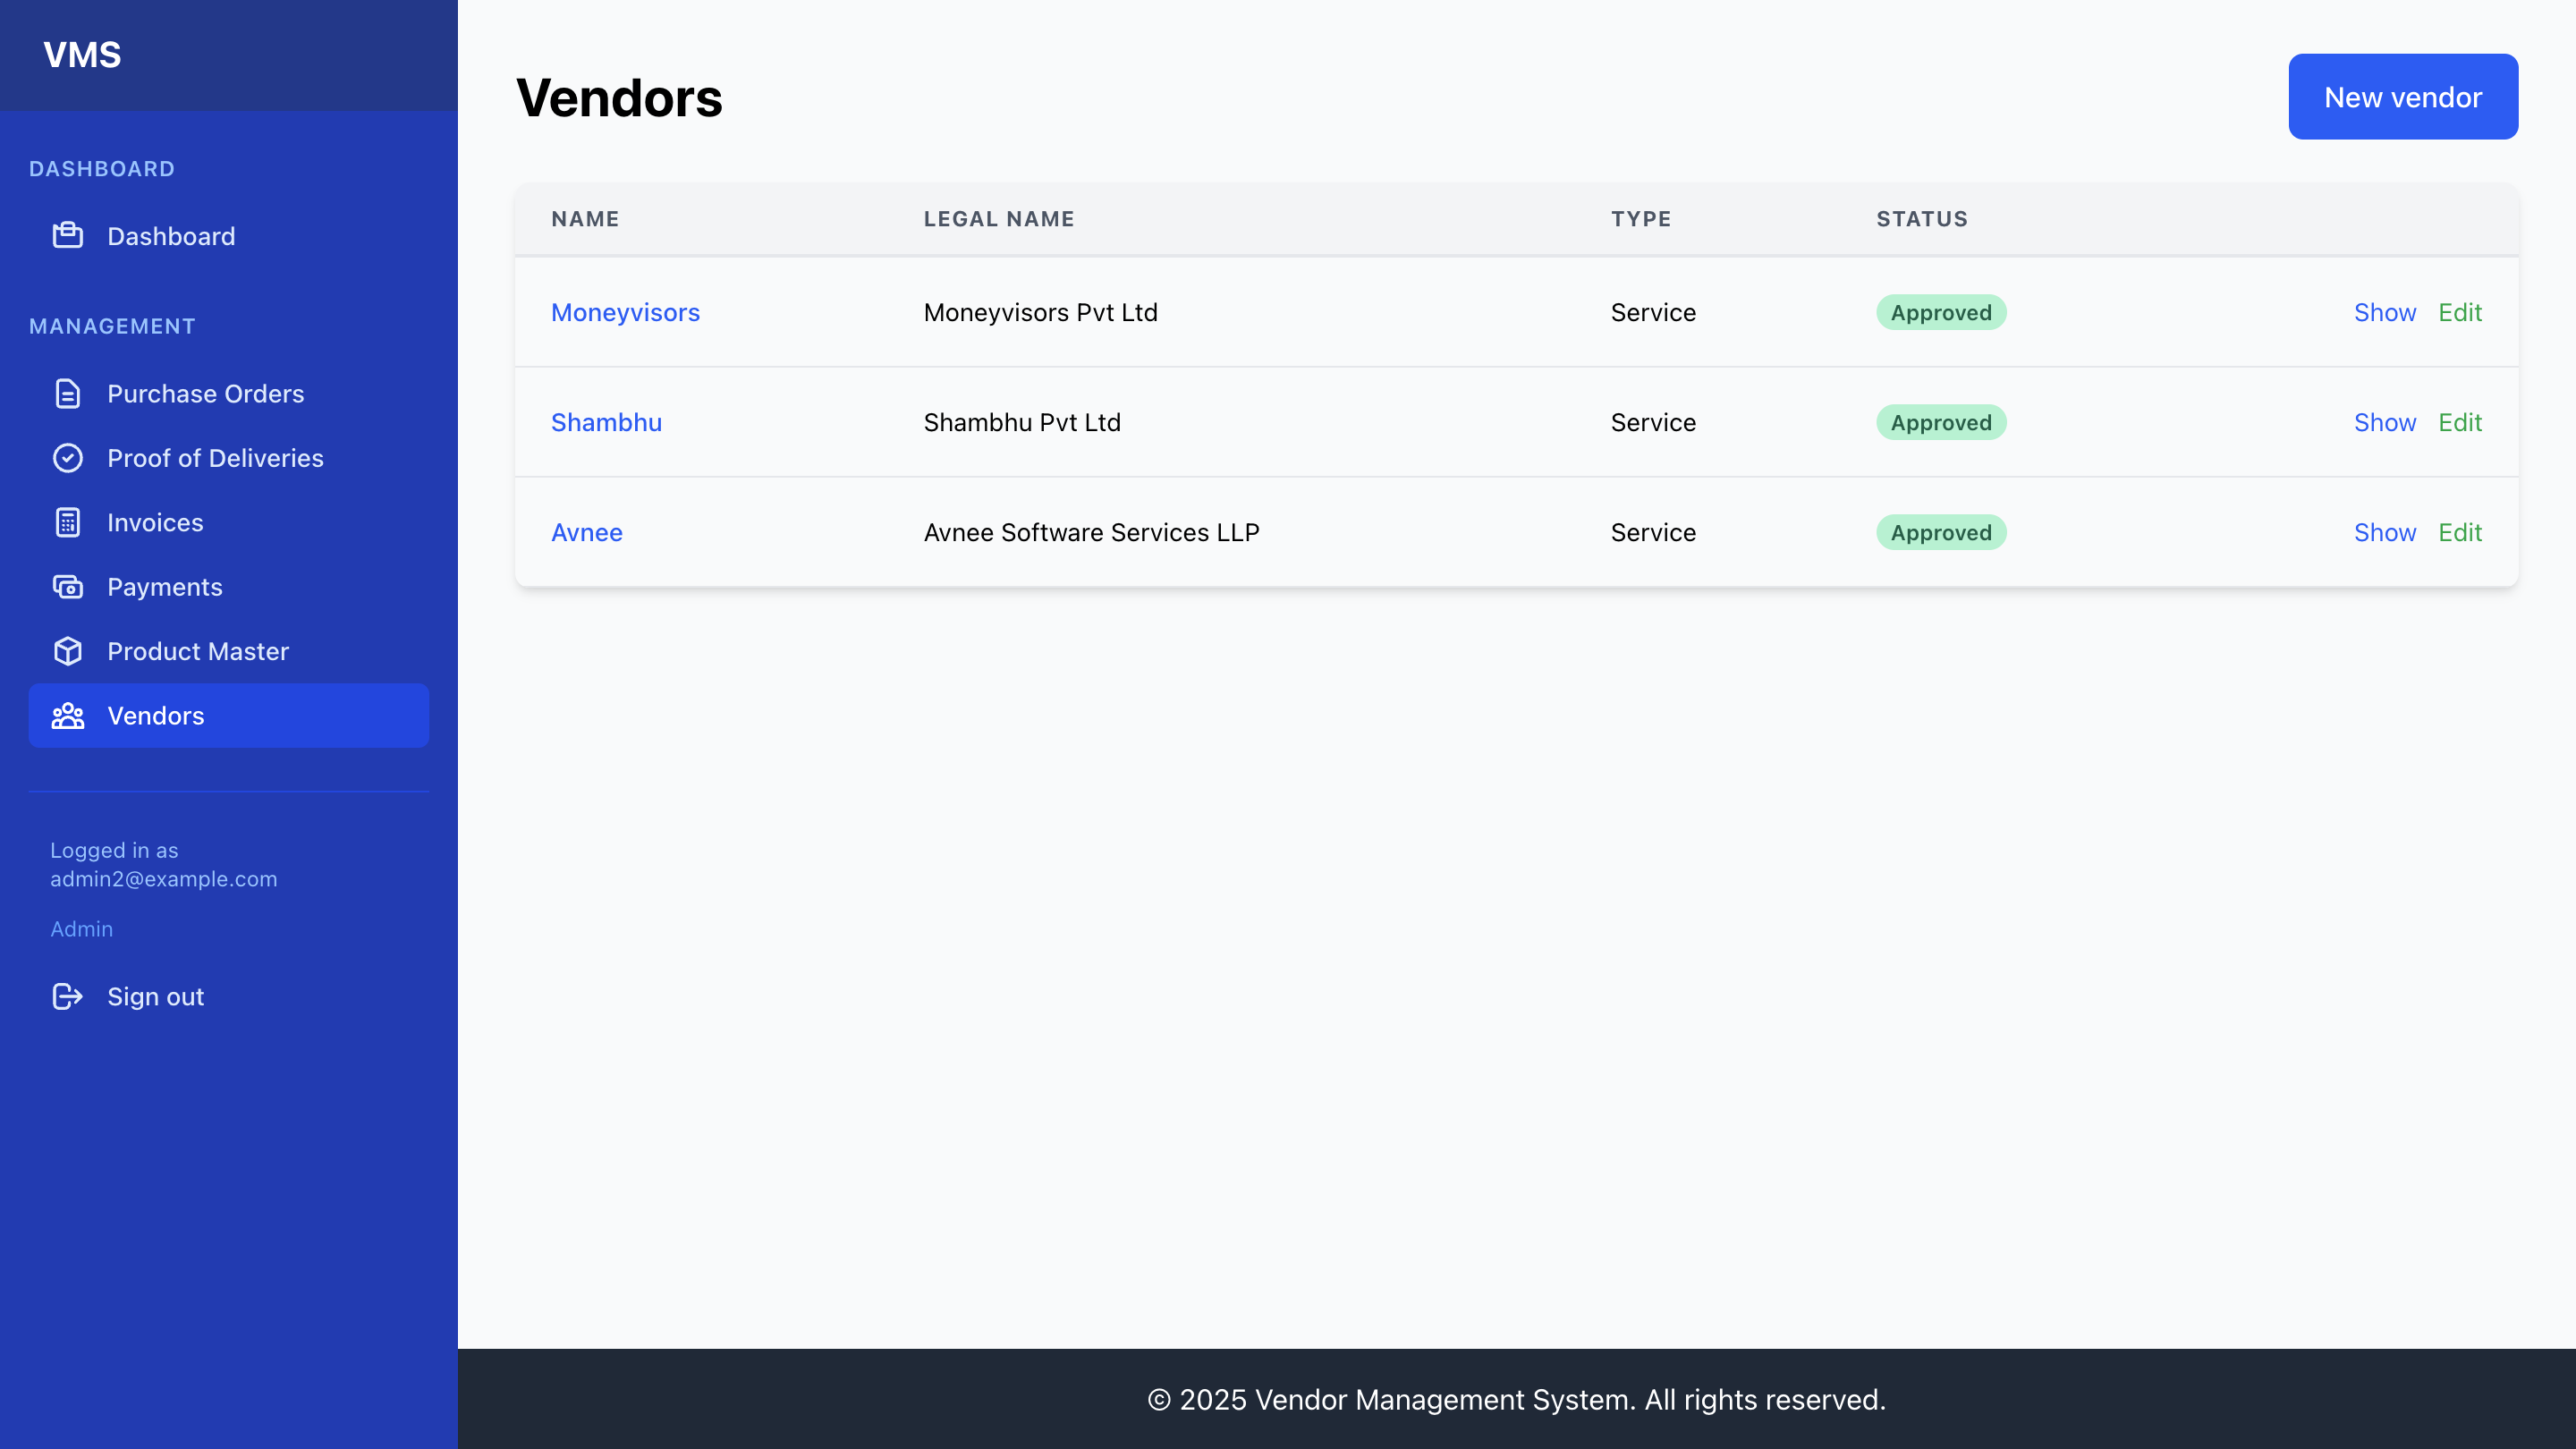
- Vendor List (Viewing all Vendors):
- From the navigation bar, click "Vendors".
- You will see a list of all vendors in the system.
- Table Columns: Vendor Name, Legal Name, Type, Status, and Actions (Show, Edit).
- Search & Filter (Future): In later versions, you will be able to search and filter this list.
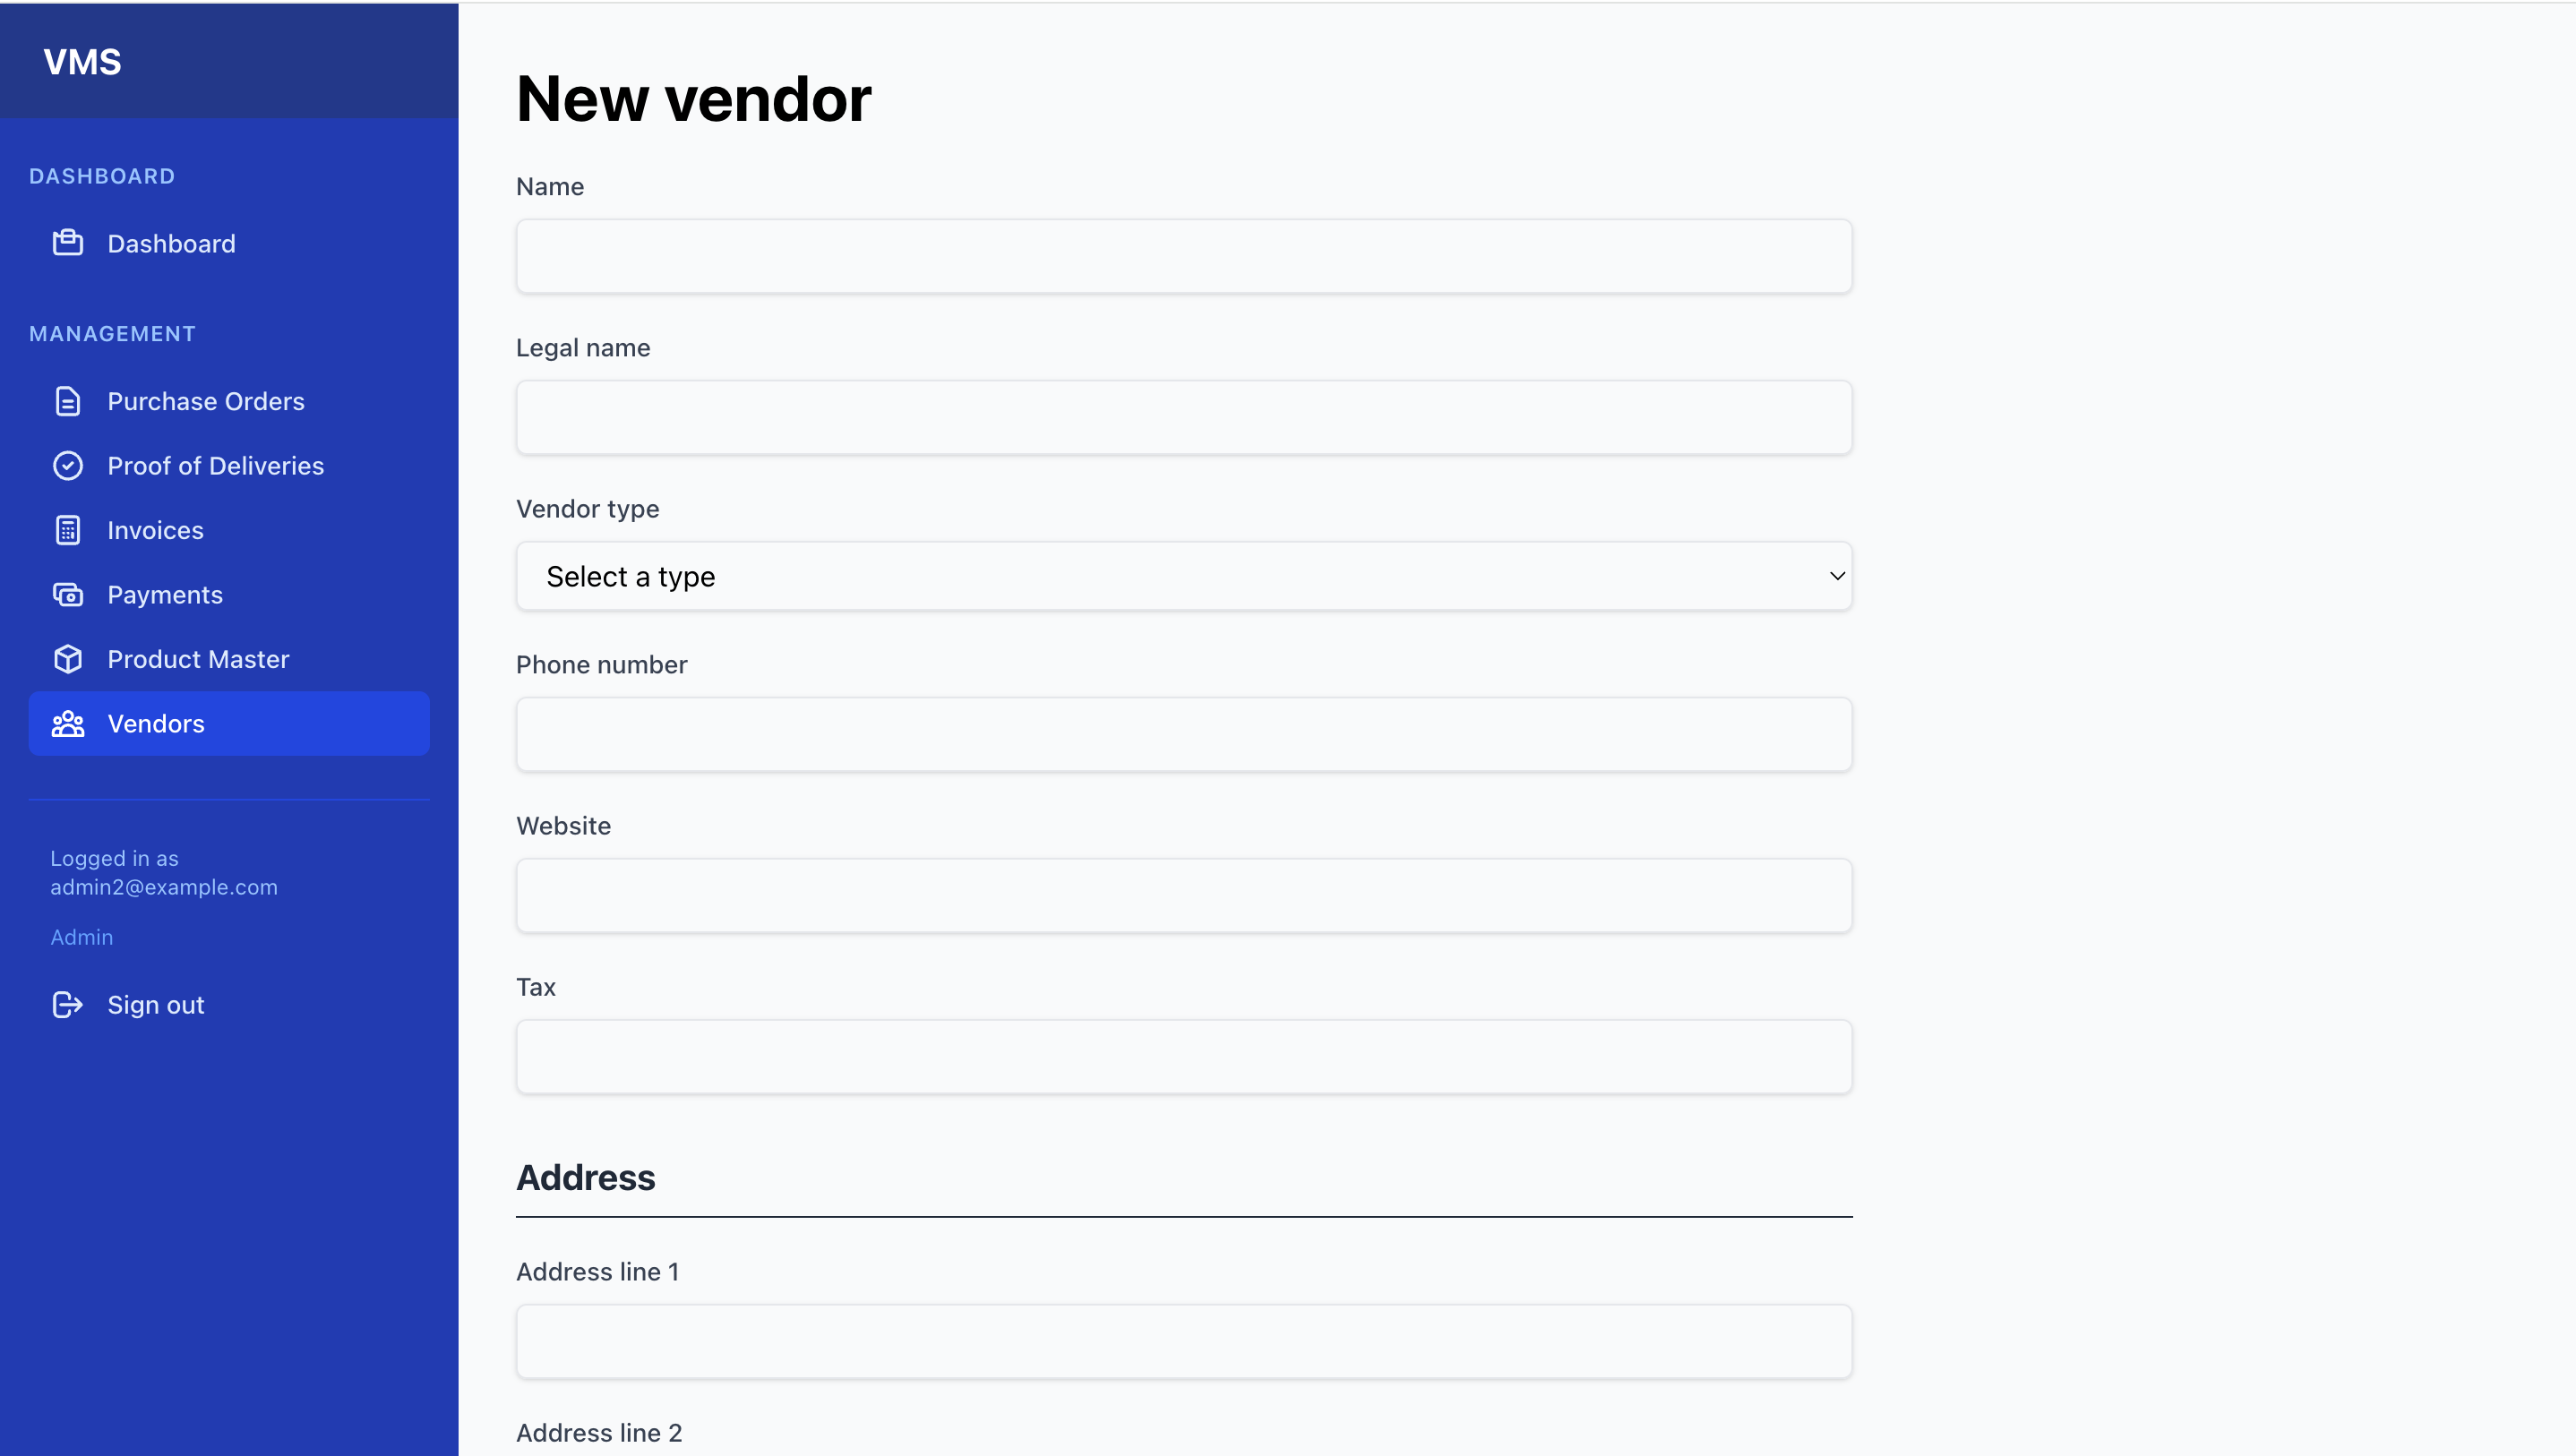
- Adding a New Vendor (Initiating Onboarding):
- From the "Vendors" list, click the "New vendor" button (top right).
- Fill in the required fields for the vendor's basic profile (Name, Legal Name, Address, Phone, Website, Tax ID, Bank Details, Vendor Type).
- Click "Create Vendor".
- Understanding
Pending ReviewStatus: Newly created vendors (and existing vendors undergoing changes initiated by them) will initially have aPending Reviewstatus. This indicates they require internal review and approval.
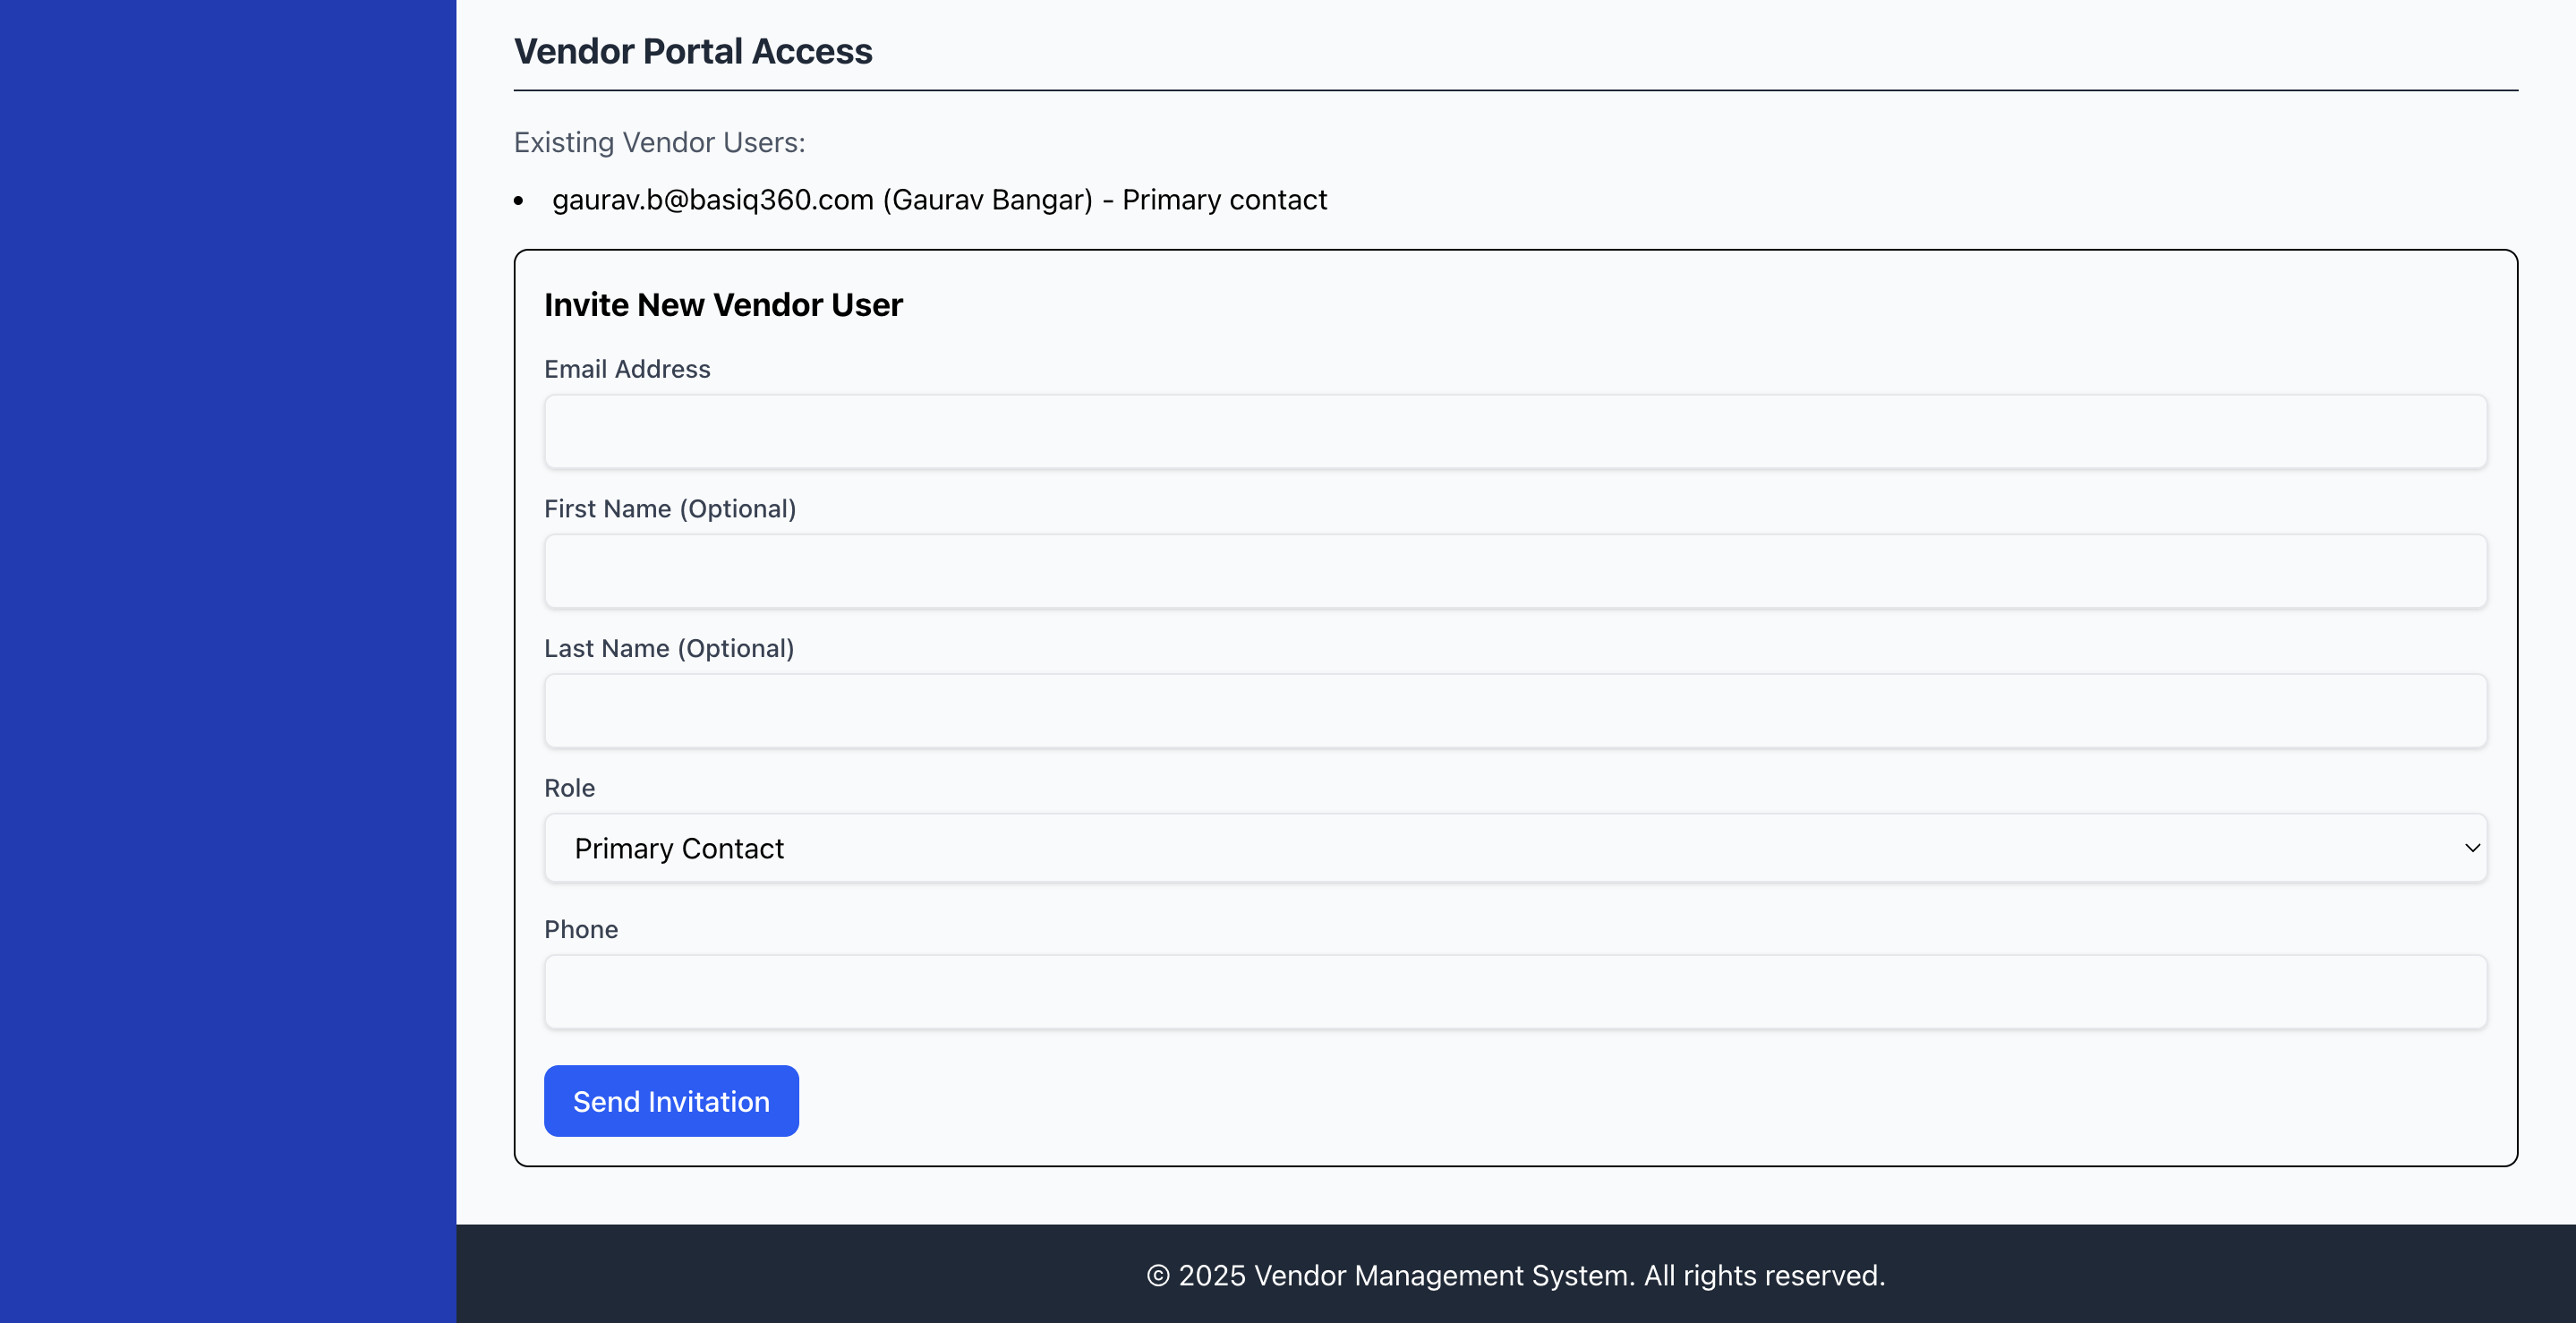
- Inviting a Vendor User (Sending Portal Access):
- After creating a new vendor, or for an existing vendor, navigate to their "Show" page by clicking their name or the "Show" link in the Vendor List.
- Scroll down to the "Vendor Portal Access" section.
- Enter the
Email Addressof the primary contact at the vendor company. You can optionally add their First Name, Last Name, and select aRole(e.g., Primary Contact). - Click "Send Invitation".
- The system will send an email to the provided address with a secure link for the vendor contact to set their password and access the Vendor Portal.
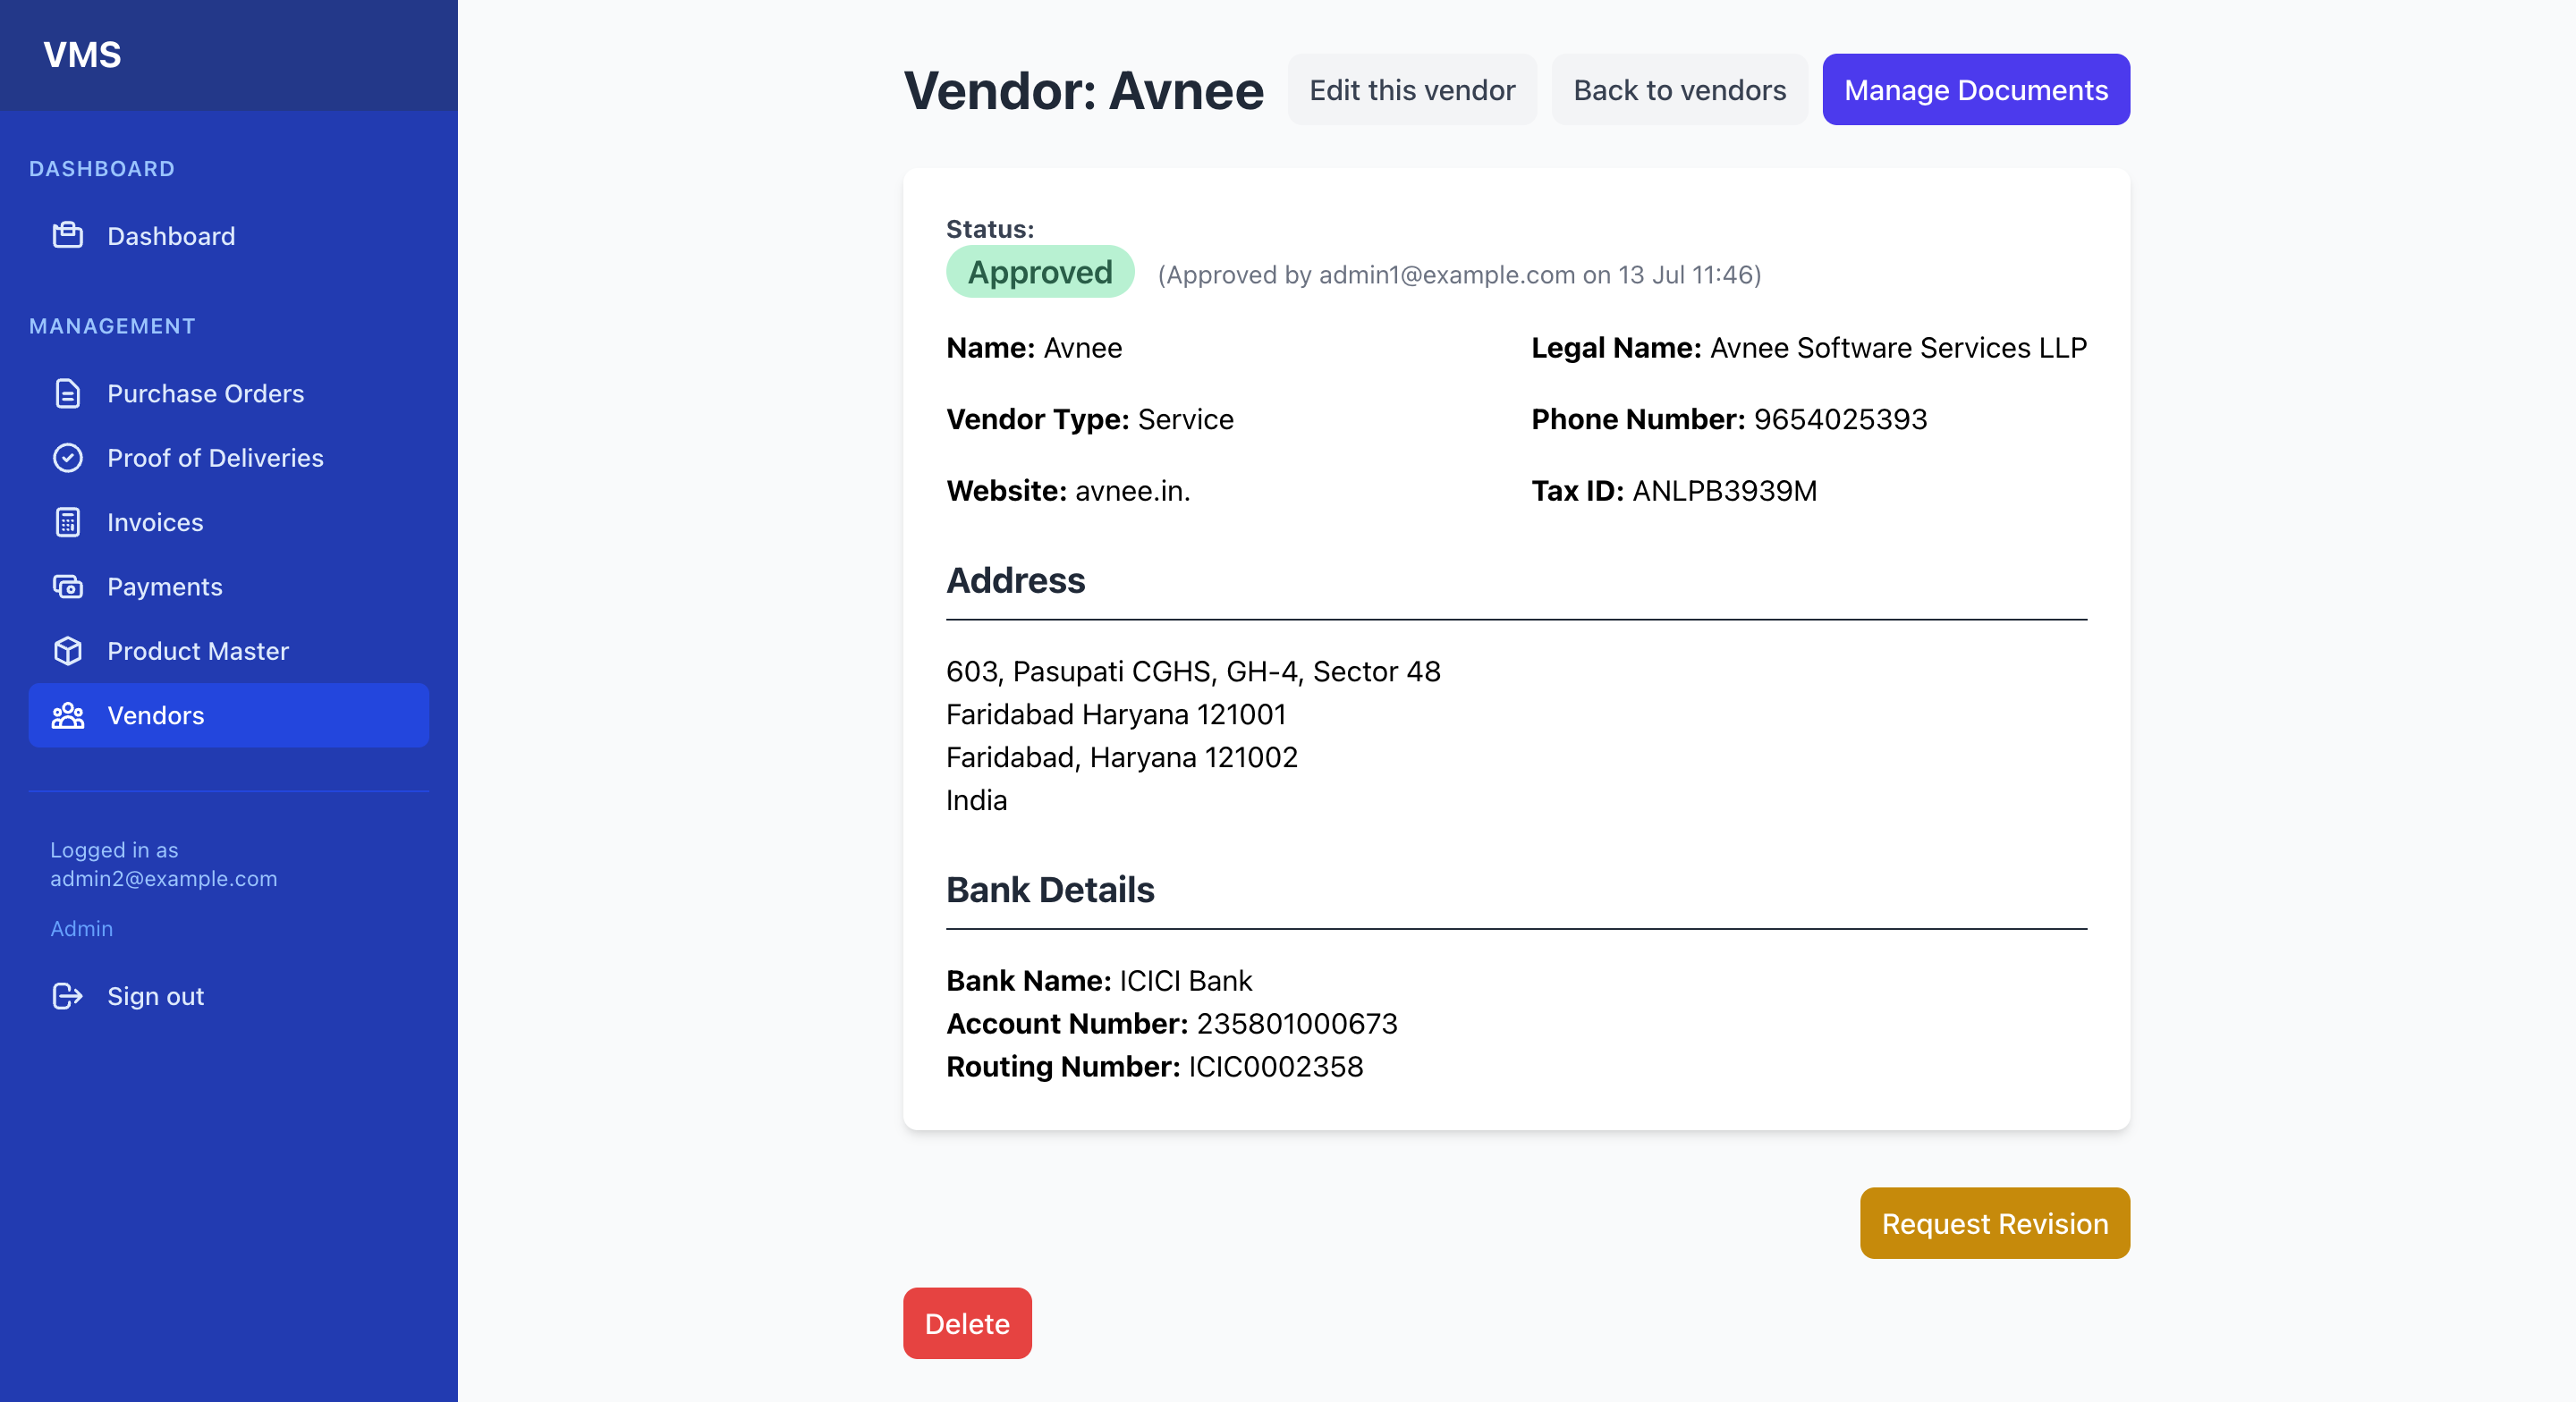
- Vendor Profile Details:
- From the Vendor List, click "Show" next to a vendor's name.
- This page displays all captured information: general details, address, bank details, current status, and any users invited to their portal.
- Editing Vendor Details: Click "Edit this vendor" on the vendor's show page. Update fields as needed and click "Update Vendor".
- Vendor Onboarding Workflow (Review & Approval):
- Reviewing
Pending Review/Revision RequestedVendor Applications:- When a vendor is newly added, or they update their profile or submit documents, their status may become
Pending Review(orRevision Requestedif you asked for changes). - Navigate to the vendor's "Show" page. Review all their details and uploaded documents (in the "Manage Documents" section).
- When a vendor is newly added, or they update their profile or submit documents, their status may become
- Approving a Vendor:
- If the vendor's information is complete and satisfactory, on their "Show" page, click the "Approve Vendor" button.
- This changes their status to
Approved, granting them full access (via their Vendor User account) to submit invoices, update PO statuses, etc.
- Rejecting a Vendor:
- If a vendor does not meet criteria or is no longer needed, on their "Show" page, click "Reject Vendor".
- This changes their status to
Rejected.
- Requesting Revisions:
- If a vendor's submitted information is incomplete or incorrect, on their "Show" page, click "Request Revision".
- This changes their status to
Revision Requested, prompting the vendor to log in and update their information.
- Reviewing
Chapter 3: Product Master
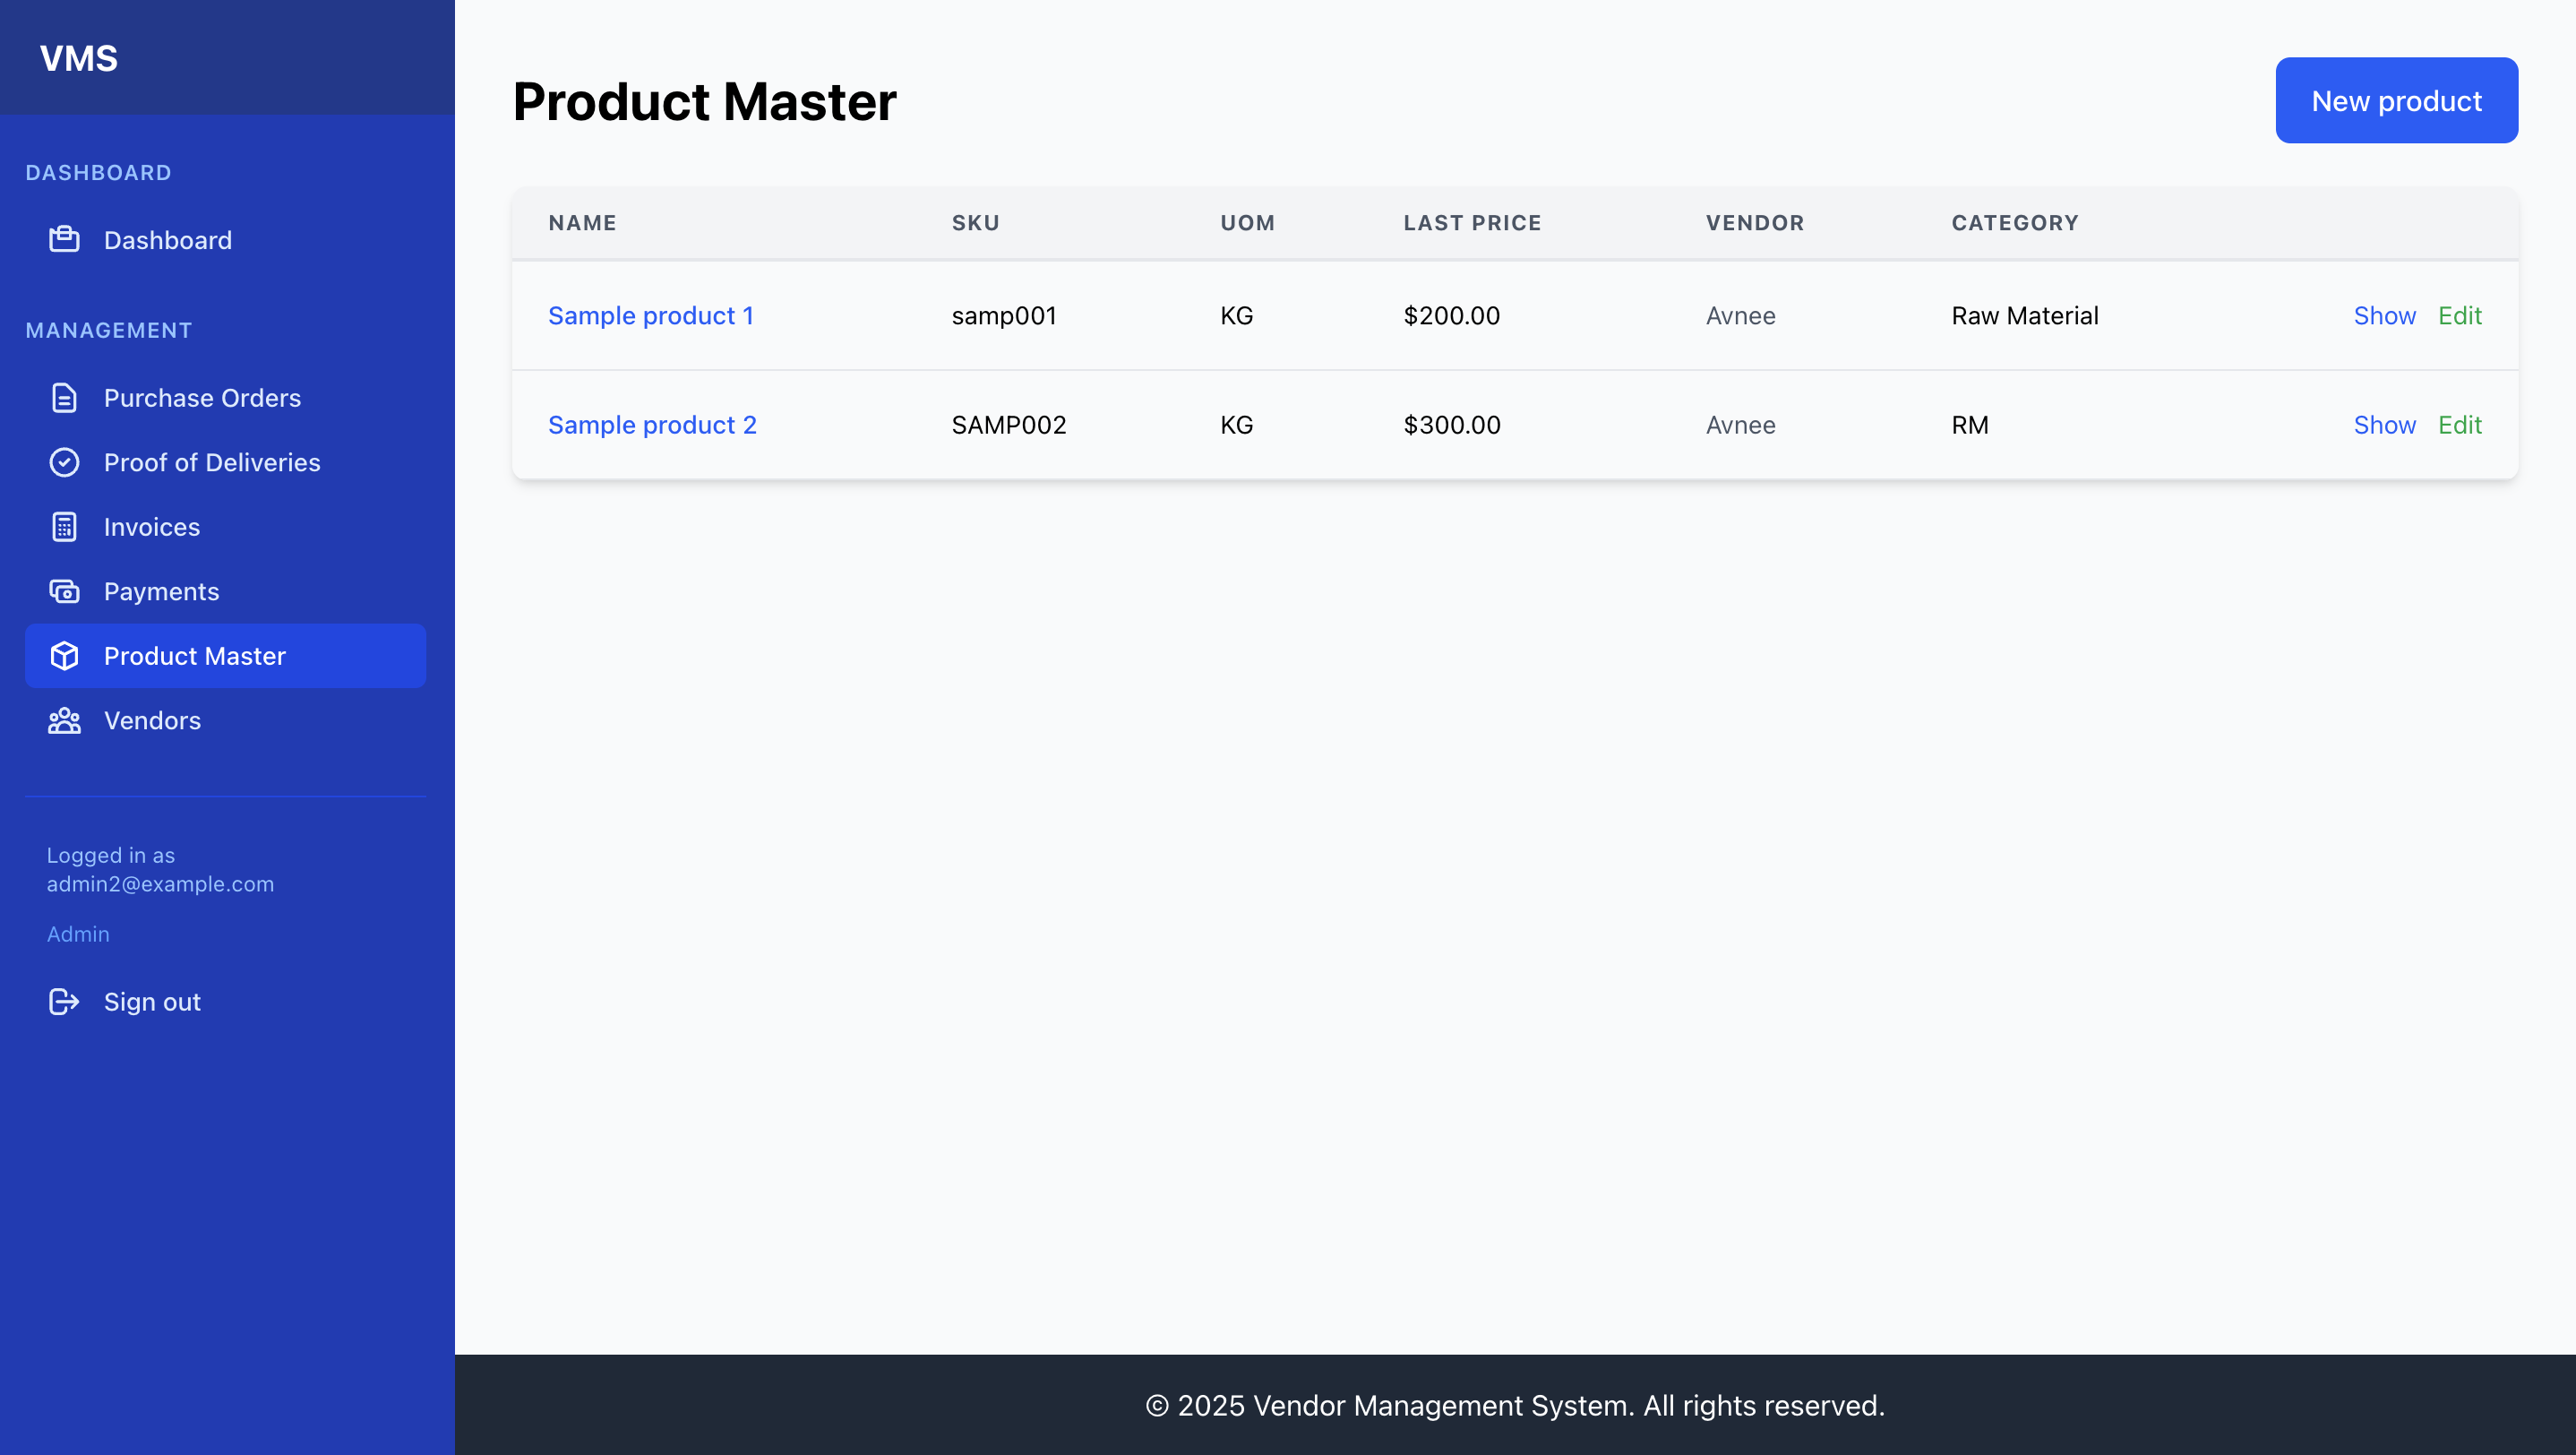
- Product List (Viewing all Products):
- From the navigation bar, click "Product Master".
- You will see a list of all products in your company's internal catalog.
- Table Columns: Name, SKU, Unit of Measure (UOM), Last Purchase Price, Current Vendor, Category, and Actions (Show, Edit).
- Search & Filter (Future): You will be able to search and filter this list.
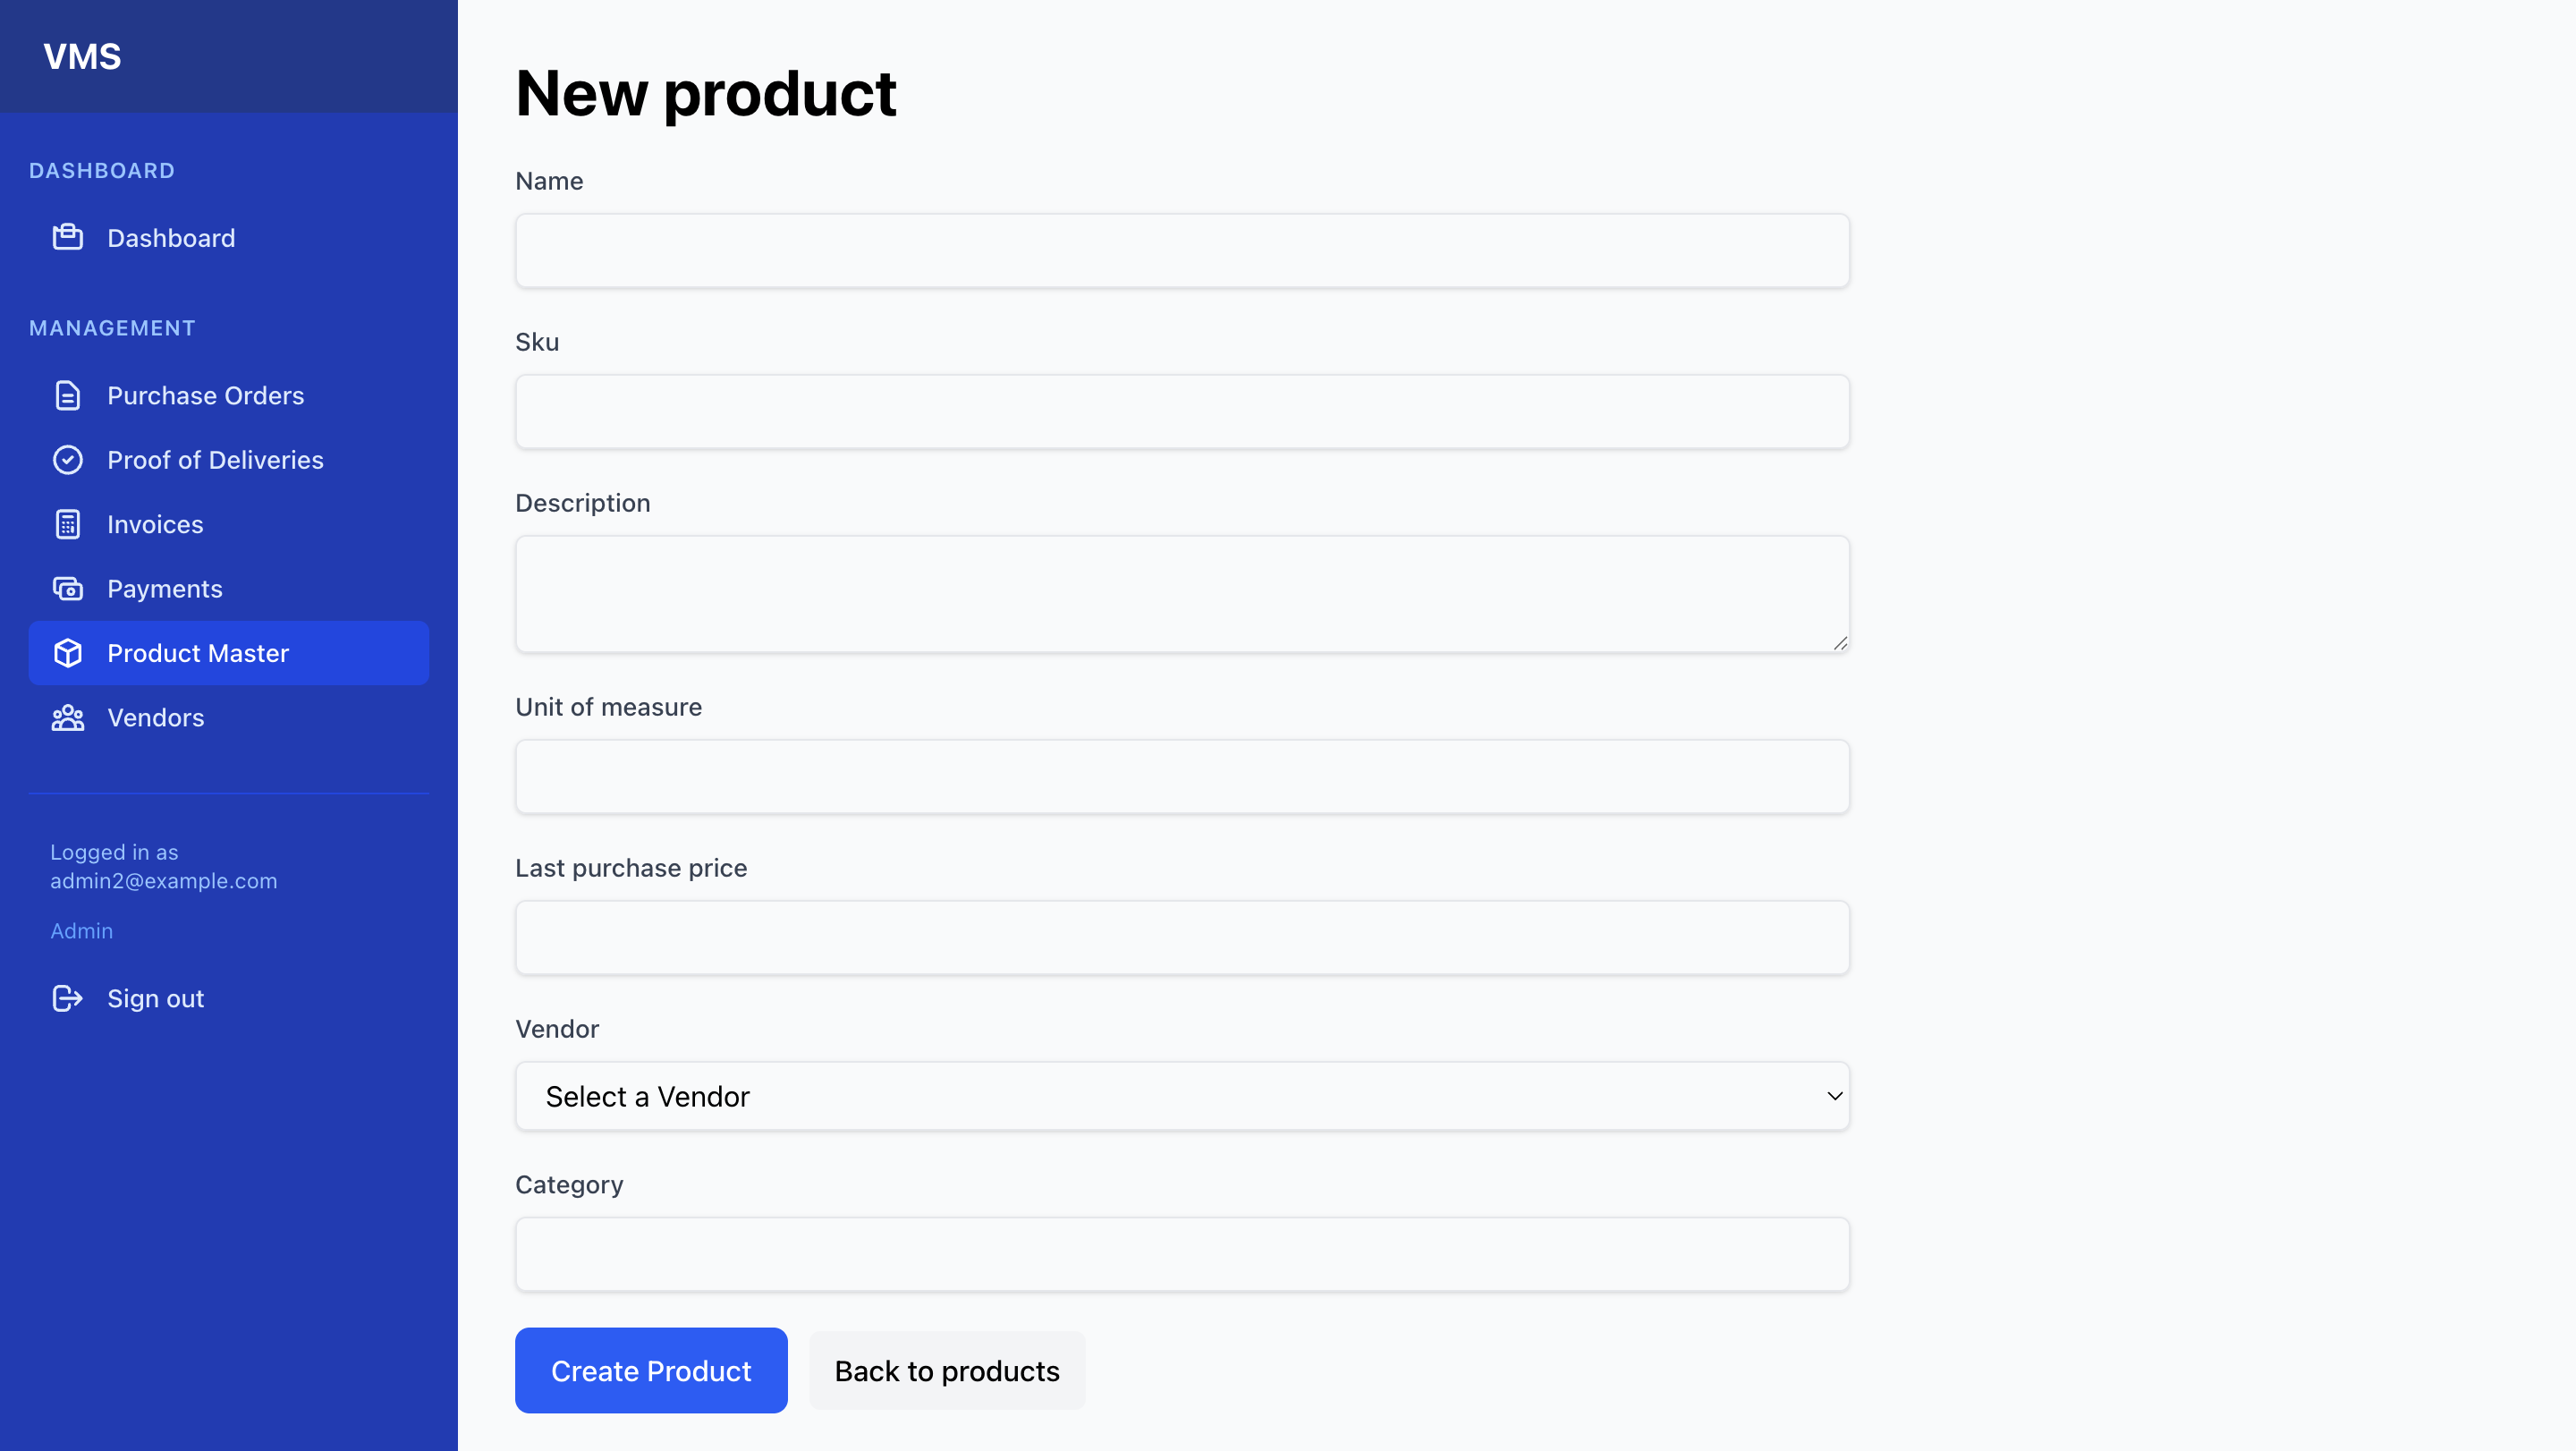
- Adding a New Product:
- From the "Product Master" list, click the "New product" button (top right).
- Fill in the product details:
Name,SKU(must be unique),Description,Unit of Measure(e.g., pcs, kg, m),Last Purchase Price(optional),Current Vendor(select from approved vendors), andCategory. - Click "Create Product".
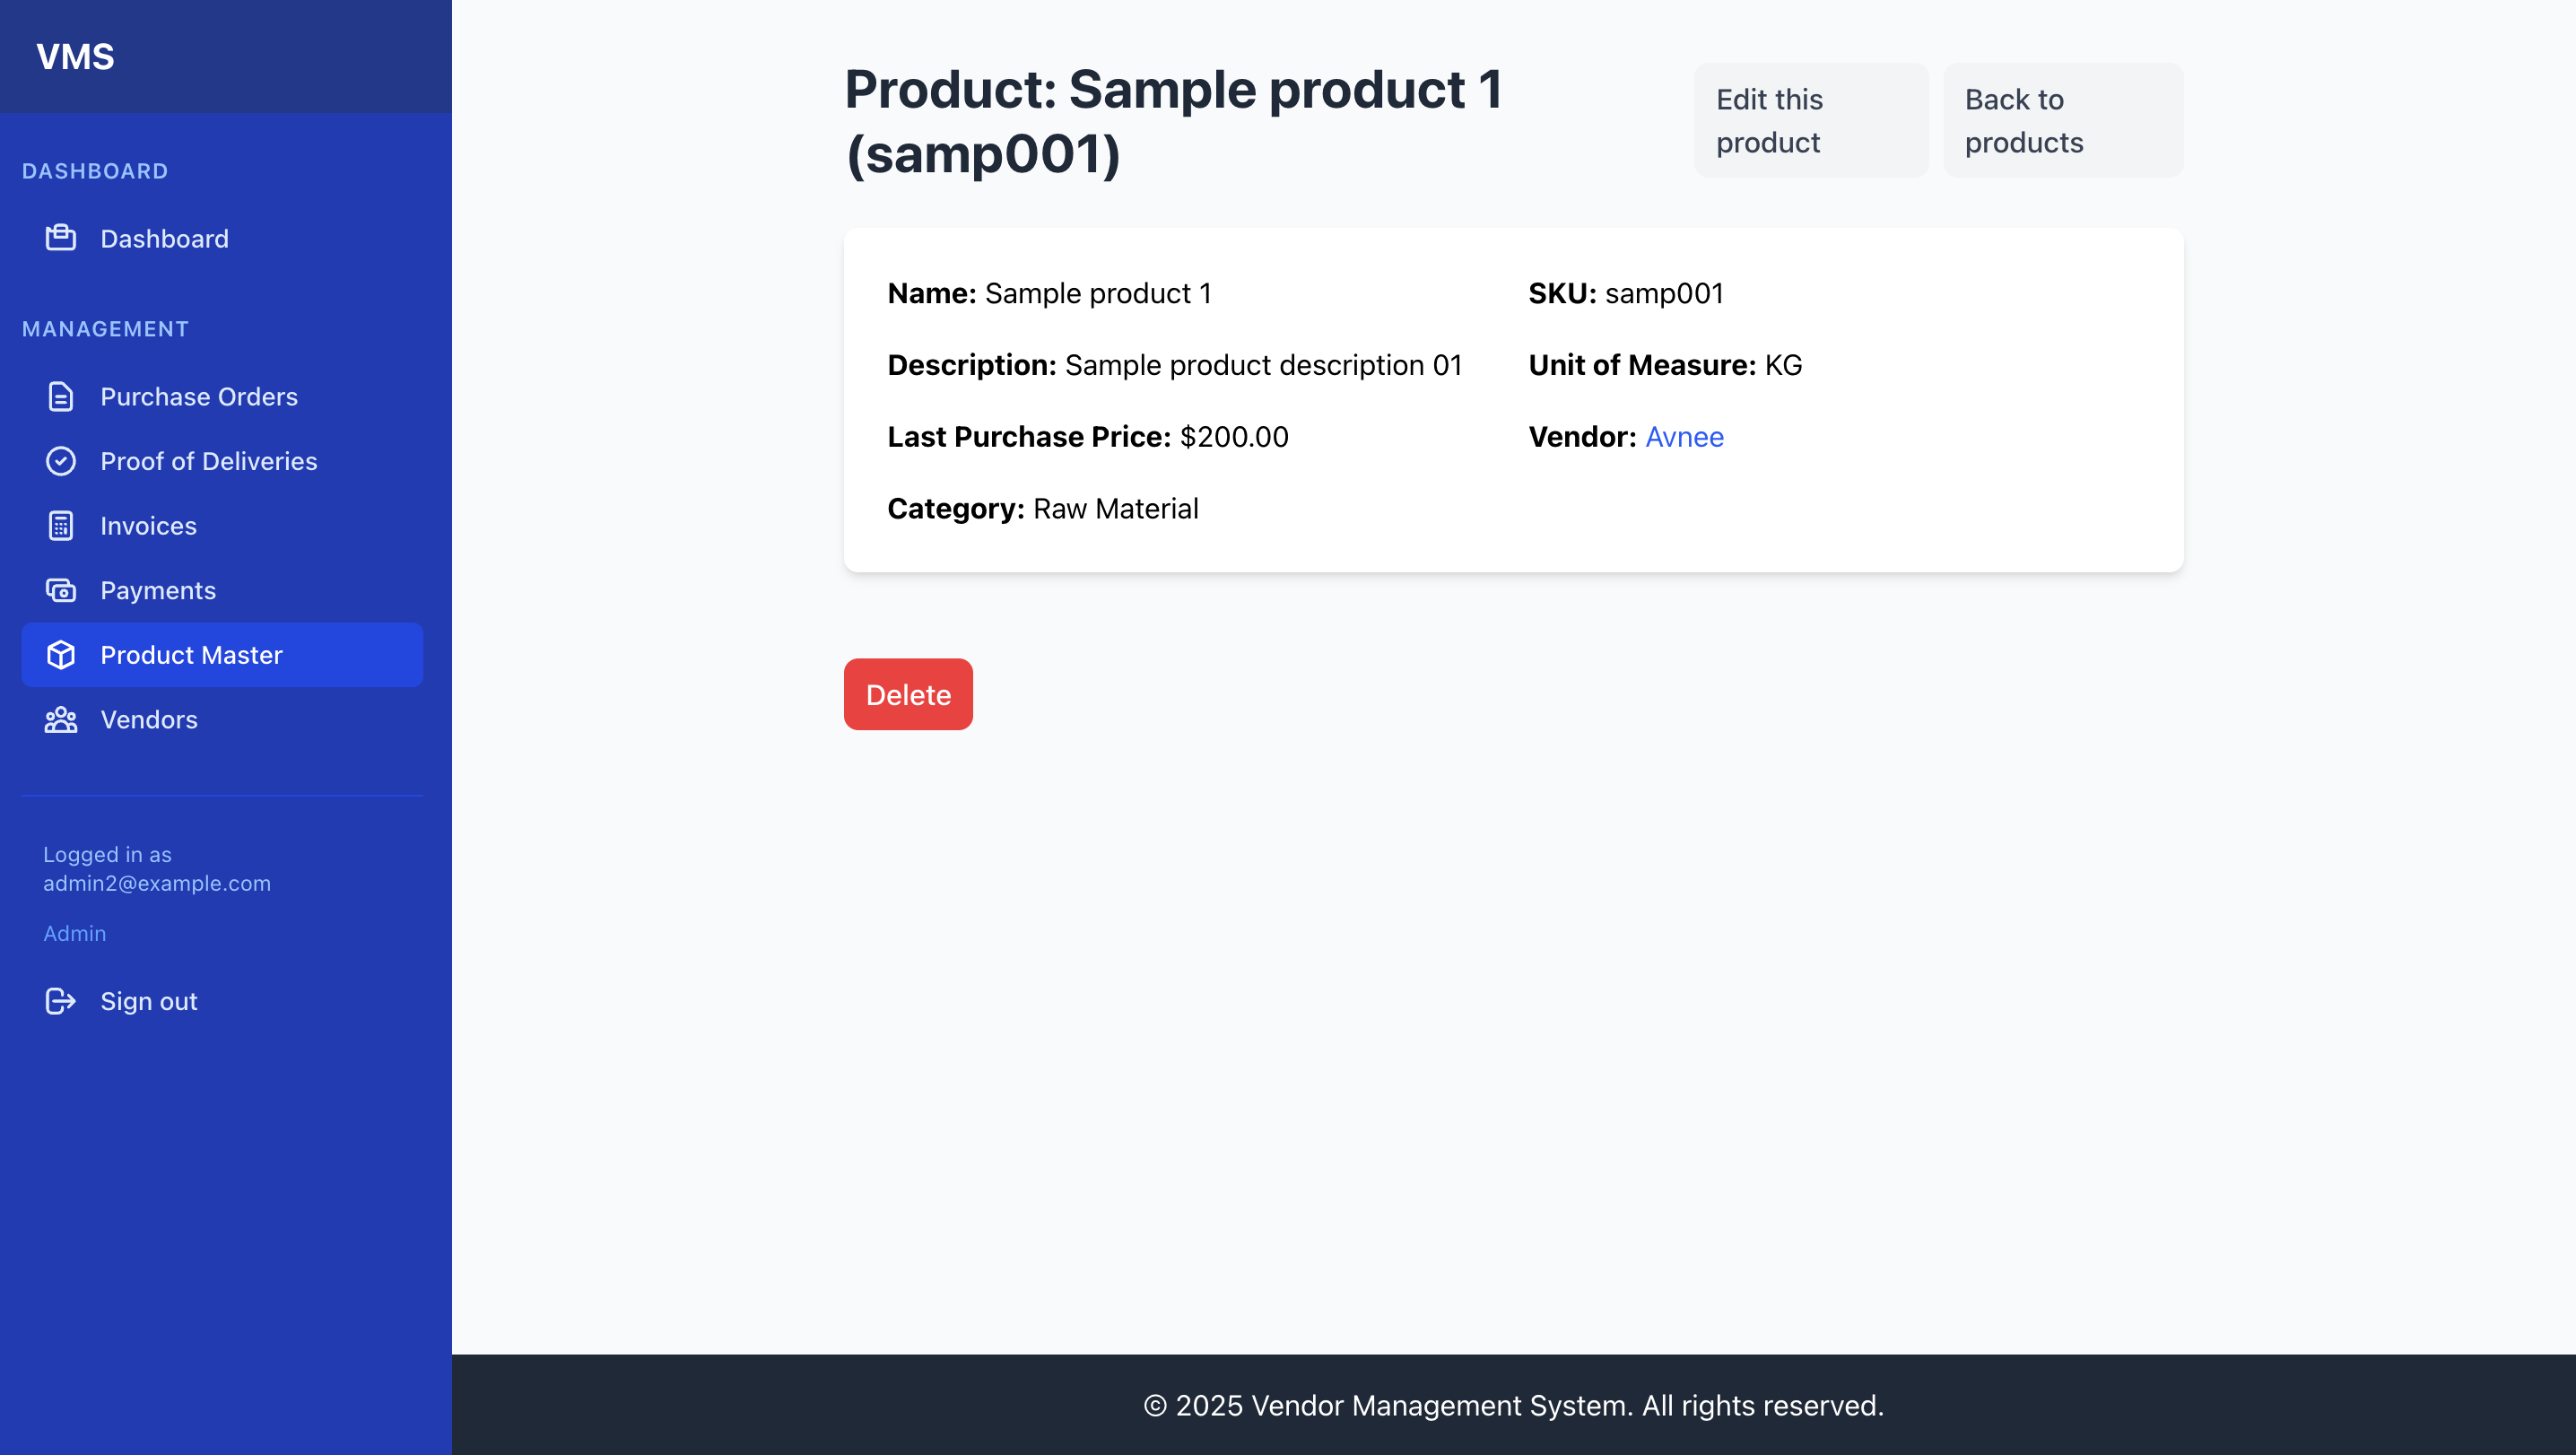
- Product Details:
- From the Product List, click "Show" next to a product's name.
- This page displays all captured product information.
- Editing Product Information: Click "Edit this product" on the product's show page. Update fields as needed and click "Update Product".
Chapter 4: Purchase Order (PO) Management
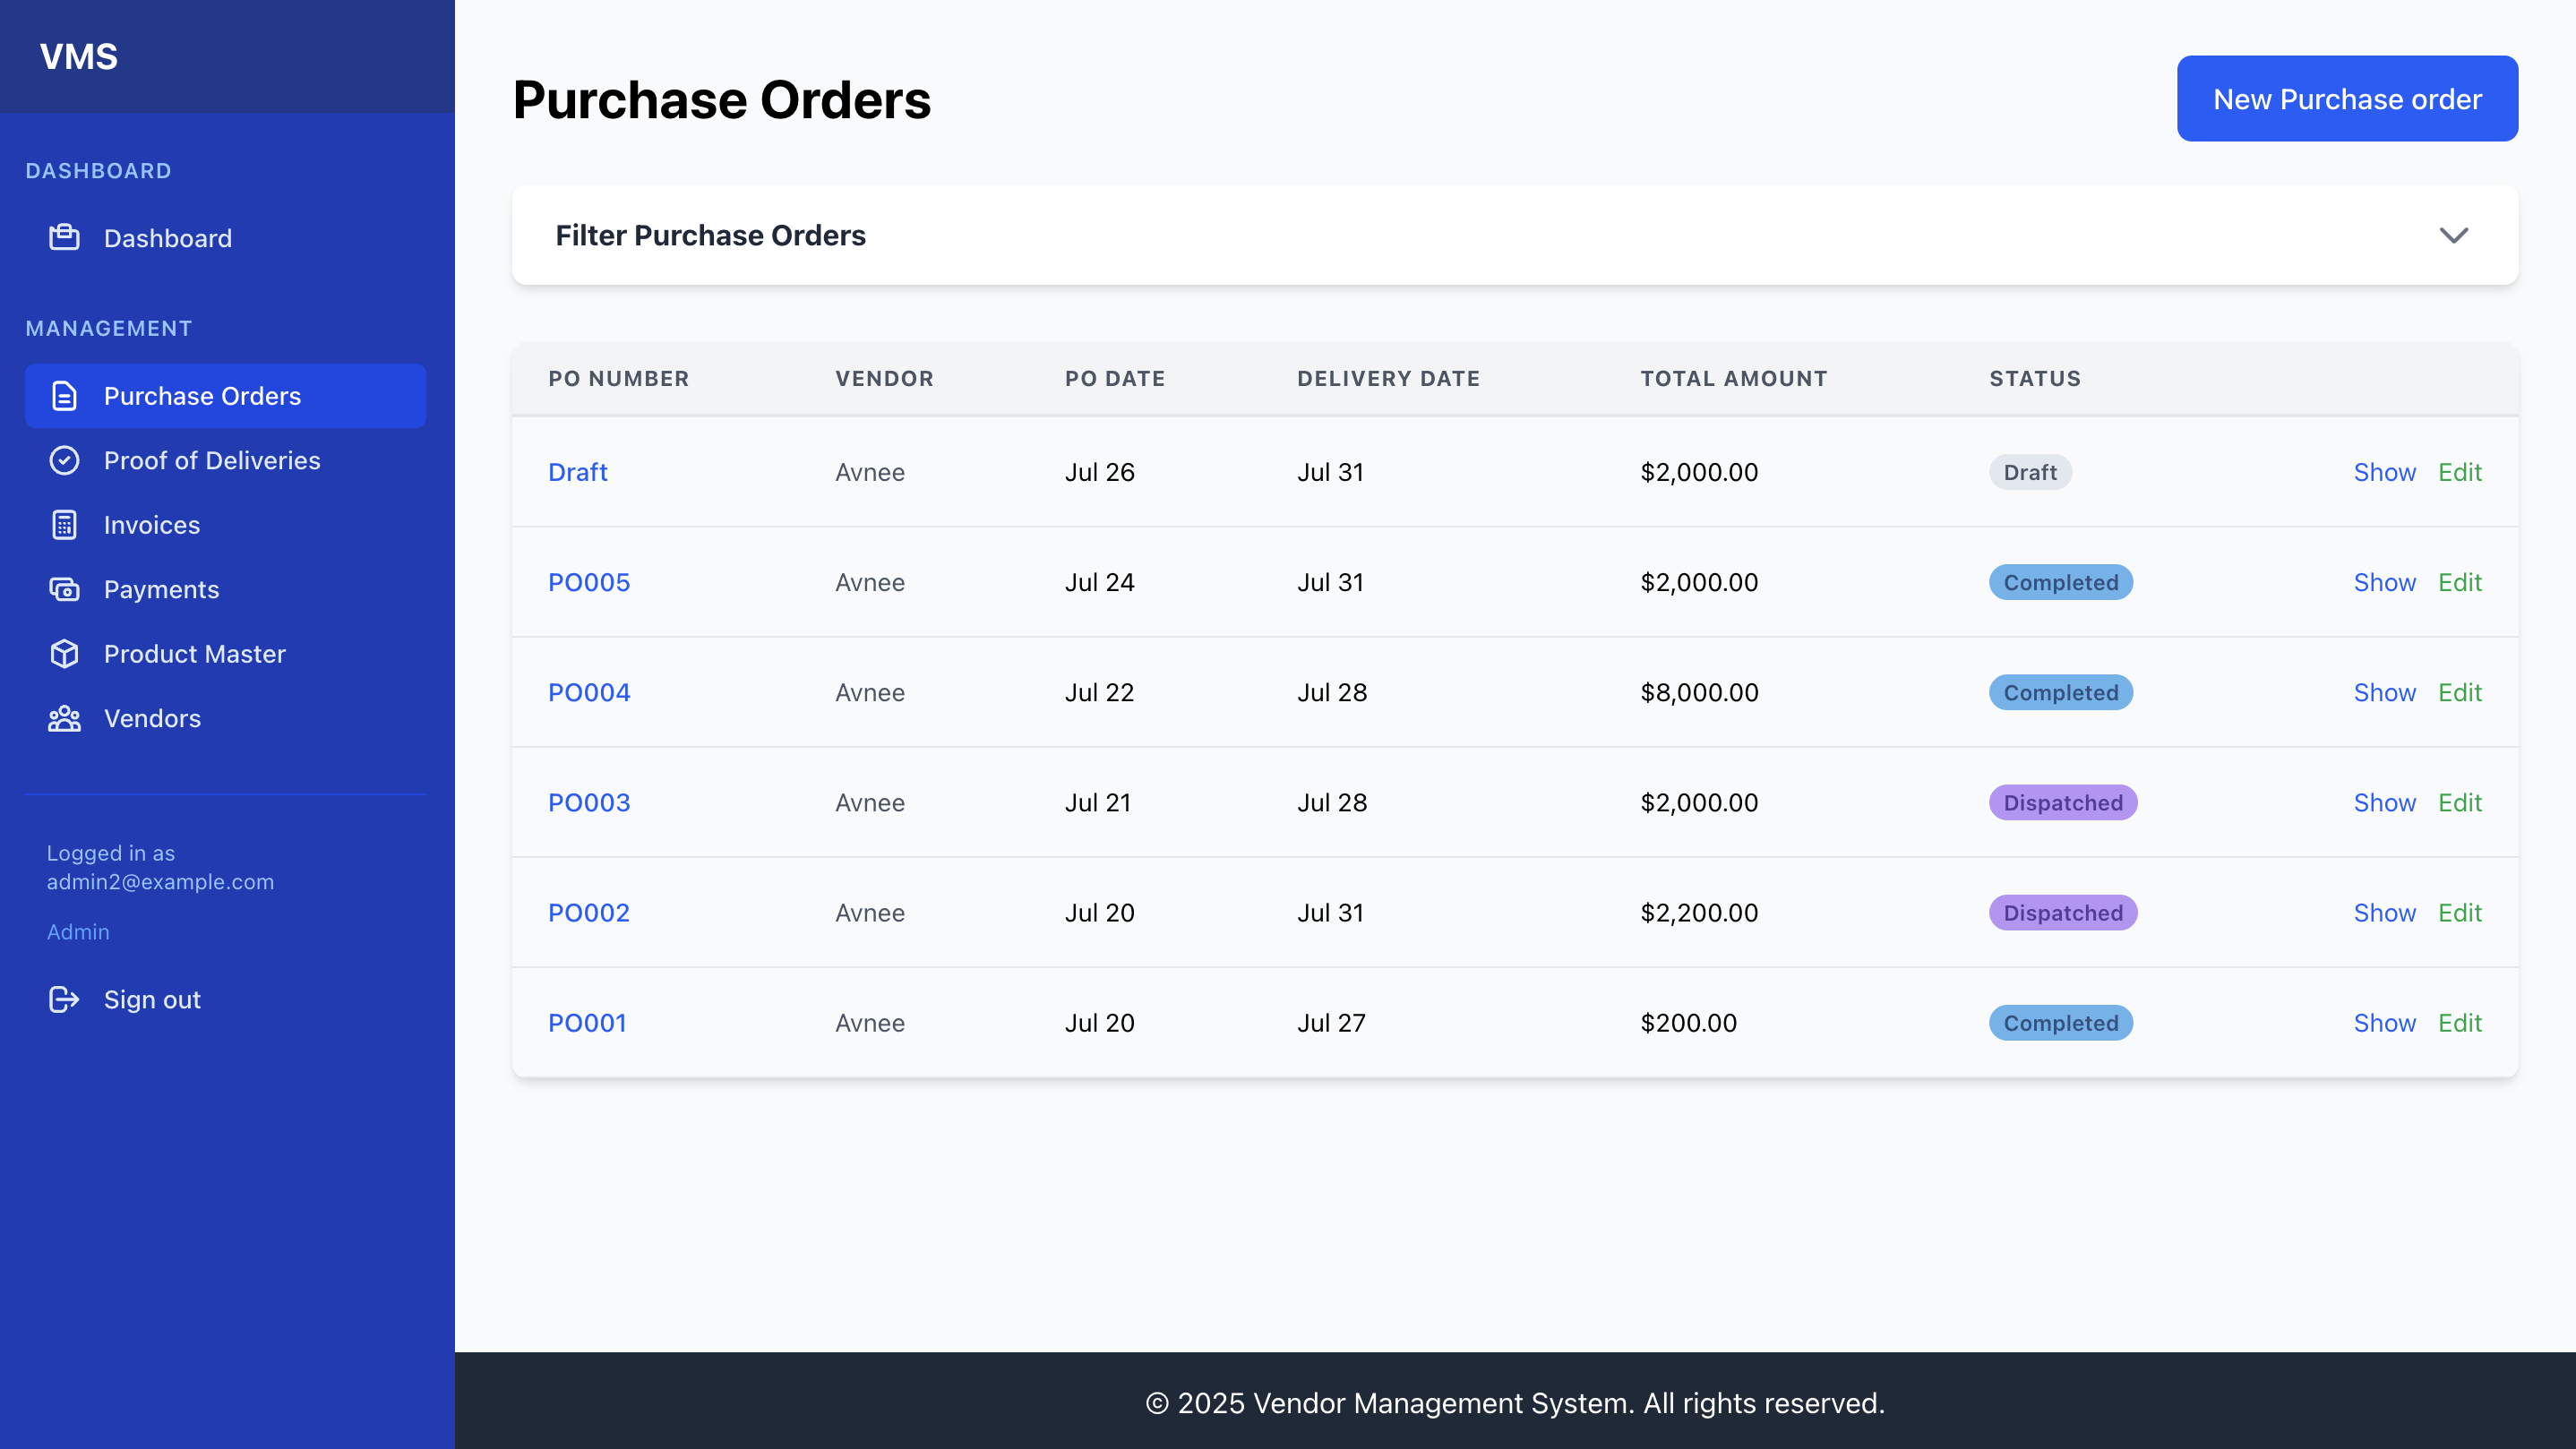
- PO List (Viewing all Purchase Orders):
- From the navigation bar, click "Purchase Orders".
- You will see a list of all Purchase Orders, sorted by creation date (newest first).
- Table Columns: PO Number, Vendor, PO Date, Delivery Date, Total Amount, Status.
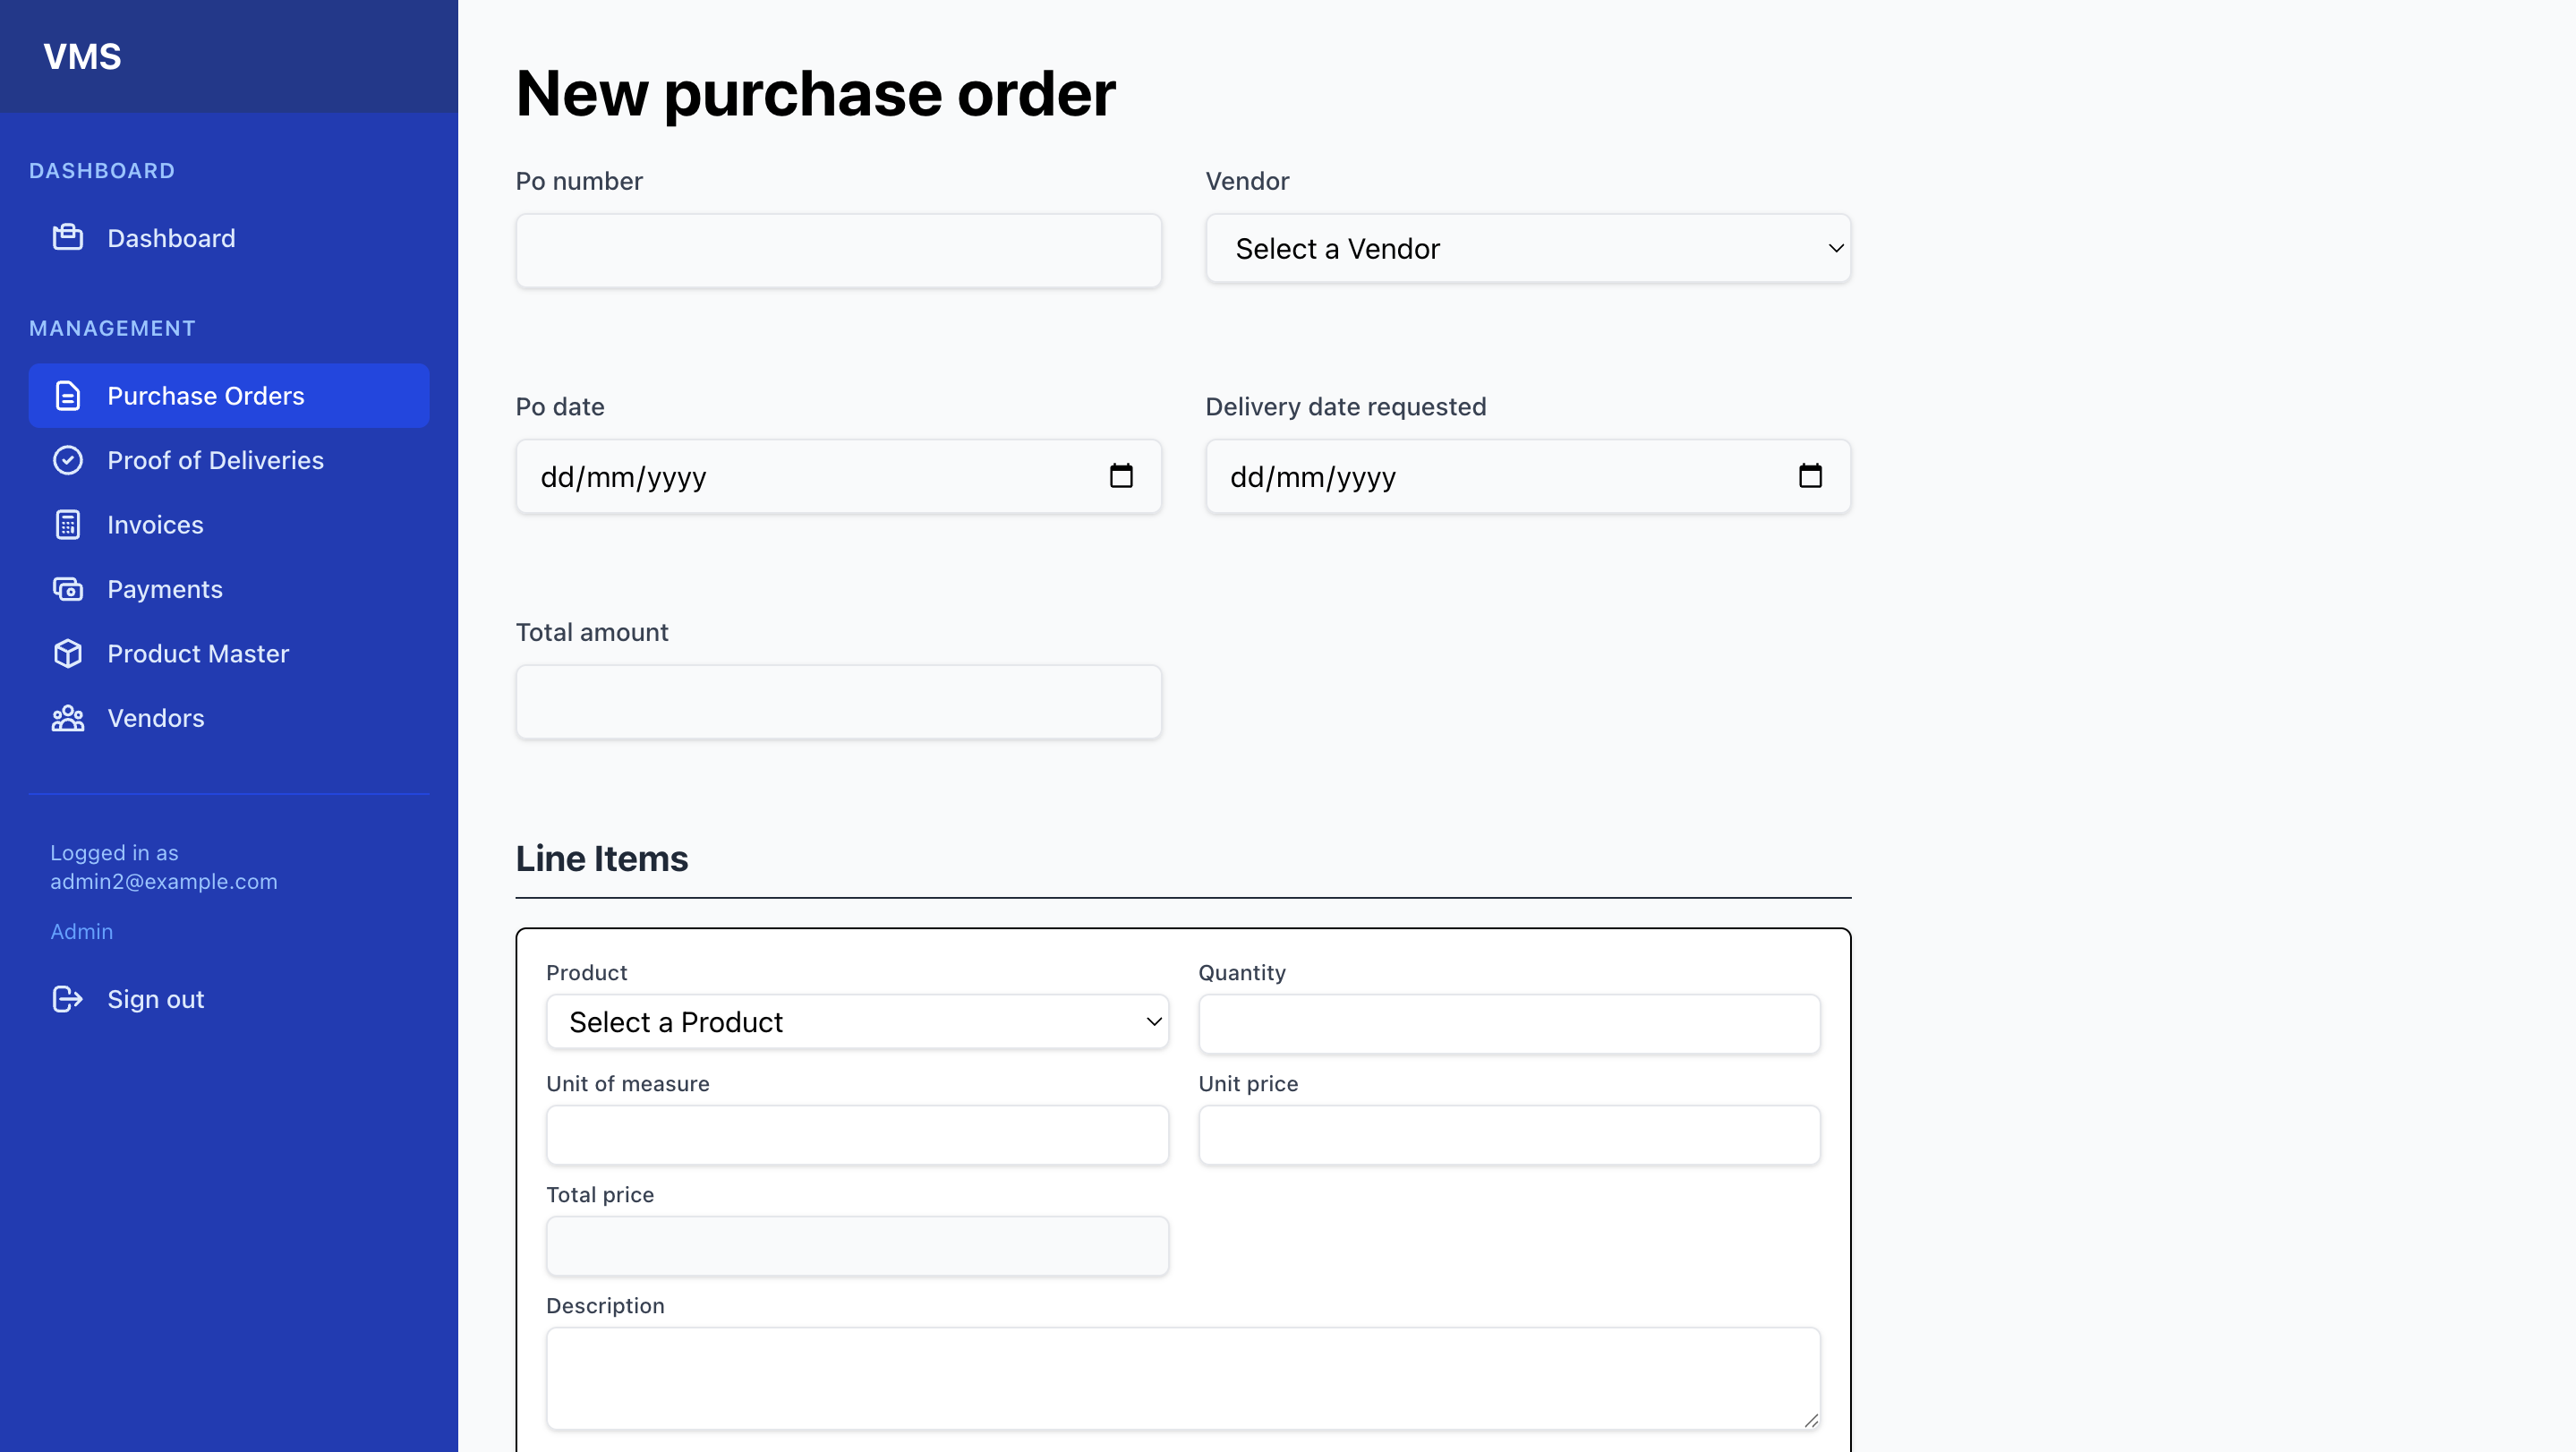
- Creating a New PO:
- From the "Purchase Orders" list, click the "New Purchase order" button (top right).
- Basic Details:
- Enter a unique
PO Number. - Select the
Vendor(only approved vendors will appear). - Enter the
PO DateandDelivery Date Requested. - The
Total Amountwill be automatically calculated from line items.
- Enter a unique
- Adding Line Items (Product Integration):
- Under the "Line Items" section, click "Add Line Item".
- Select a Product: Choose an item from the "Product" dropdown.
- Automatic Population: The
Unit of MeasureandUnit Pricefields will automatically populate based on the selected product's master data.
- Automatic Population: The
- Custom Item Name: If the item is not from the Product Master, you can leave Product blank and enter a custom
Item Name. - Quantity: Enter the quantity of the item.
- Override UOM/Price: You can manually override the auto-populated
Unit of MeasureandUnit Priceif needed for this specific PO. Total Pricefor the line item and the overallTotal Amountfor the PO will update automatically.- Description: Add any specific notes for the line item.
- Adding/Removing: Click "Add Line Item" to add more rows, or "Remove Line Item" for an existing row.
- Understanding
DraftStatus: New POs are created with aDraftstatus. They are not yet visible to the vendor.
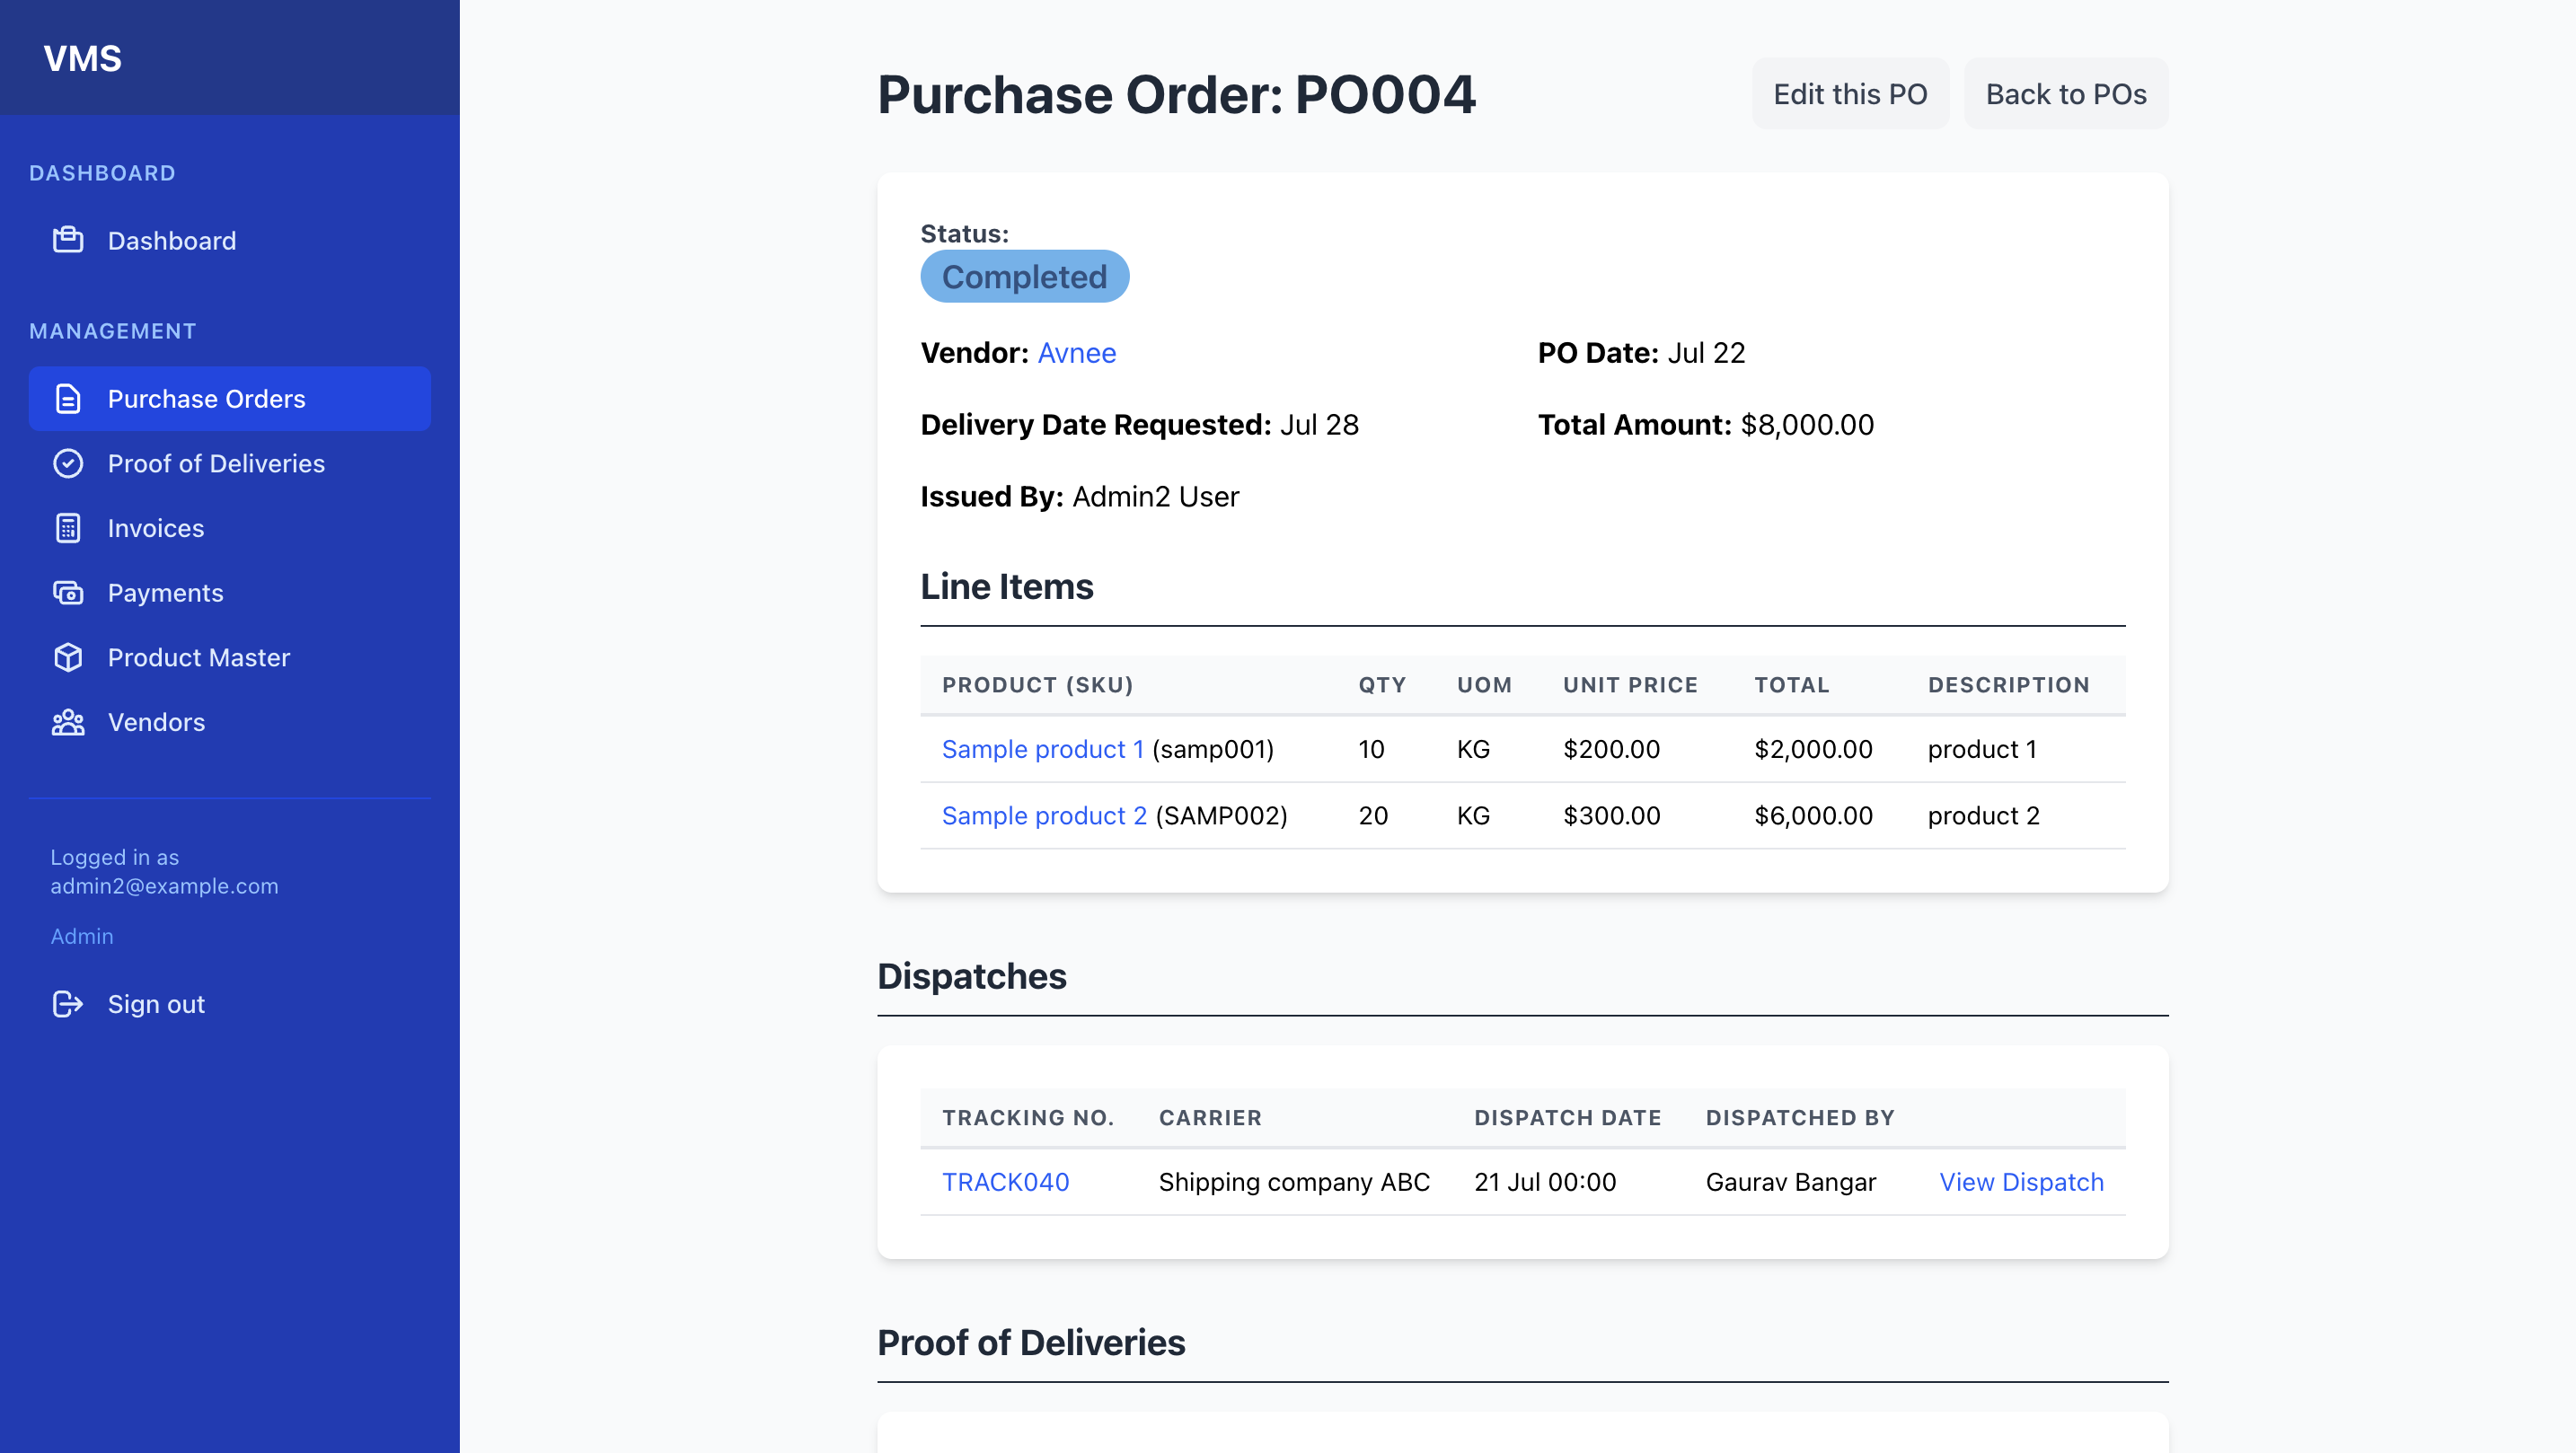
- PO Details:
- From the PO List, click "Show" next to a PO's number.
- This page displays all PO details, including vendor information, dates, totals, and a breakdown of all line items.
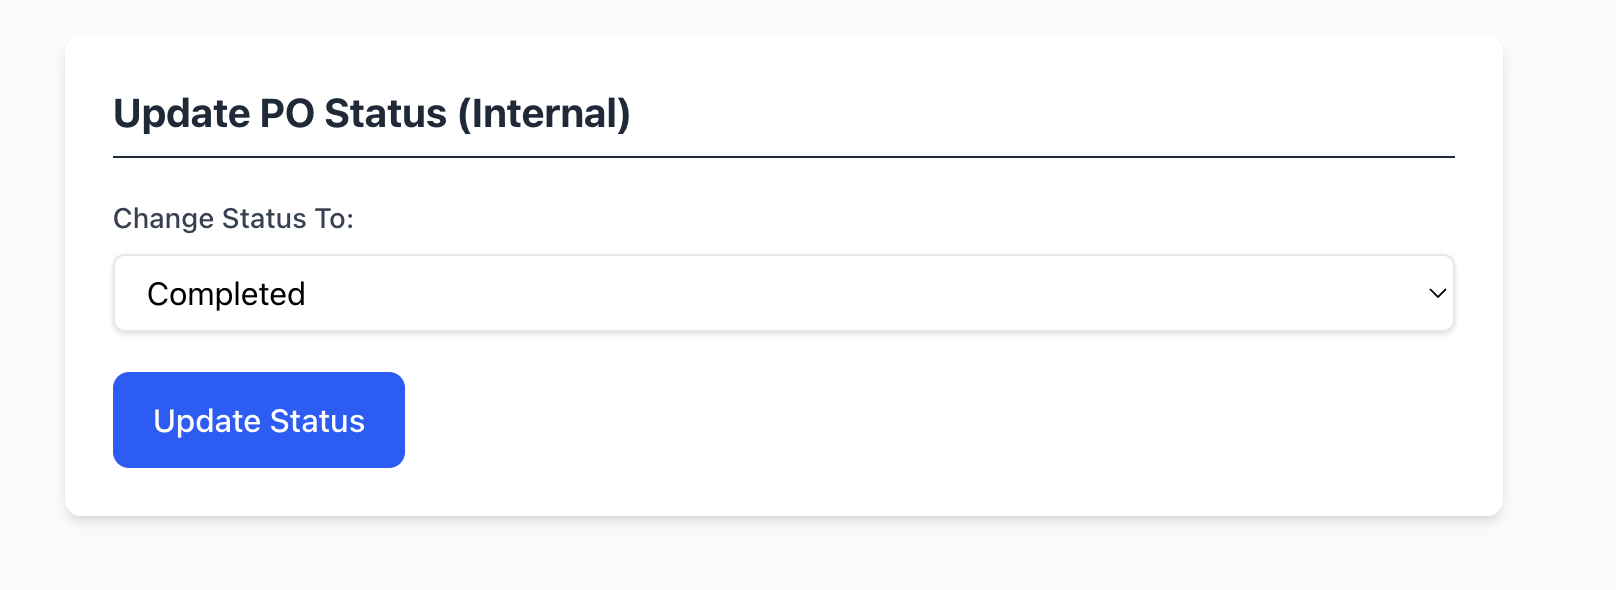
- Updating PO Status (Internal):
- On a PO's "Show" page, scroll down to the "Update PO Status (Internal)" section.
- Select a
New Statusfrom the dropdown (e.g., changeDrafttoSentto make it visible to the vendor, orSenttoCancelled). - Click "Update Status".
- Note: Changing a PO status like to
SentorCancelledwill make it visible or unavailable to the vendor, respectively. Statuses likeDispatchedandDeliveredare typically updated by the vendor through their portal.
Chapter 5: Dispatch Management (Admin Review)
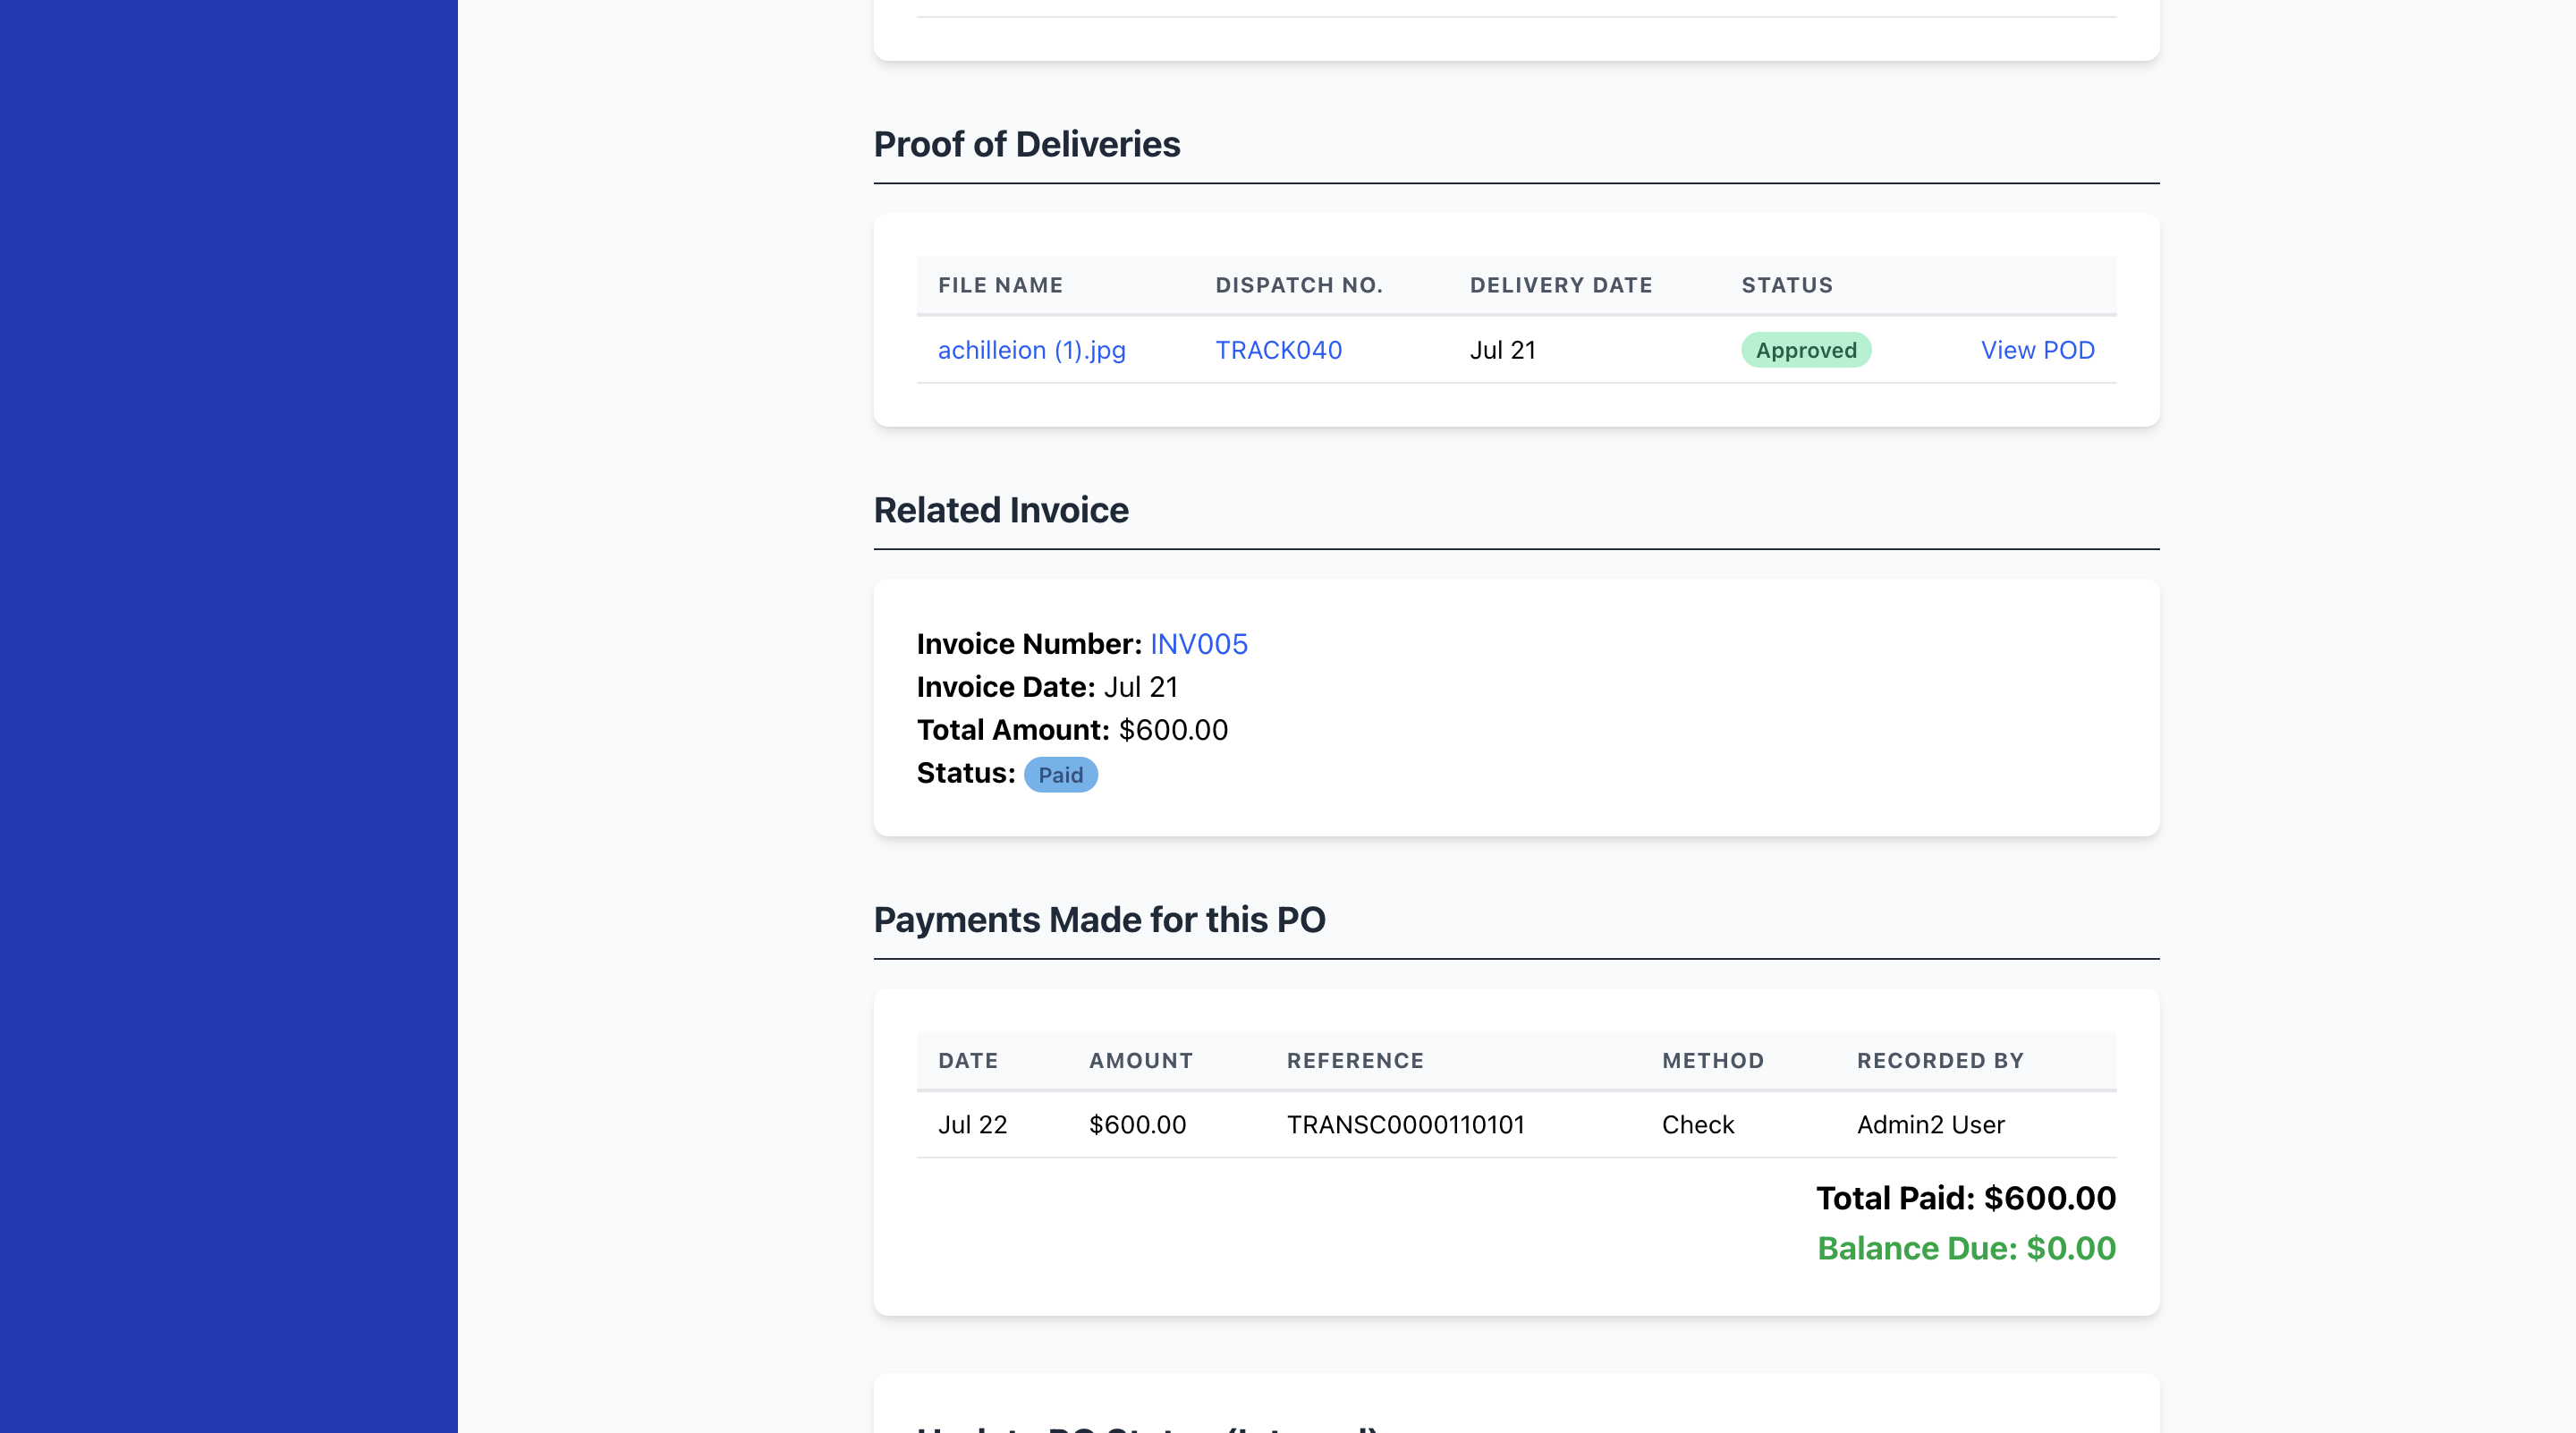
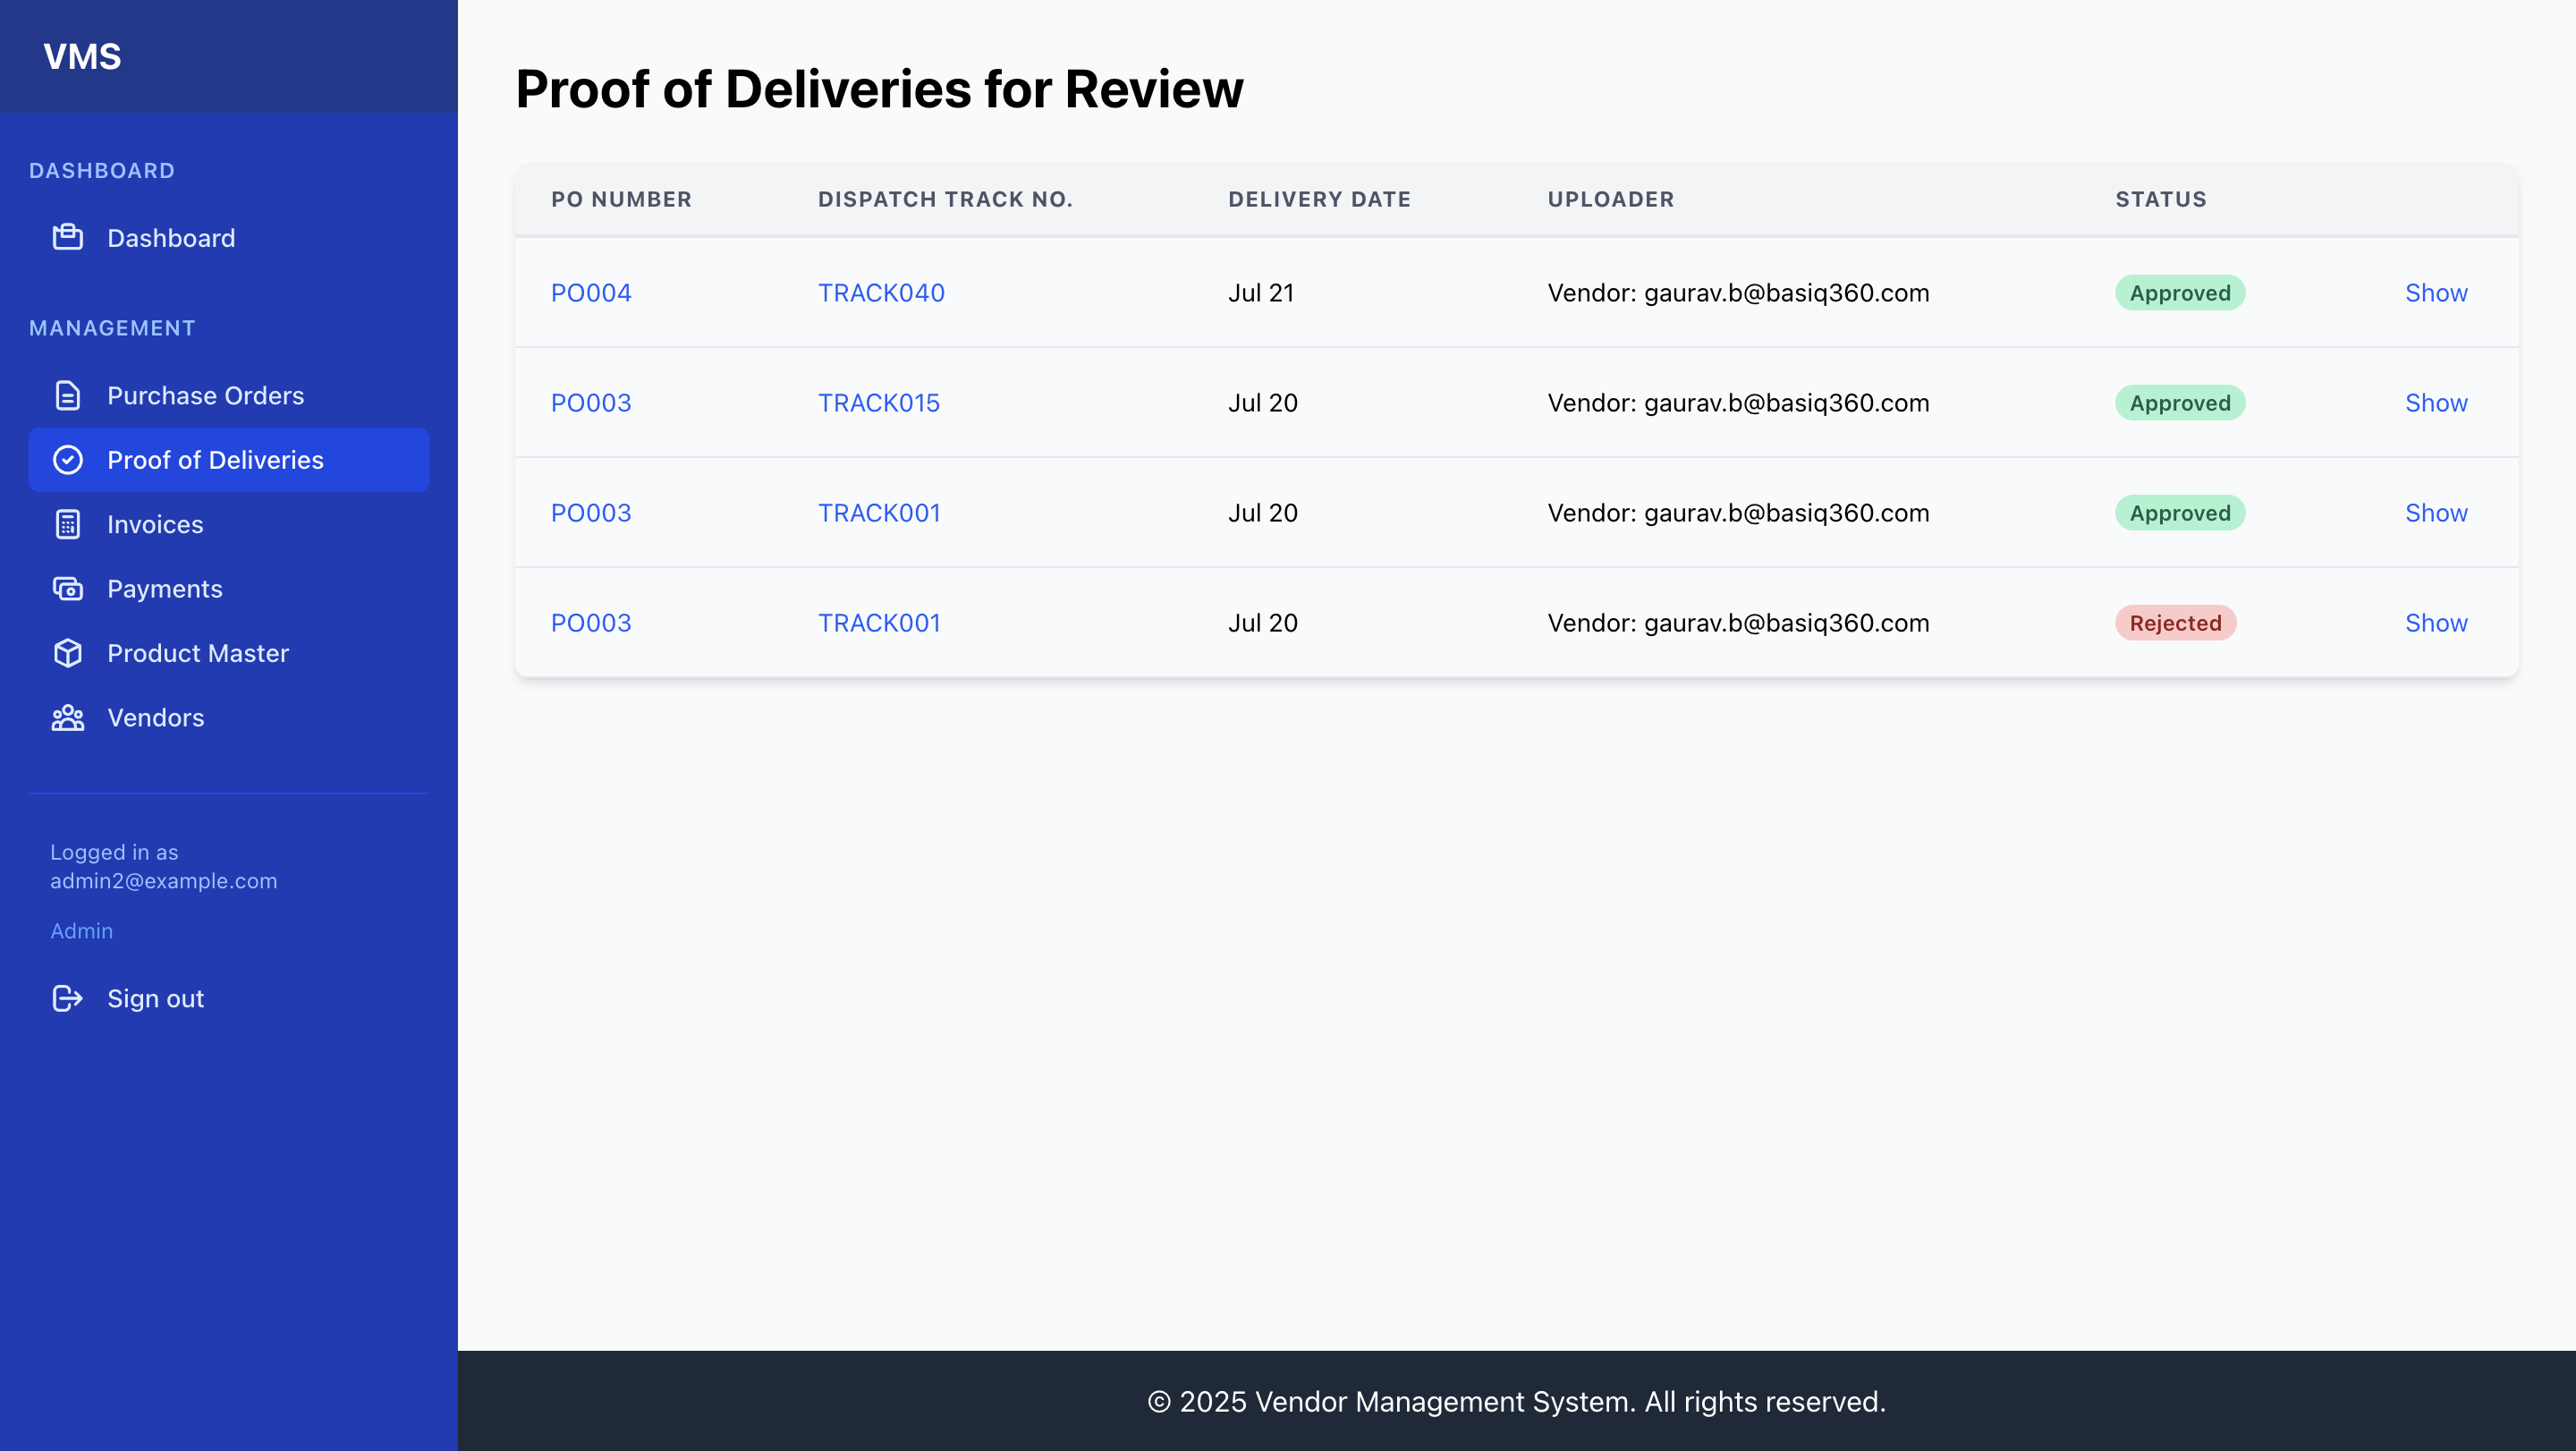
- Proof of Deliveries List (Reviewing all PODs):
- From the navigation bar, click "Proof of Deliveries".
- This list shows all PODs uploaded by vendors, typically those with a
Submittedstatus, awaiting your review. - Table Columns: PO Number, Dispatch Tracking Number, Delivery Date, Uploader, Status, and Actions (Show).
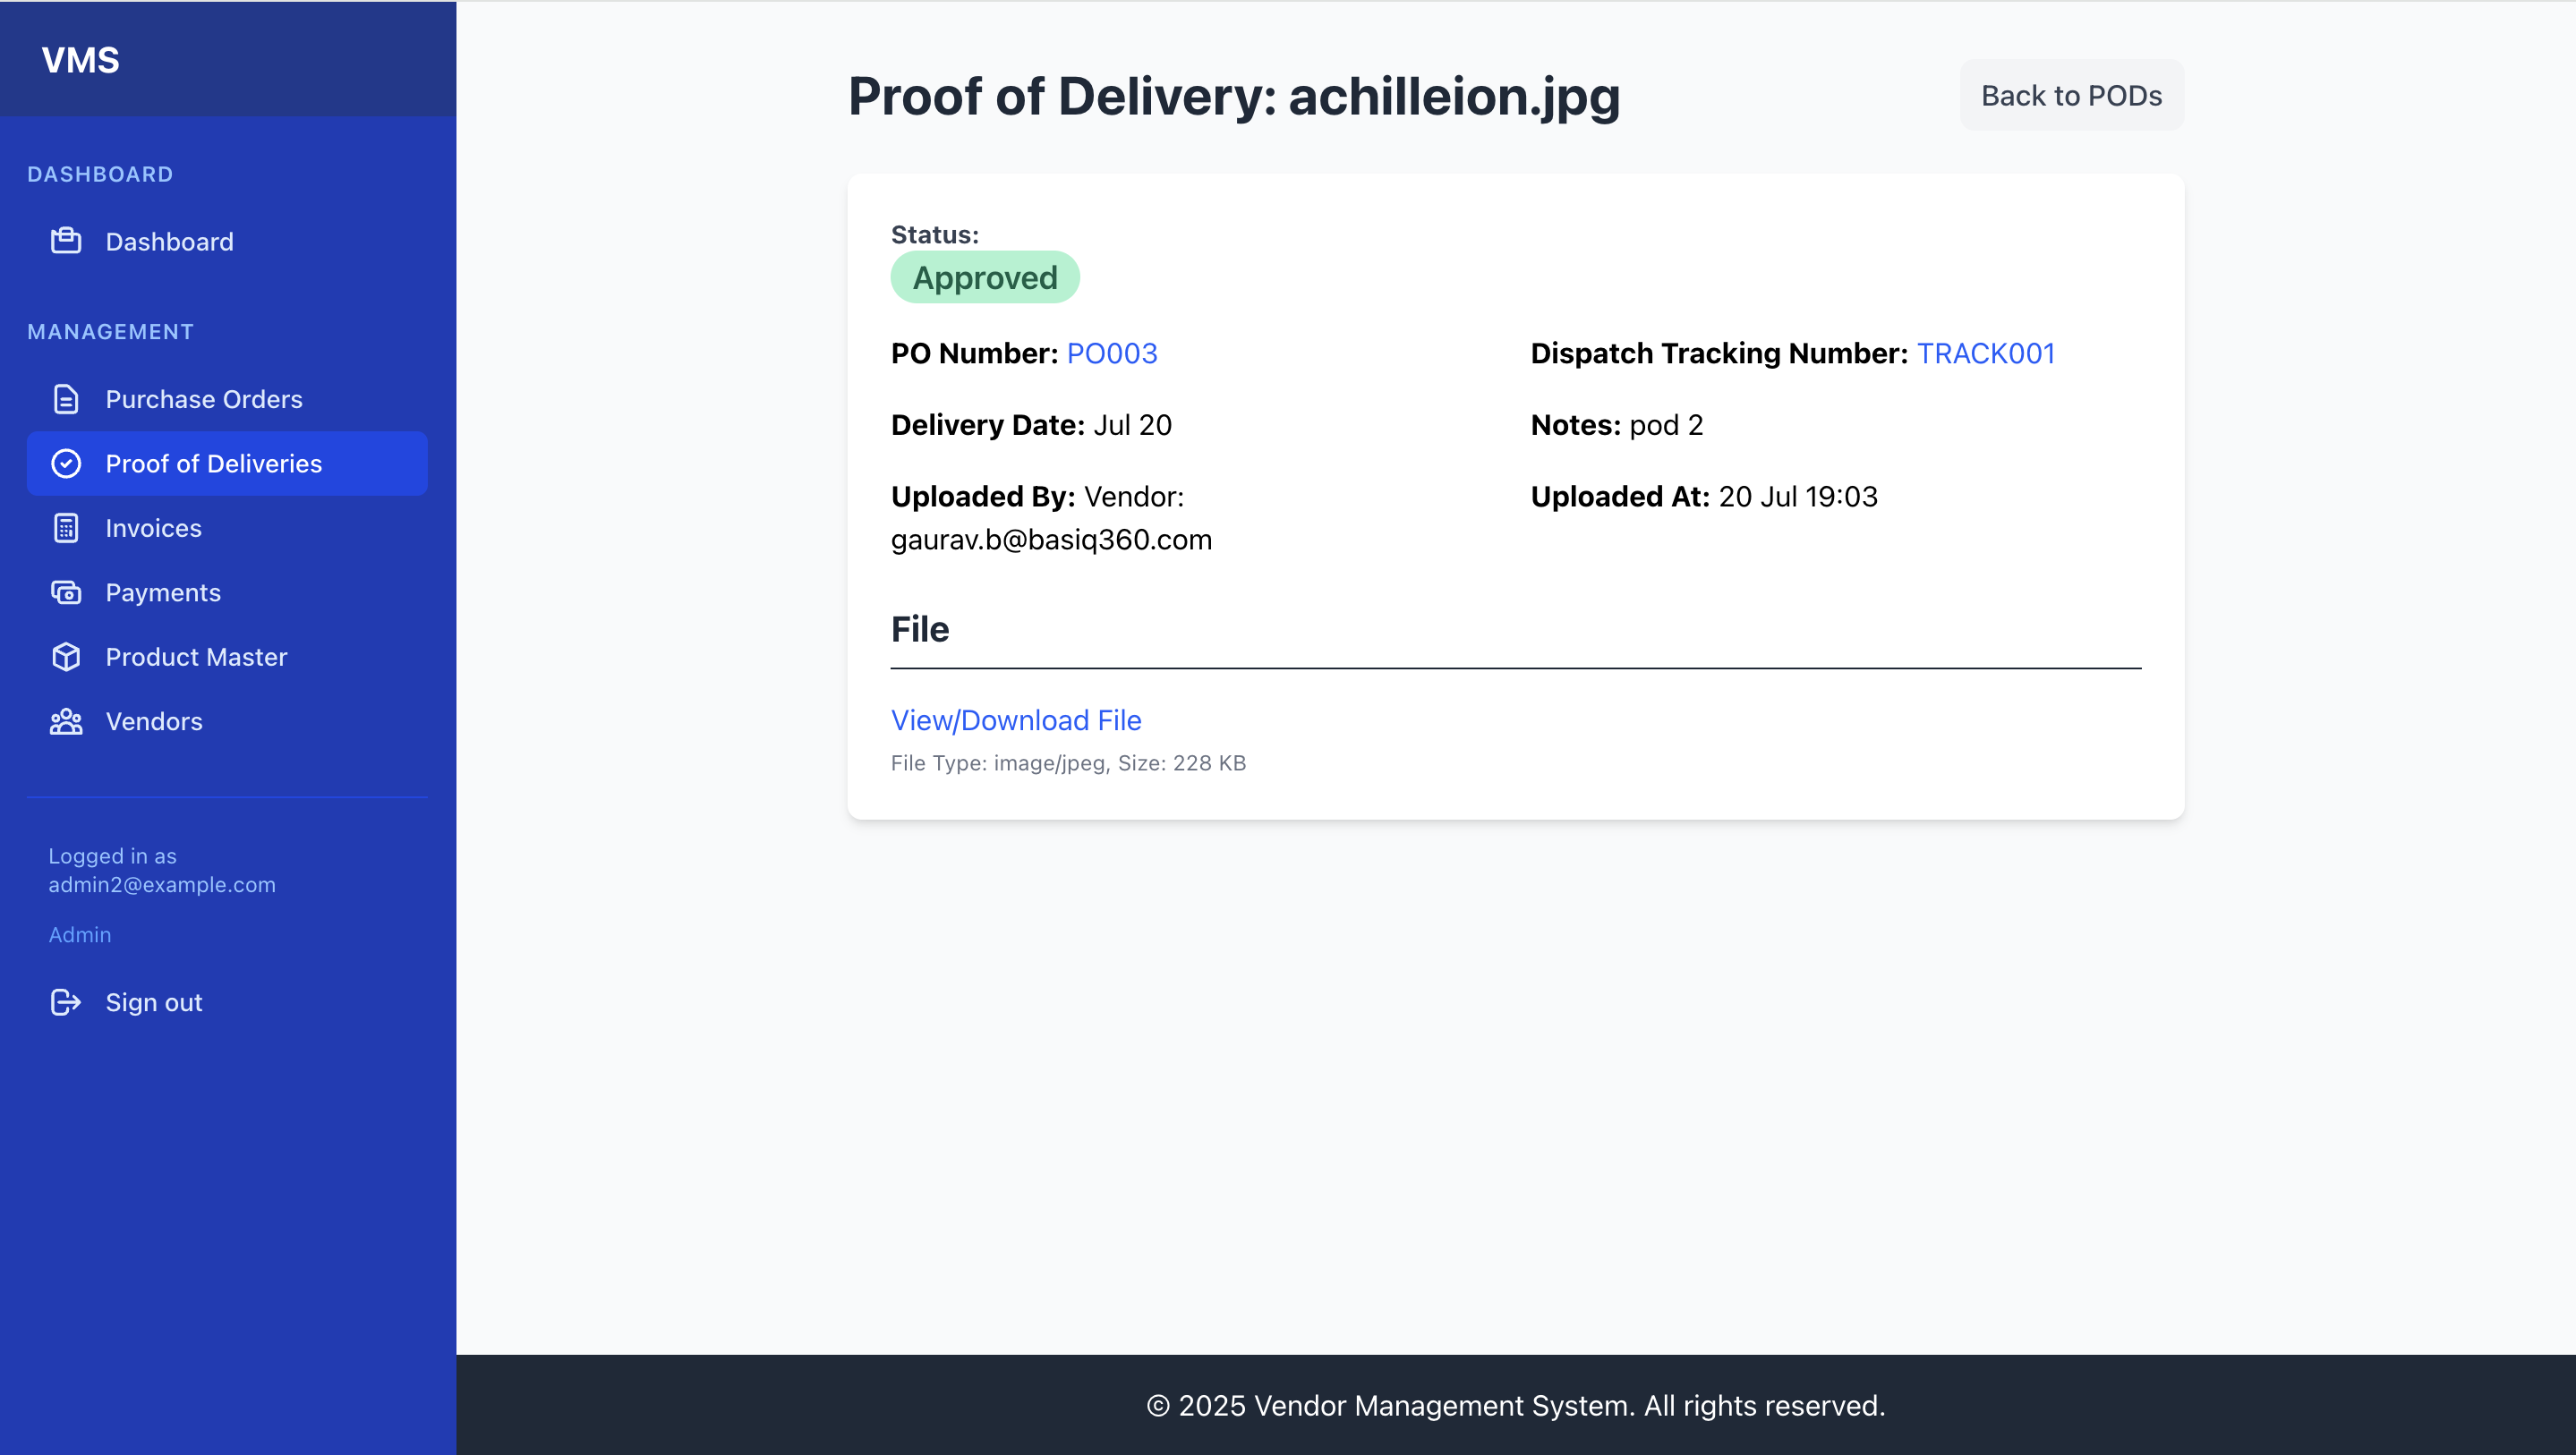
- POD Details:
- From the POD list, click "Show" next to a POD's tracking number.
- This page displays the POD file, details (delivery date, notes), and linked Dispatch and Purchase Order information.
- Approving a POD:
- If the POD accurately reflects the delivery and all is in order, on the POD's show page, click "Approve POD".
- This changes the POD status to
Approved.
- Rejecting a POD:
- If the POD is incorrect, incomplete, or does not match expectations, on its show page, click "Reject POD".
- This changes the POD status to
Rejected.
Chapter 6: Invoice Management (Admin Review)
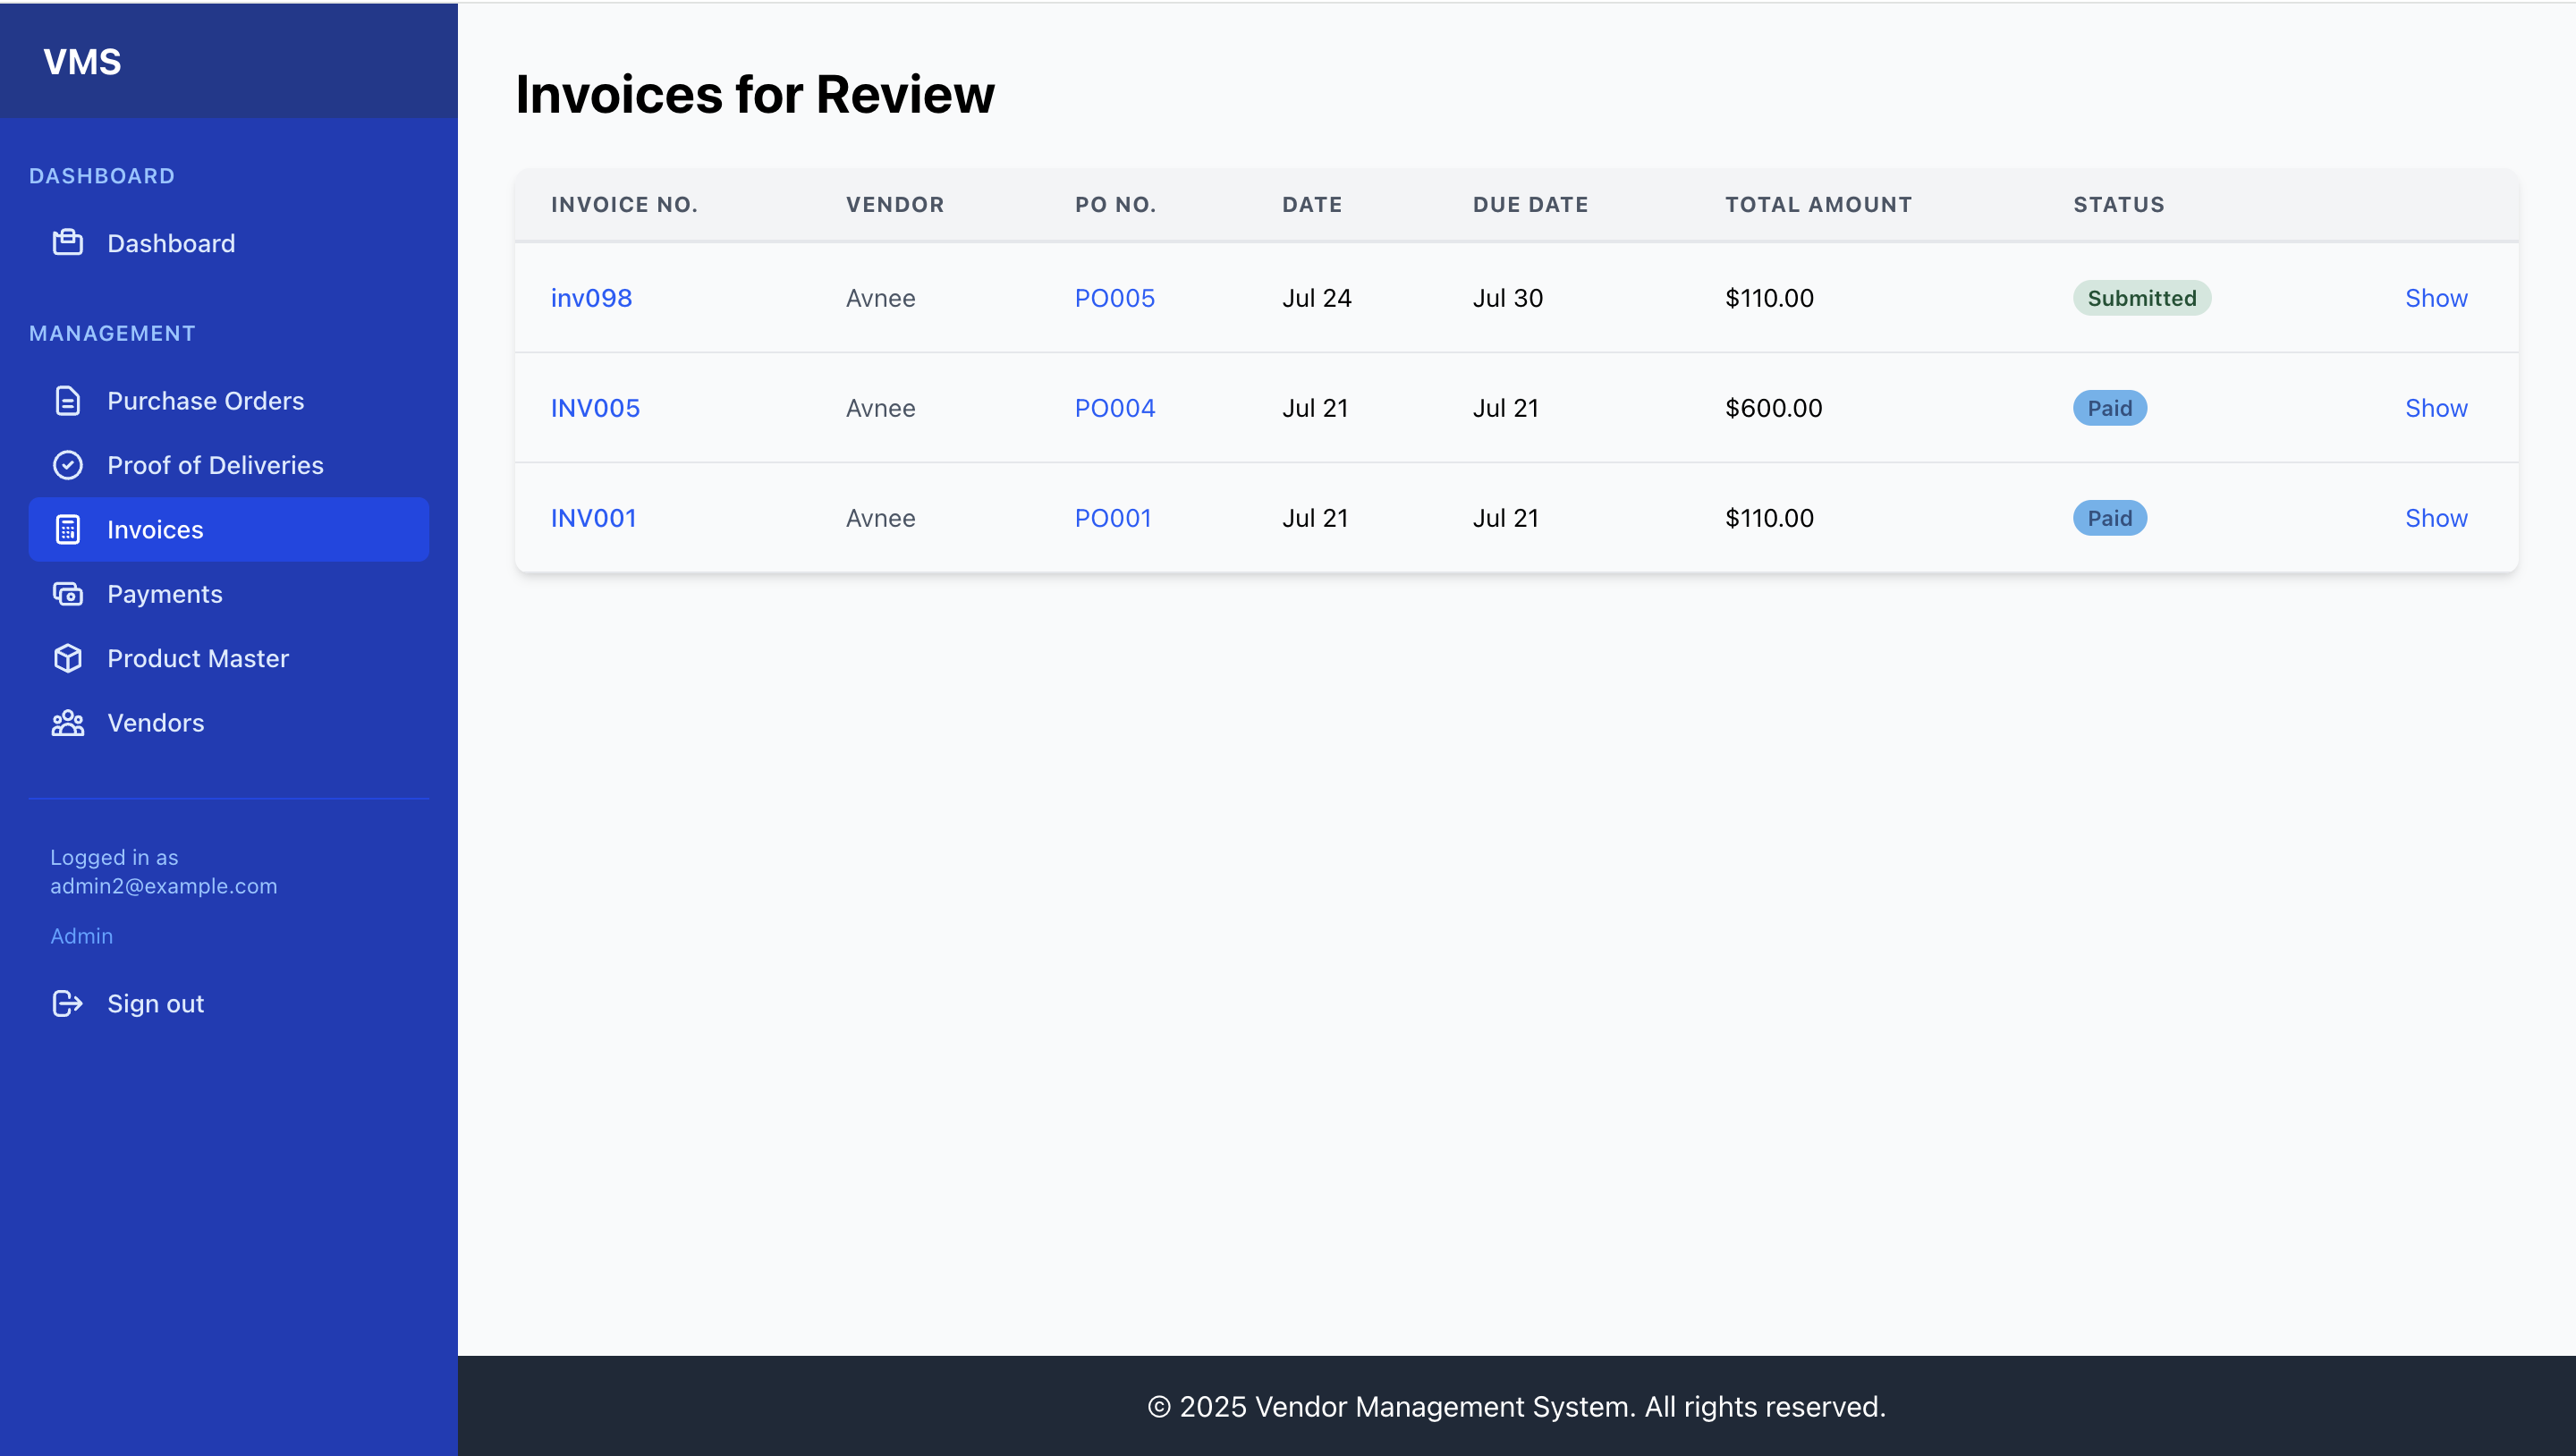
- Invoice List (Reviewing all Invoices):
- From the navigation bar, click "Invoices".
- This list shows all invoices submitted by vendors, typically those with a
Submittedstatus, awaiting your review. - Table Columns: Invoice No., Vendor, PO No., Date, Due Date, Total Amount, Status, and Actions (Show).
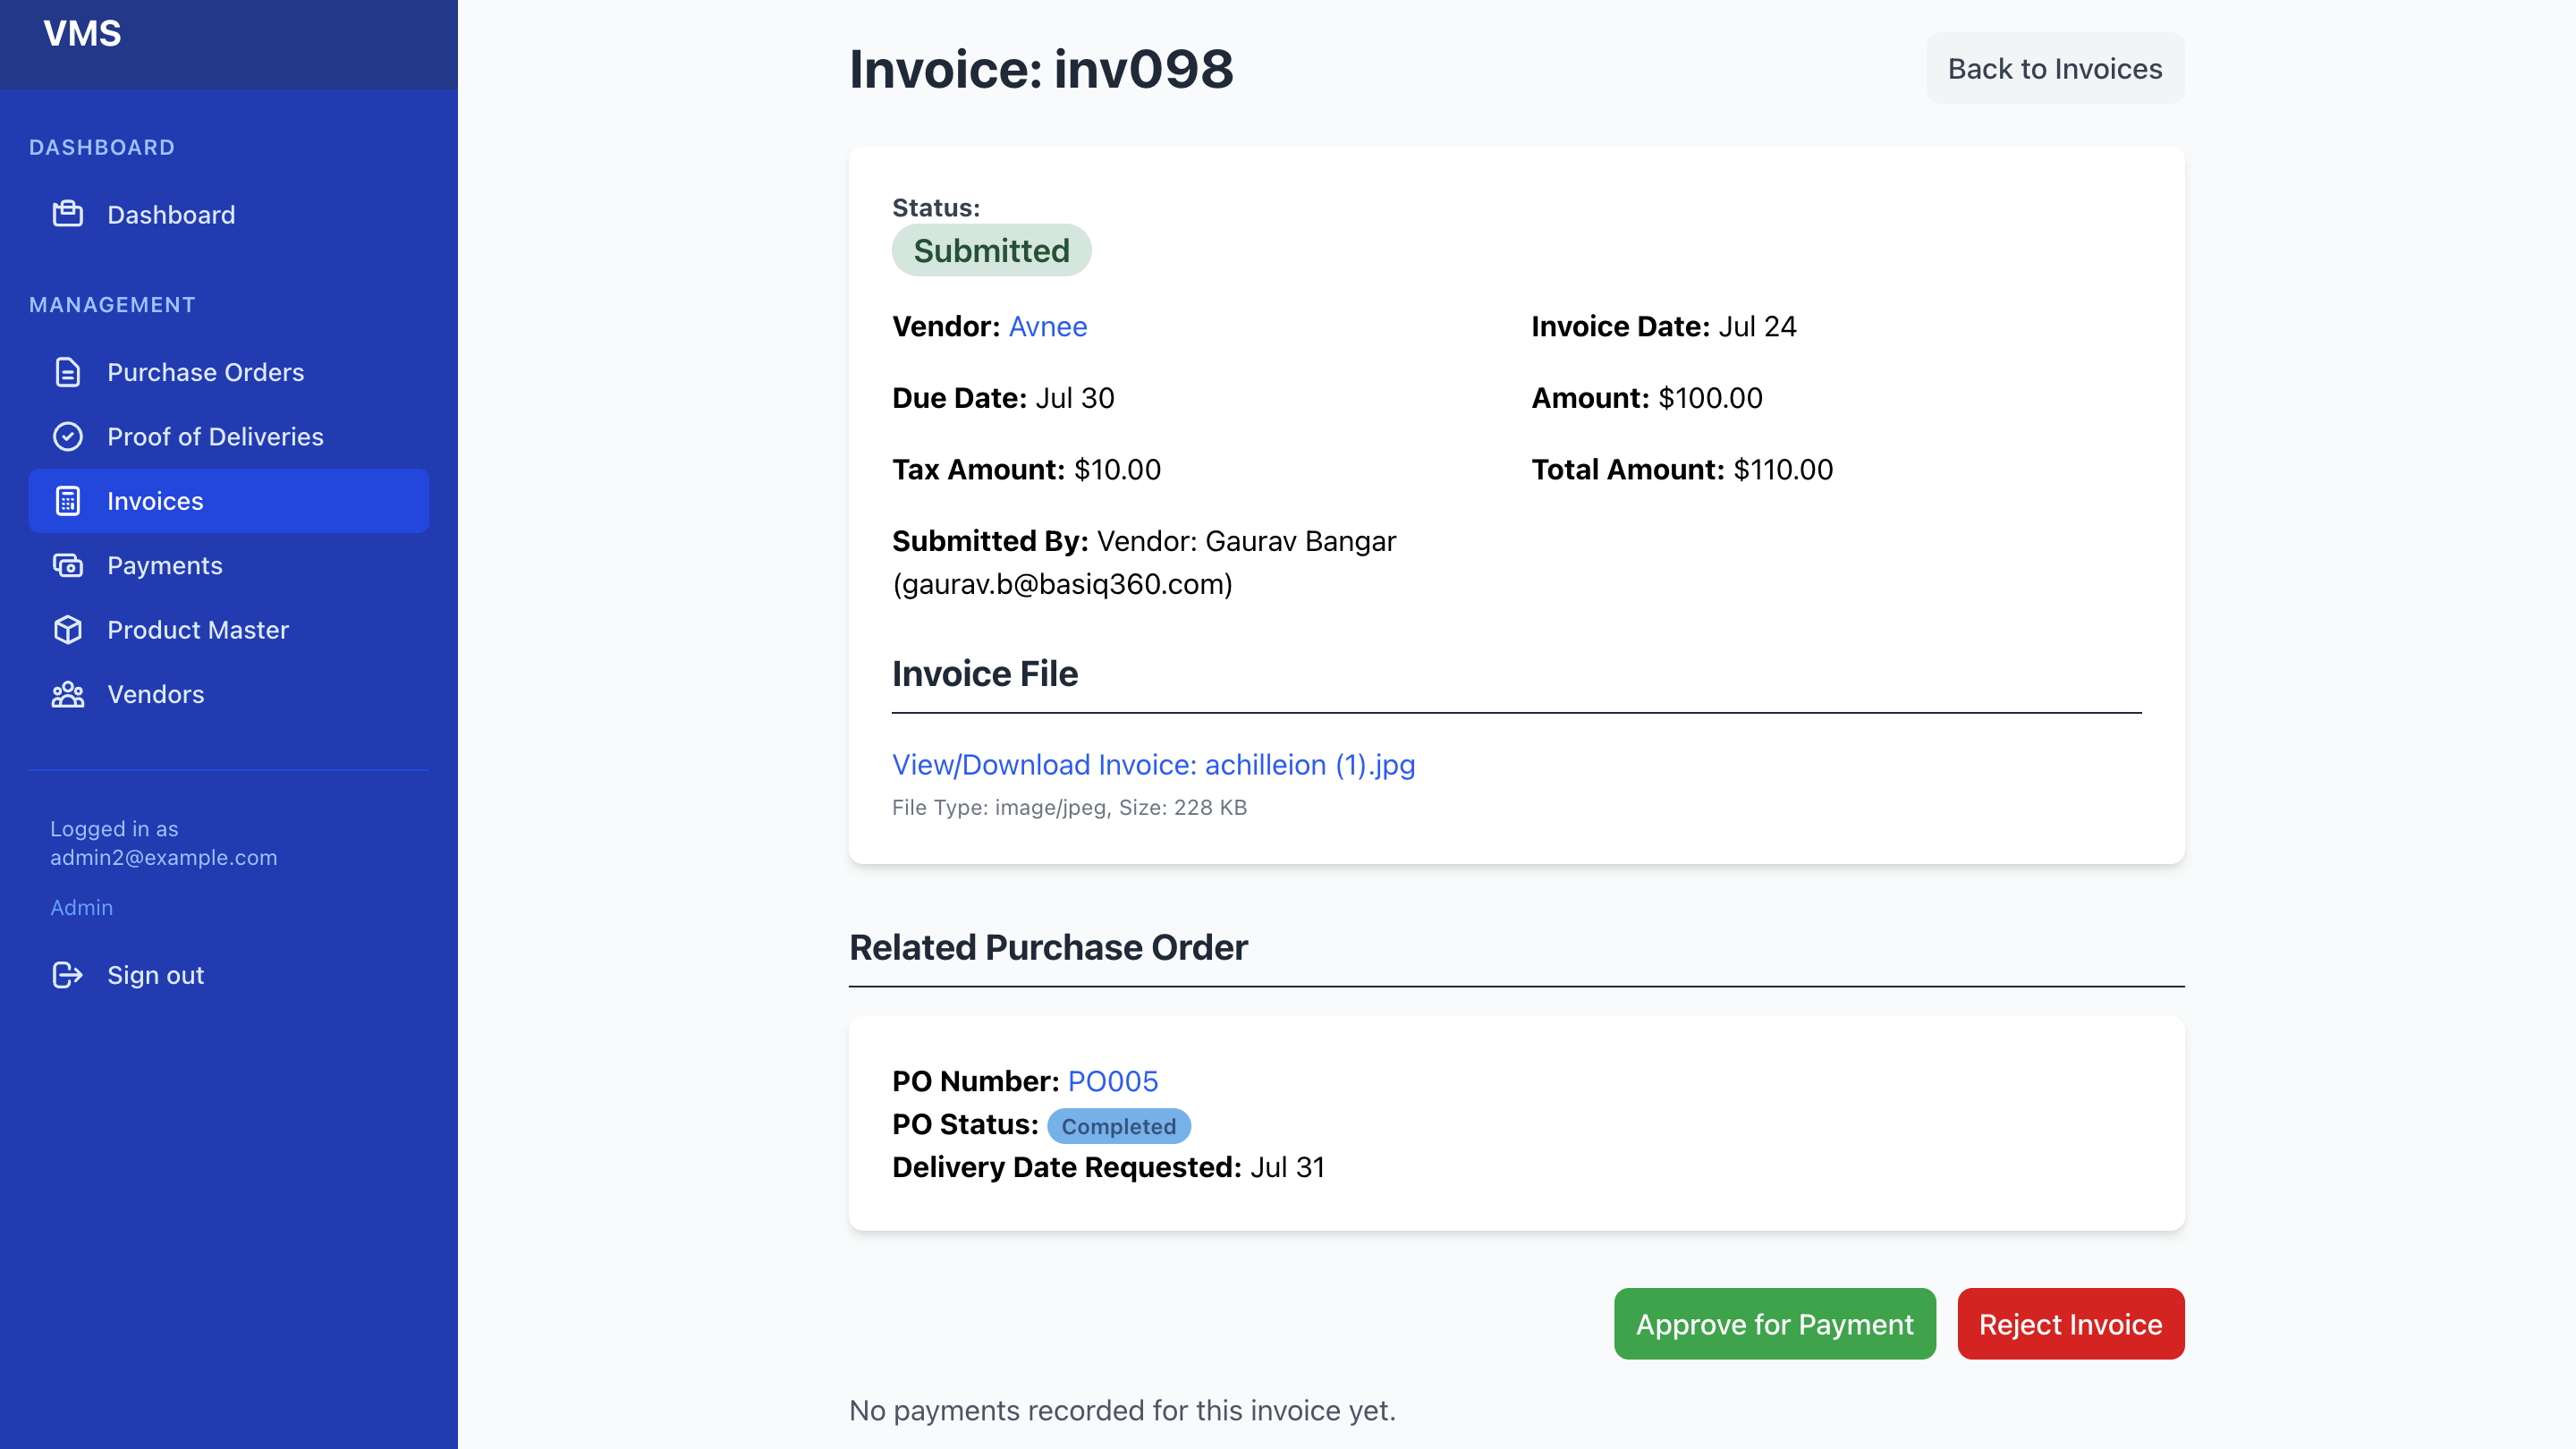
- Invoice Details:
- From the Invoice list, click "Show" next to an invoice number.
- This page displays all invoice details, including amounts, dates, the attached invoice PDF (which you can view/download), and the single linked Purchase Order.
- Invoice Workflow:
- Approving for Payment:
- If the invoice matches the PO and is ready for payment, on the invoice's show page, click "Approve for Payment".
- This changes the invoice status to
Approved for Payment.
- Rejecting an Invoice:
- If an invoice is incorrect or disputed, on its show page, click "Reject Invoice".
- This changes the invoice status to
Rejected.
- Approving for Payment:
Chapter 7: Payment Management
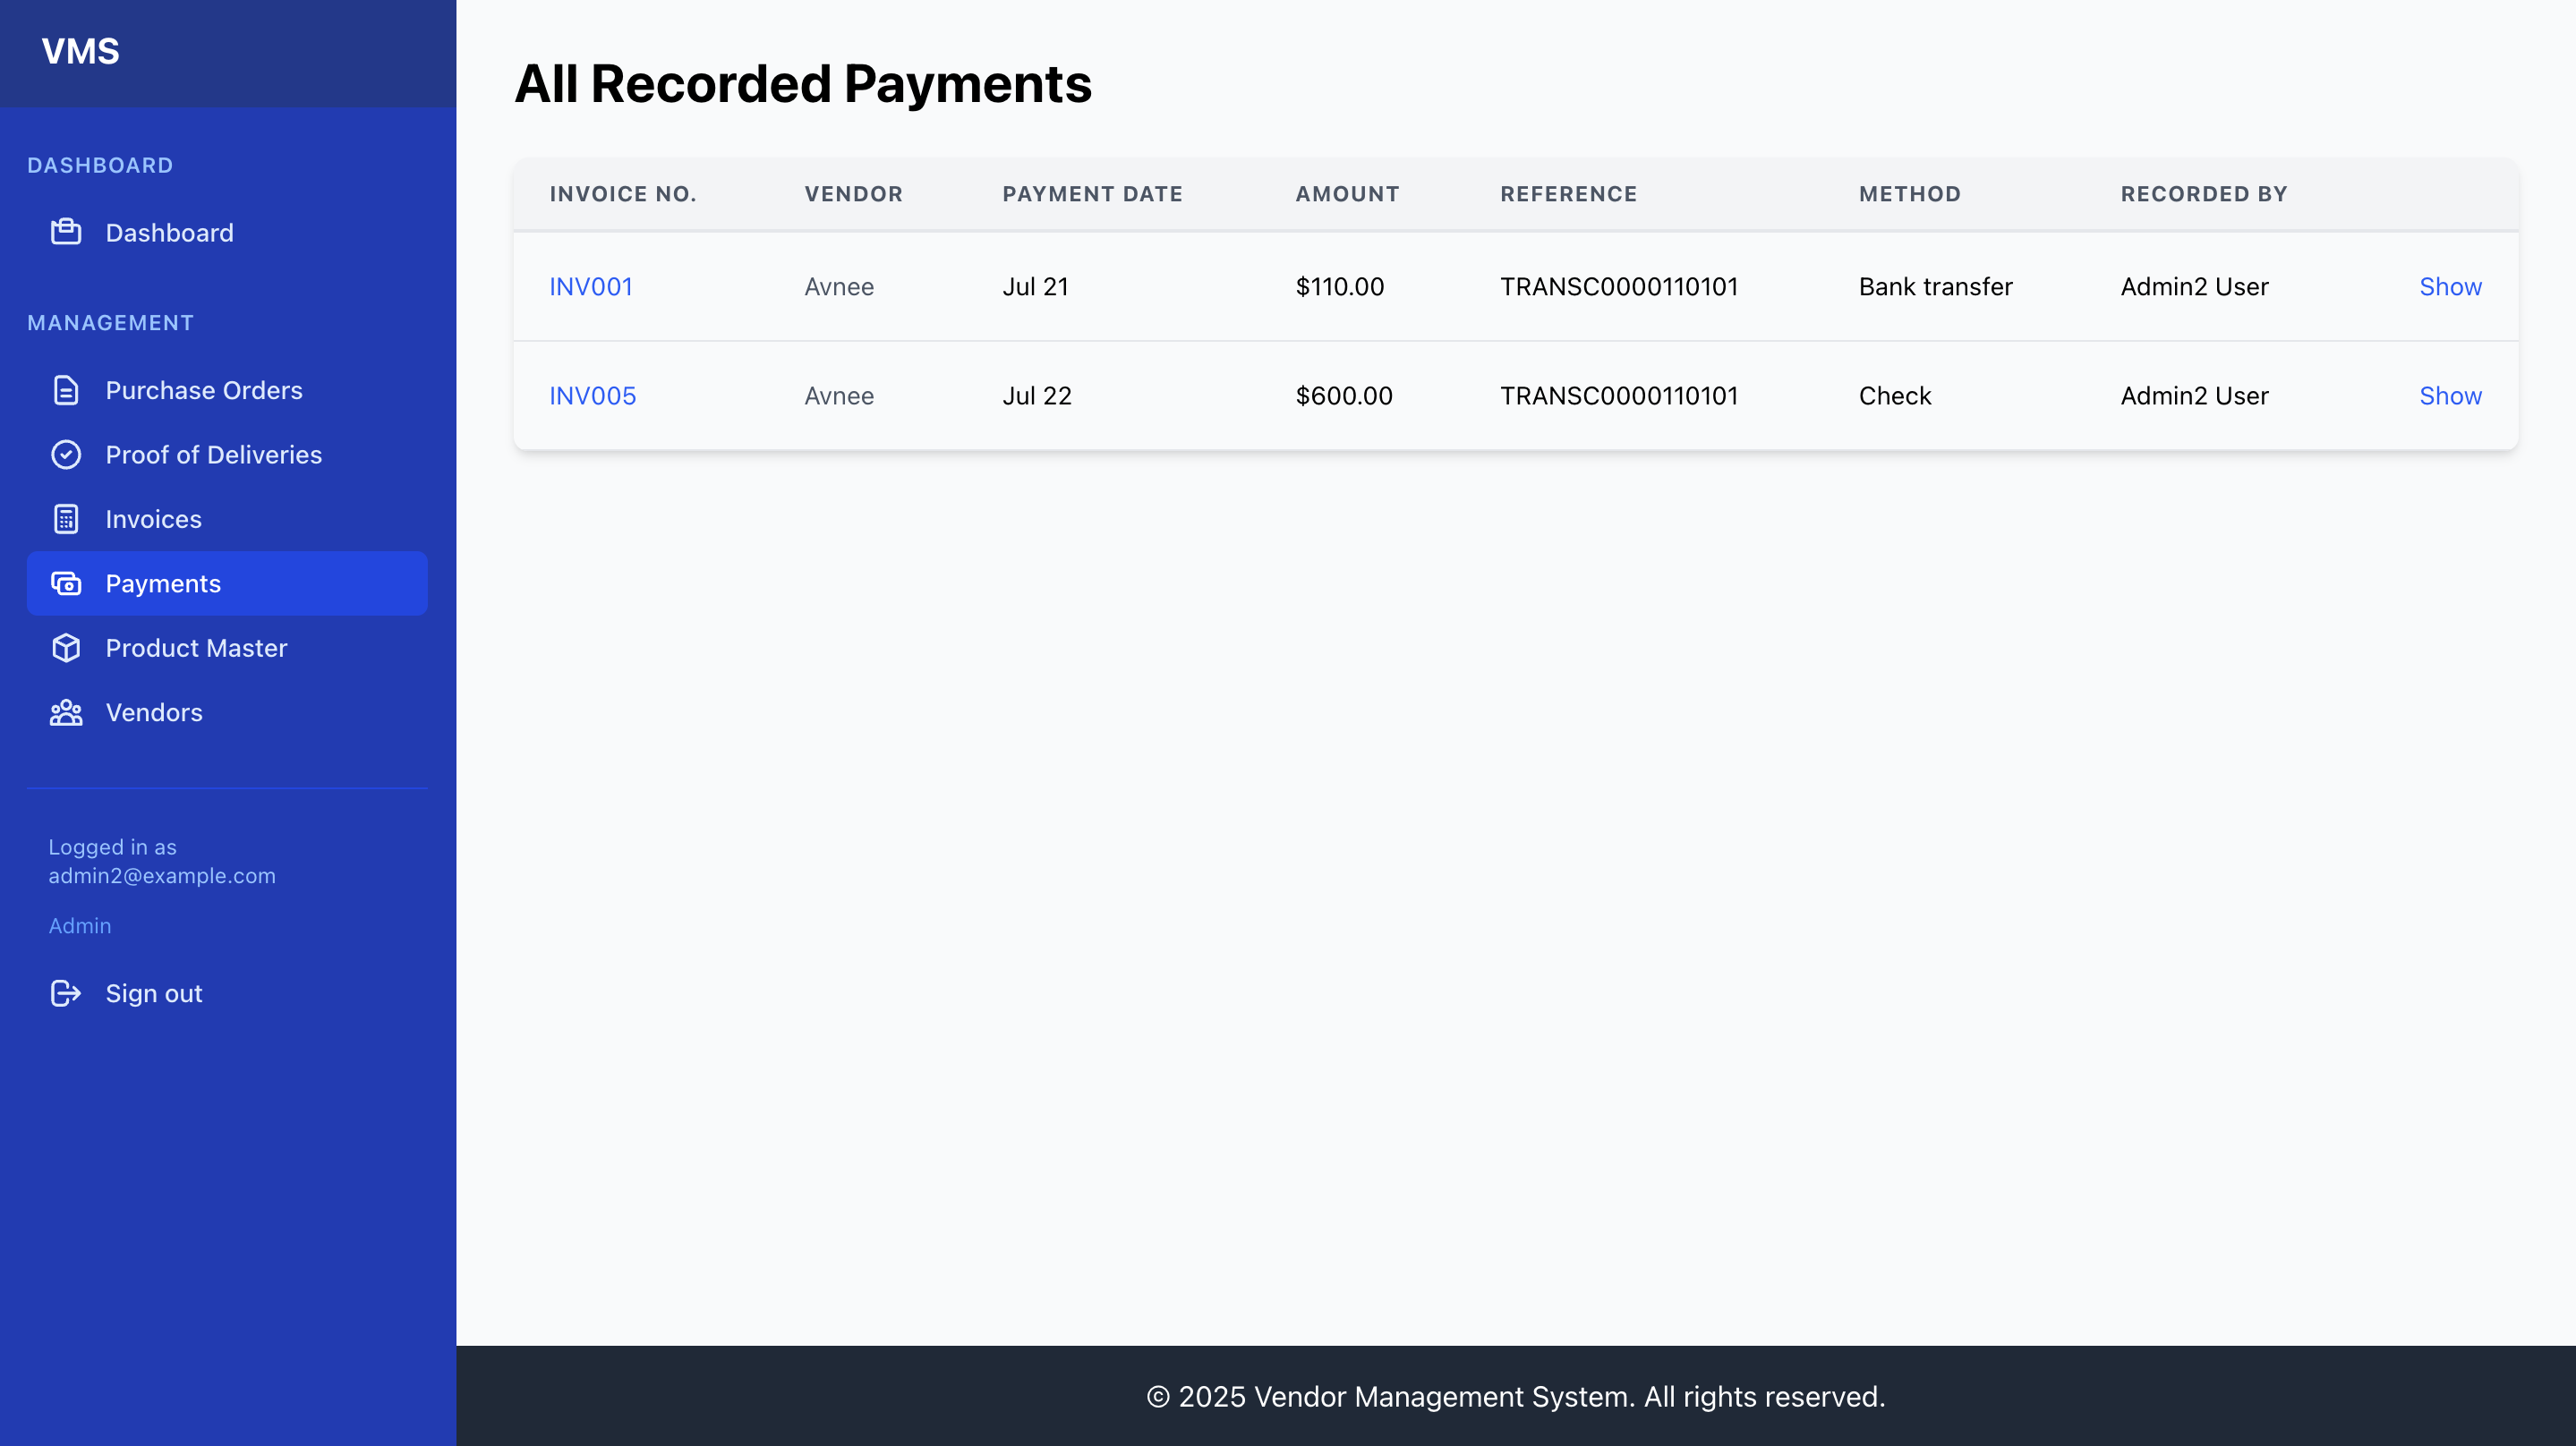
- Payments List (Viewing all Recorded Payments):
- From the navigation bar, click "Payments".
- This list displays a history of all payments that have been recorded in the system.
- Table Columns: Invoice No., Vendor, Payment Date, Amount, Reference, Method, Recorded By.
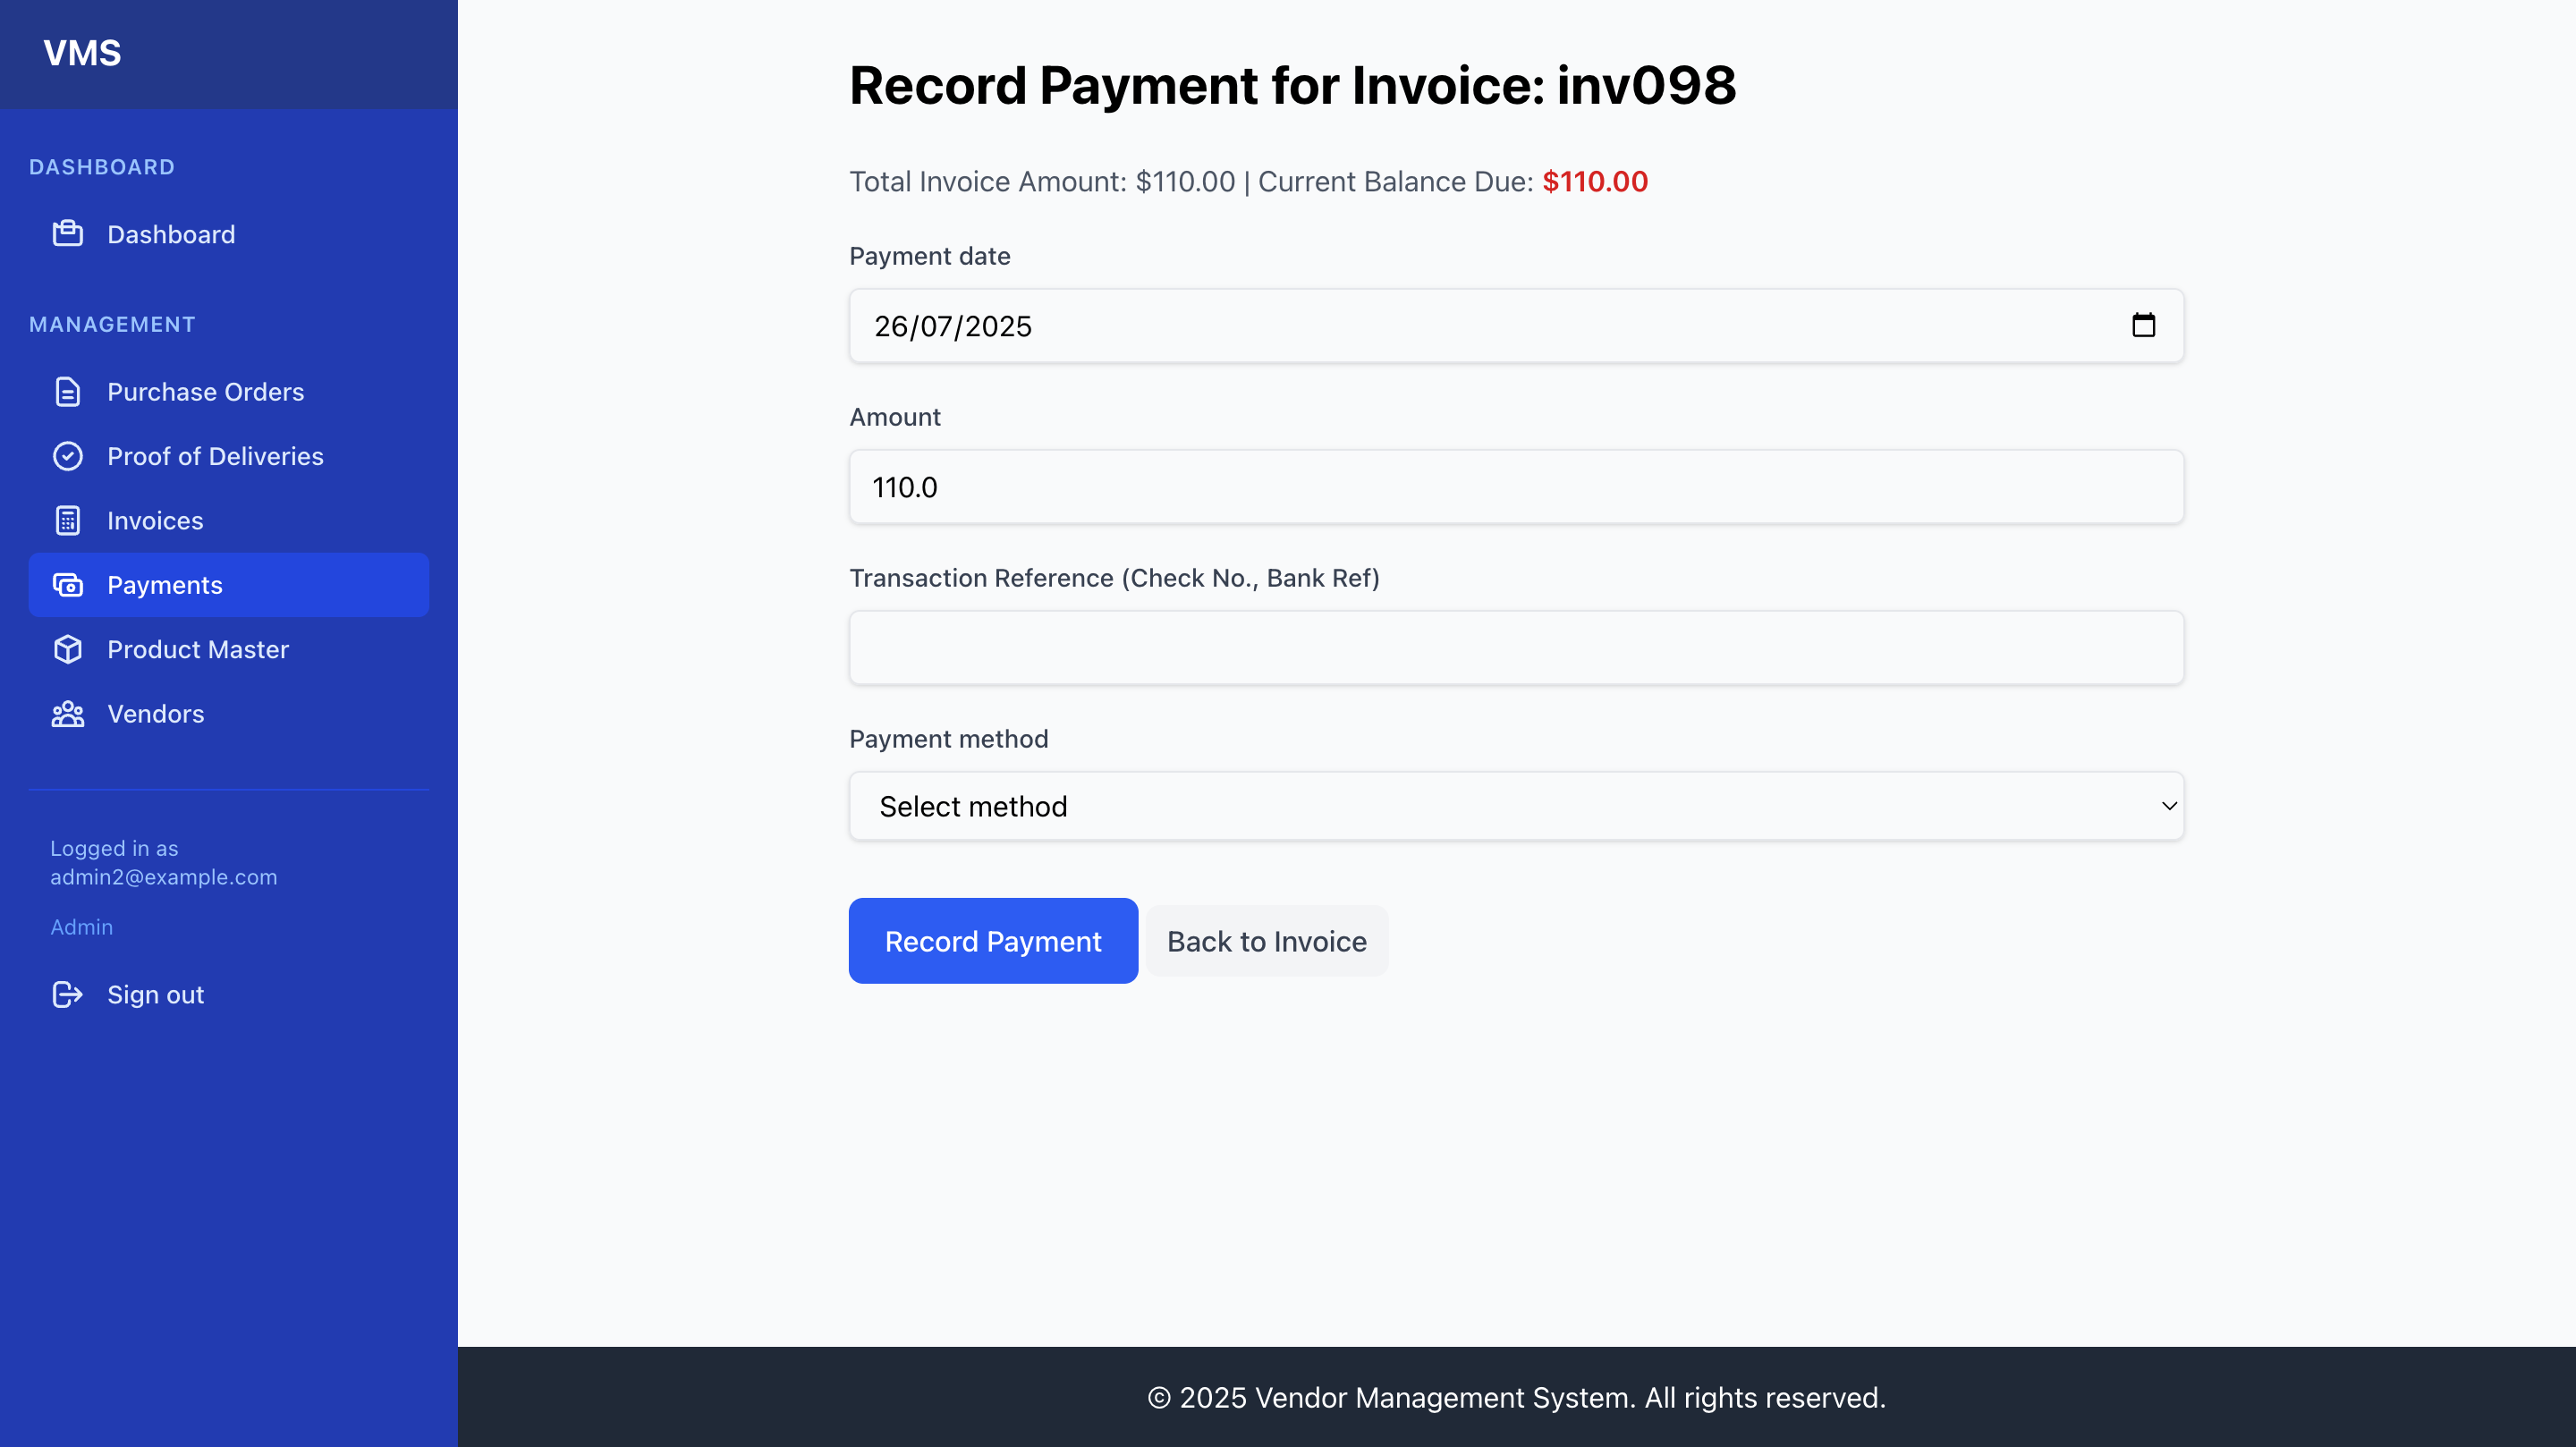
- Recording a Payment:
- Navigate to an invoice's "Show" page (Chapter 6).
- If the invoice status is
Approved for Payment, a "Record Payment" button will be visible. Click it. - Fill in the payment details:
Payment Date: The date the payment was made.Amount: The amount paid. The system will pre-fill with the remaining balance due.Transaction Reference: A check number, bank transaction ID, or other unique reference.Payment Method: Select how the payment was made (e.g., Bank Transfer, Check).
- Click "Record Payment".
- Understanding Invoice Status Change: Upon recording a payment, the invoice's status will automatically update to
Paidif the full amount has been received. If a partial payment is recorded, the status might change toReviewed(if not alreadyApproved for Payment) and remainApproved for Paymentuntil fully paid, allowing for multiple payment entries.
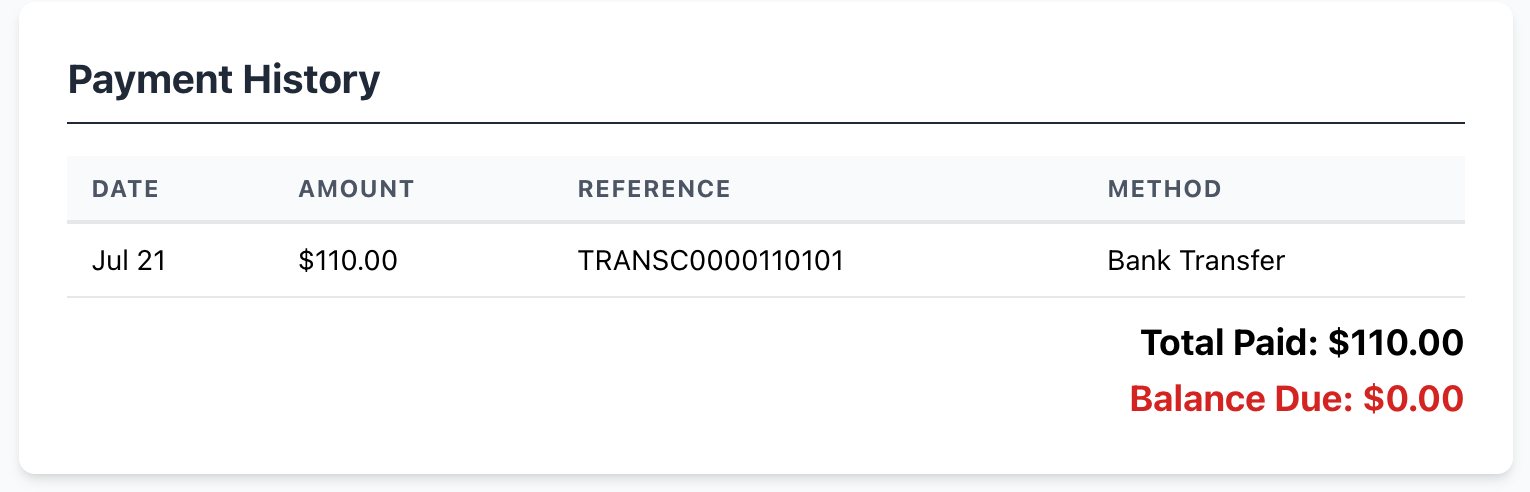
- Payment History:
- On any invoice's "Show" page, scroll down to the "Payment History" section.
- This section lists all payments recorded against that specific invoice, showing total paid and remaining balance due.
Part 2: Vendor User Guide
This section is for your external vendors who log into the Vendor Portal.
Chapter 8: Getting Started in the Vendor Portal
- Accessing the Portal:
- You will receive an email invitation from the admin with a secure link. Click this link.
- You will be prompted to set your password. Create a strong password.
- If you already have an account, navigate to the Vendor Portal login page:
http://yourdomain.com/vendors/auth/sign_in.
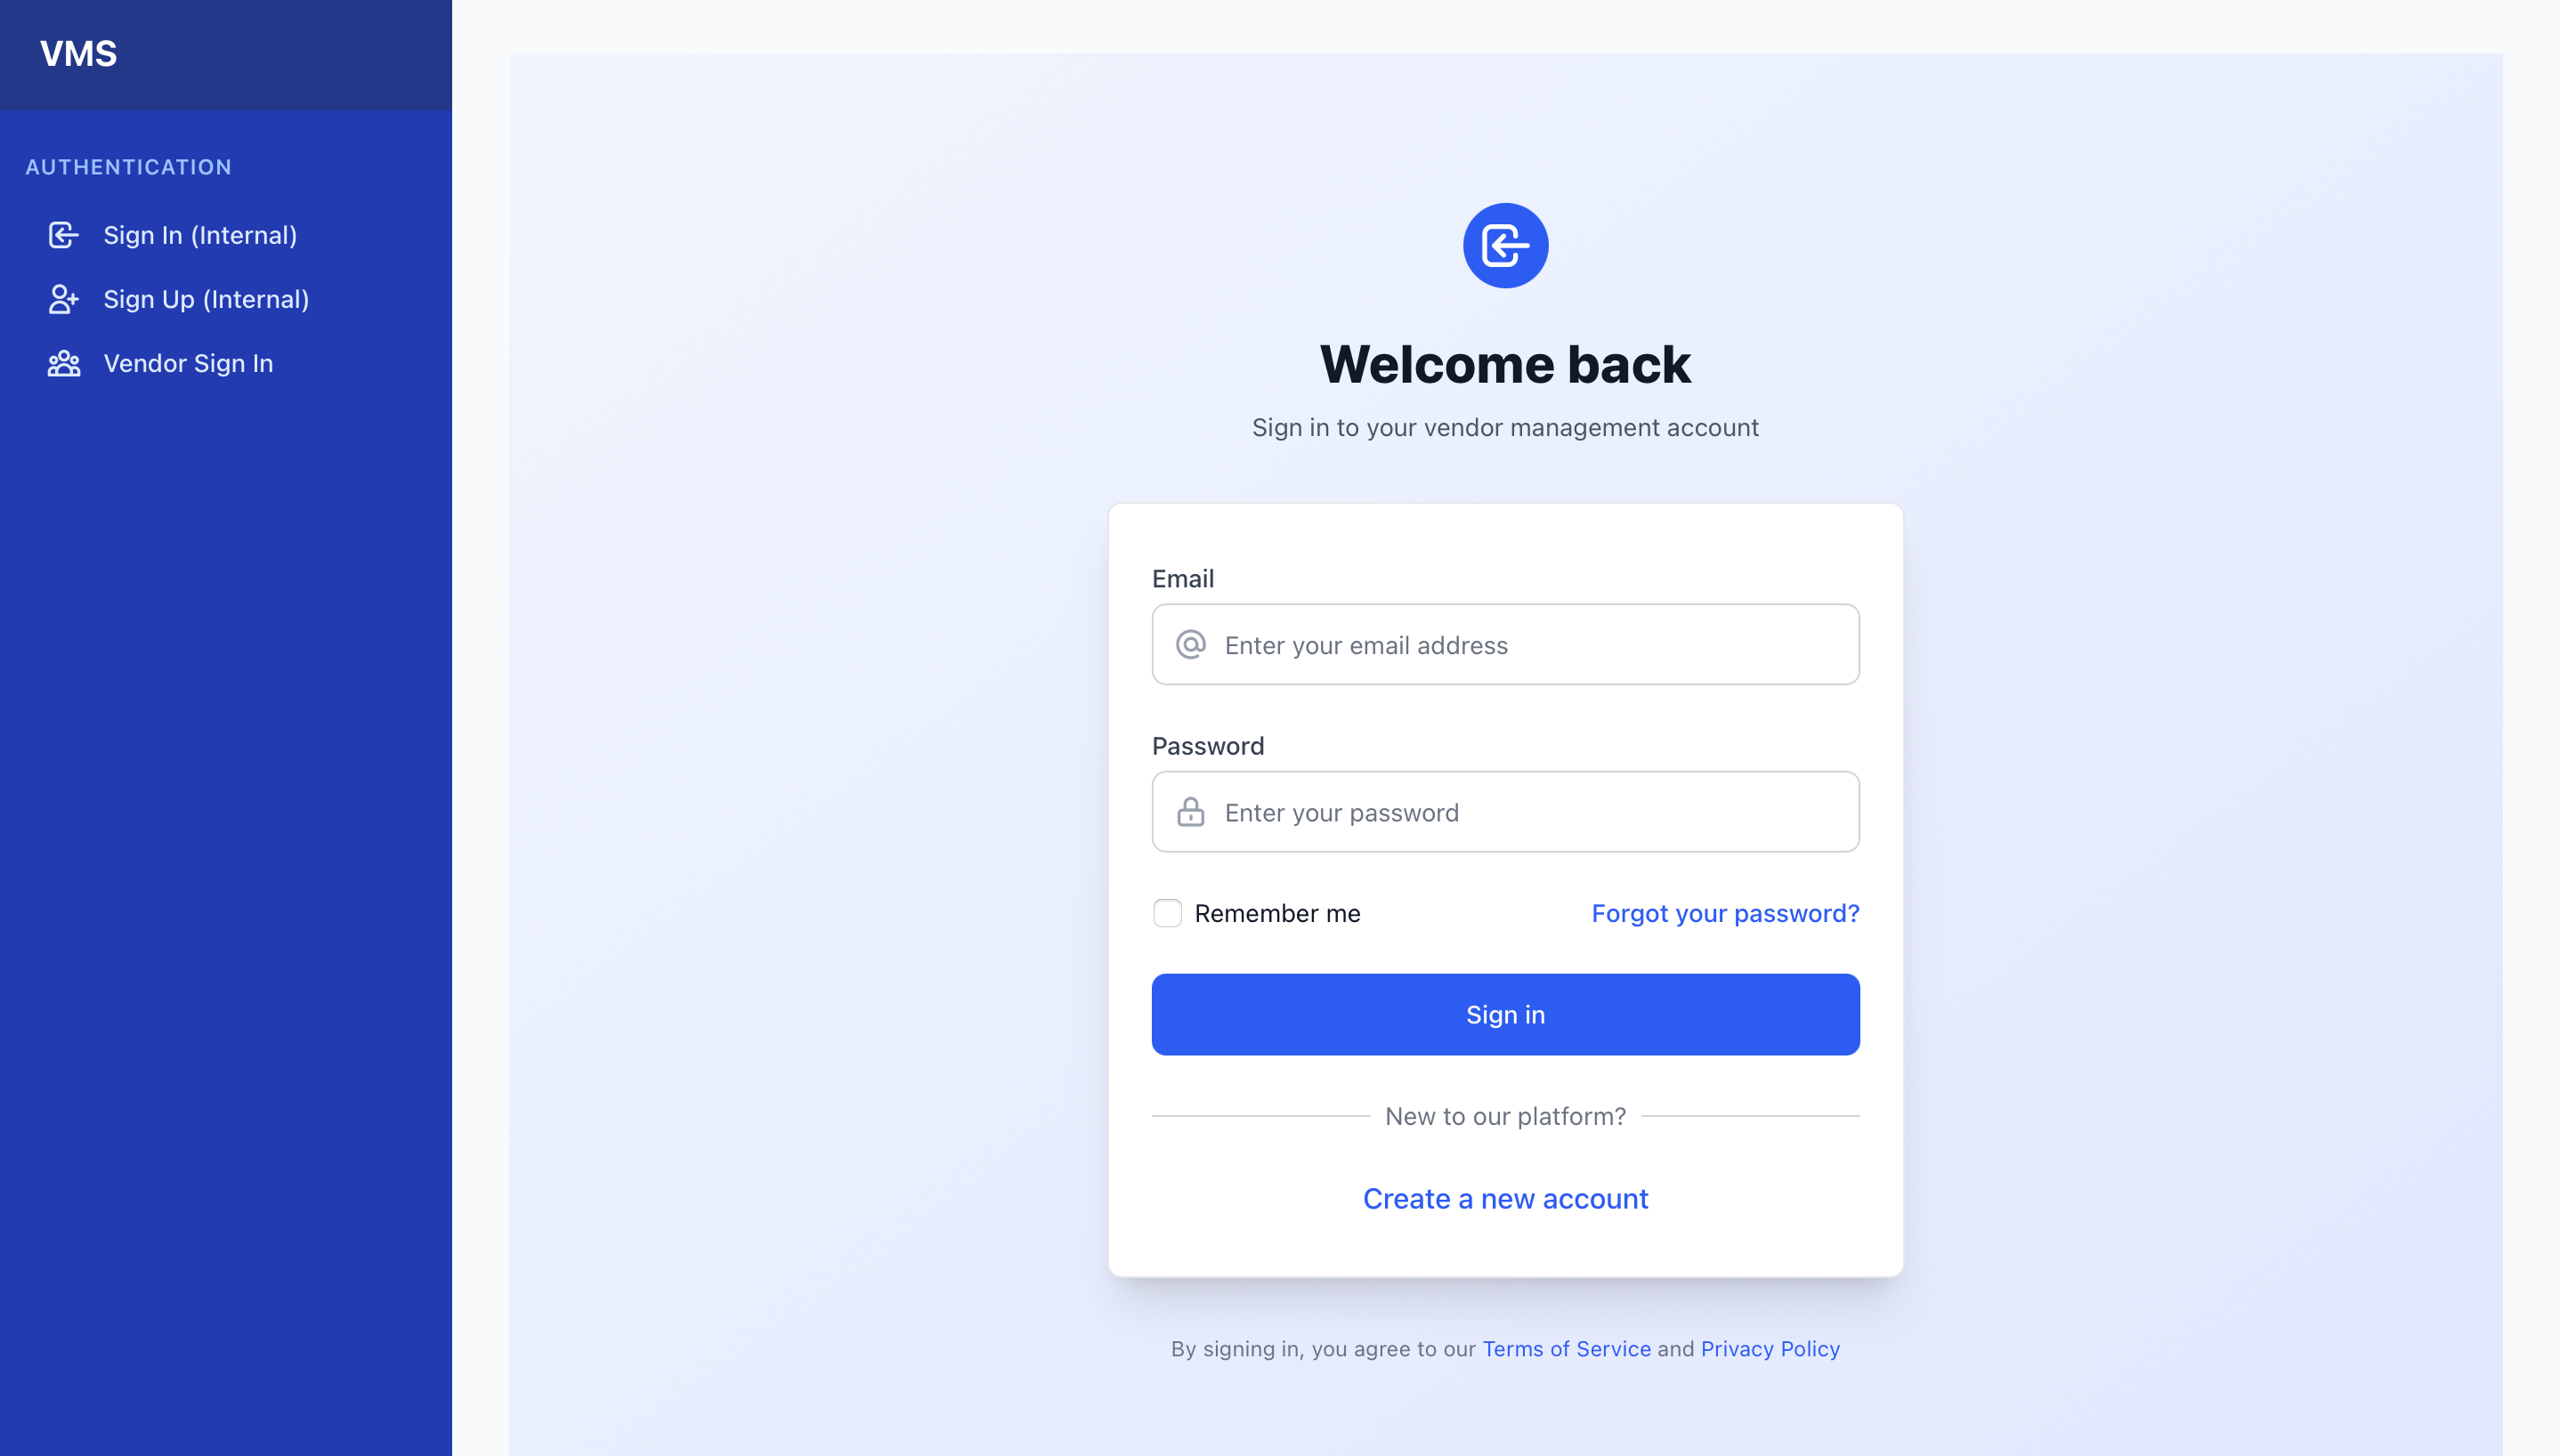
- Logging In:
- Enter your
Email AddressandPassword. - Click "Sign In".
- Enter your
- Main Navigation:
Once logged in, the navigation bar at the top provides quick access to different modules relevant to your company.
- Vendor Portal: Returns to your portal's home page (My Profile).
- My Profile: View and update your company's profile details.
- My Documents: Upload and manage required company documents.
- My Orders: View Purchase Orders issued to your company and update their status.
- My Invoices: Submit new invoices and track their status.
- (Your Name/Email): Displays your logged-in email and company name.
- Sign out: Logs you out of the Vendor Portal.
Chapter 9: My Company Profile
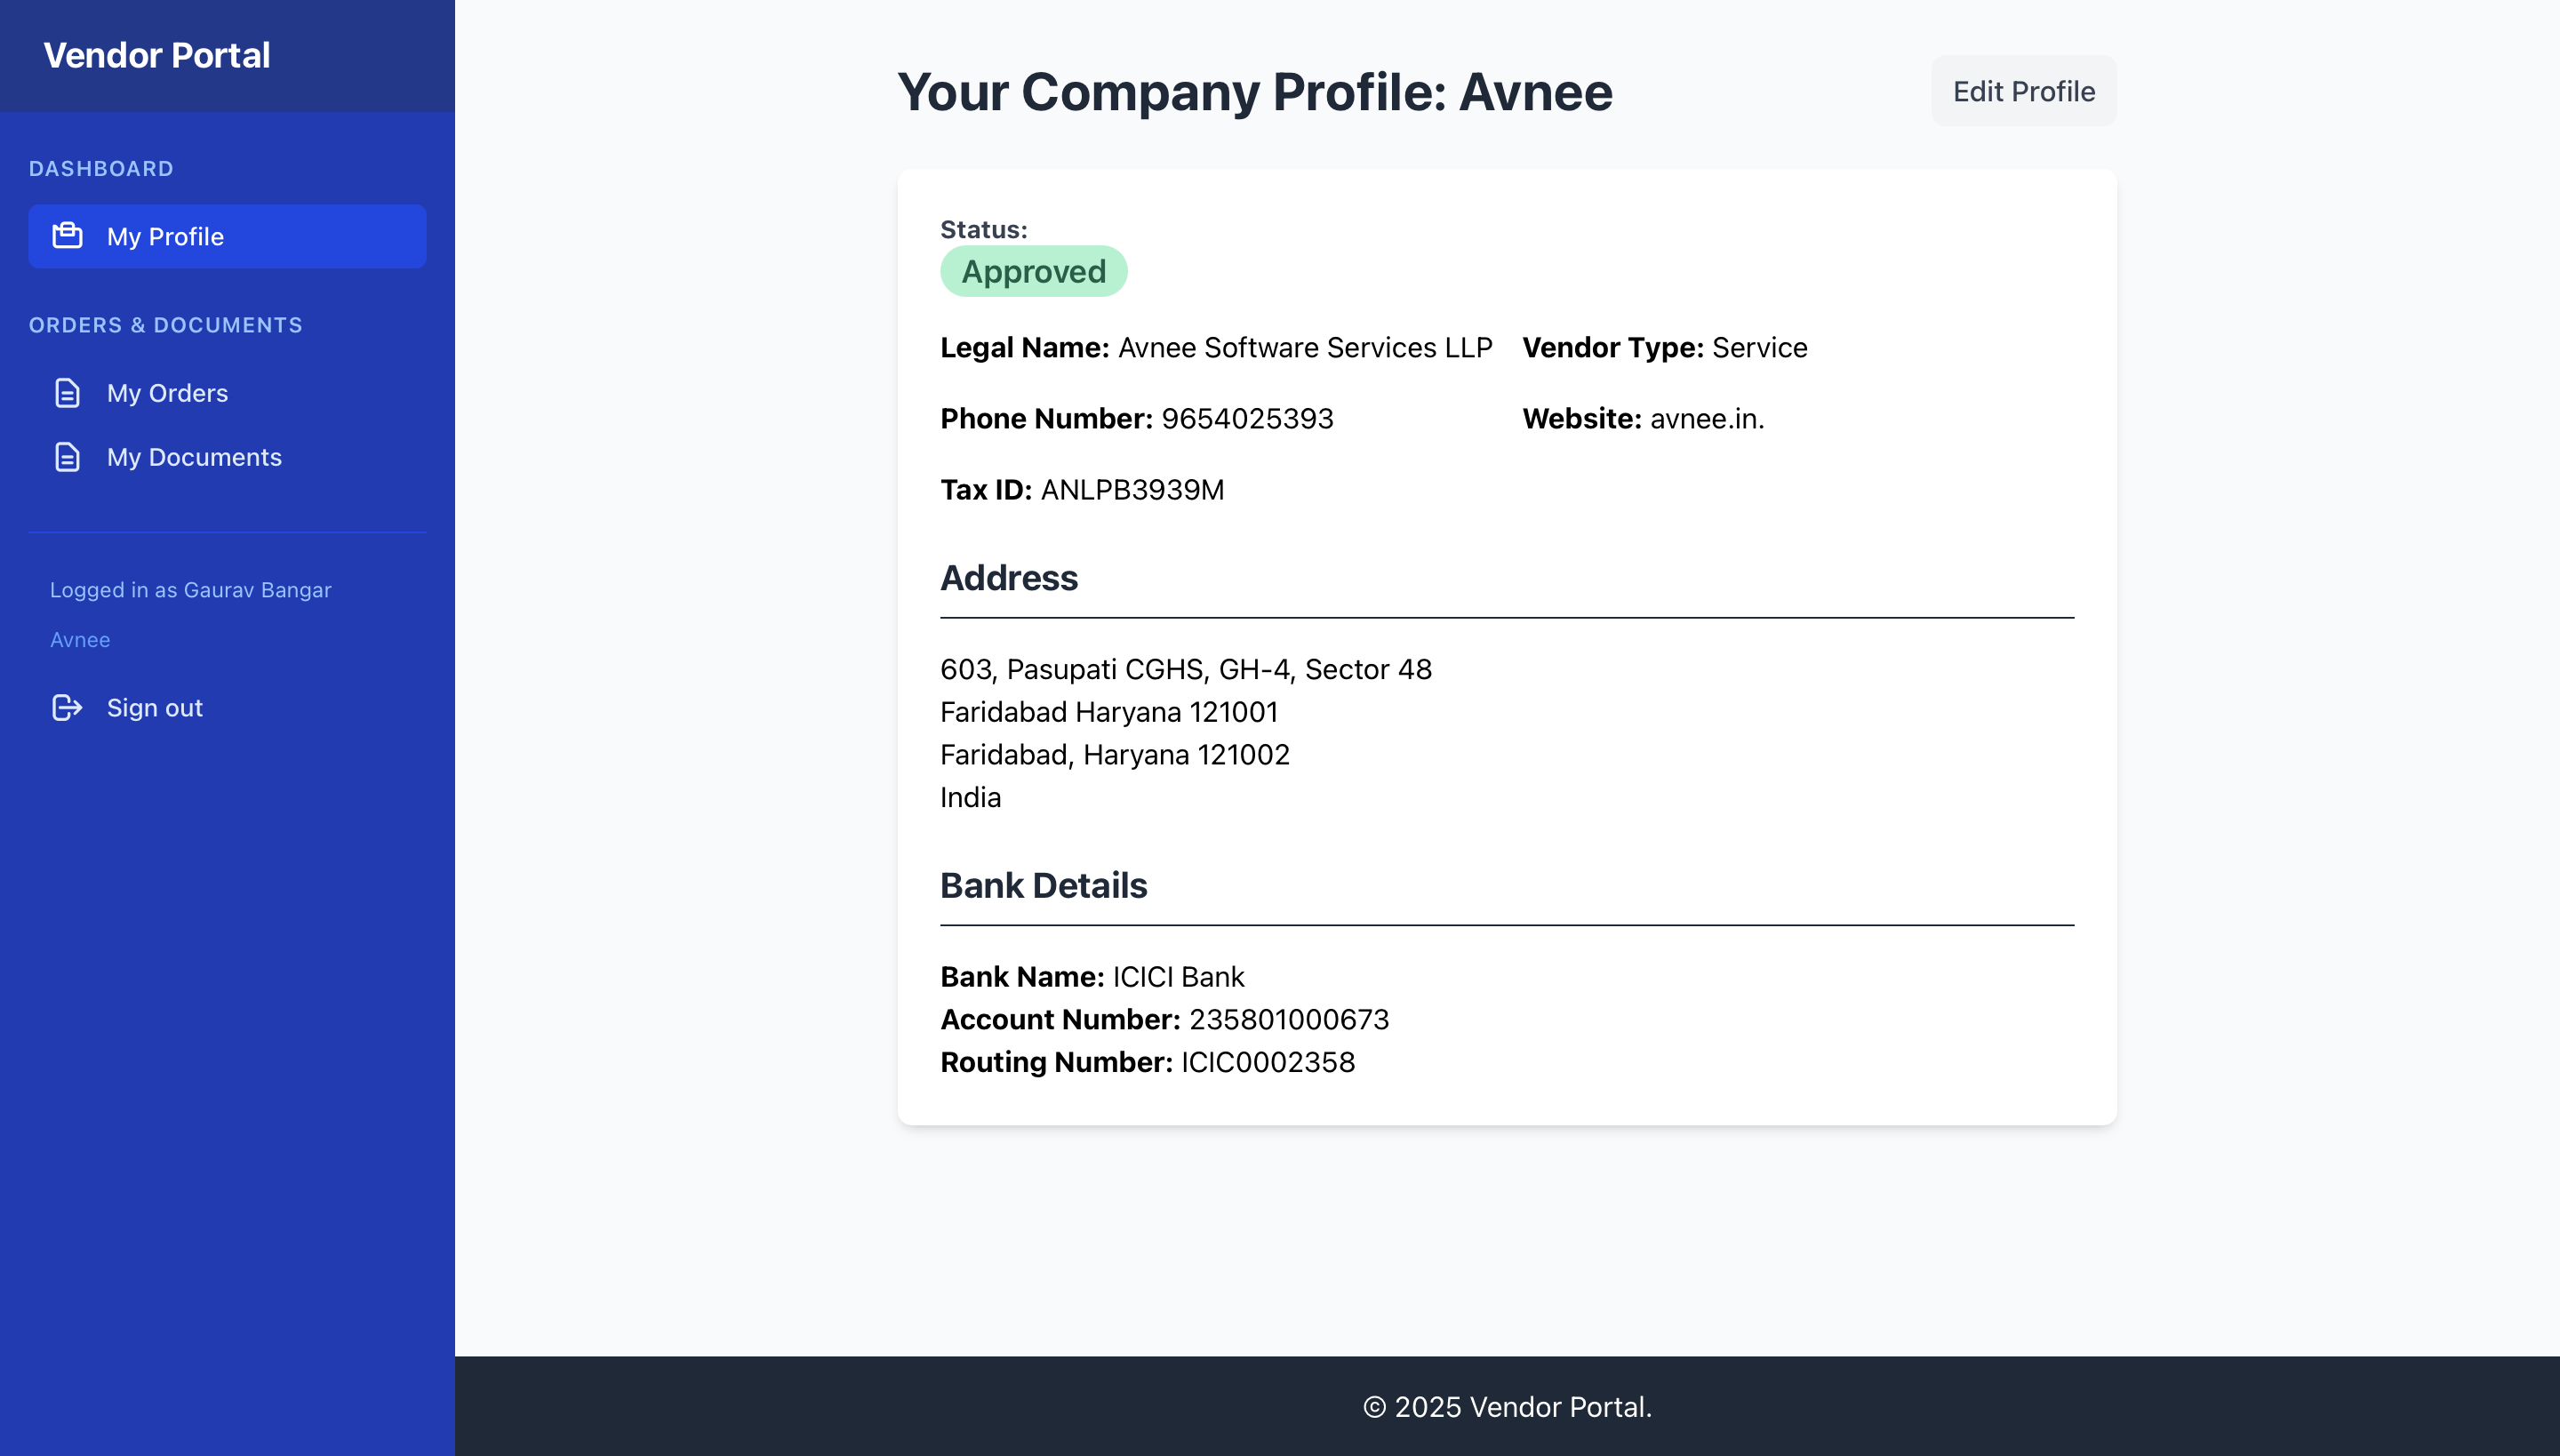
- Profile Overview:
- From the navigation bar, click "My Profile".
- This page provides an overview of your company's information as recorded in the VMS. You will see your company's
Statushere (e.g.,Pending Review,Approved,Revision Requested).
- Completing/Updating Profile:
- On the "My Profile" page, click the "Edit Profile" button.
- Fill in or update your company's
Legal Company Name,Addressdetails,Phone Number,Website,Tax ID, andBank Details. - Note: Your main
Vendor NameandVendor Typeare set by [Your Company Name] and cannot be edited by you here. - Click "Update Profile" to save your changes.
- Profile Status:
- Pending Review: Your profile is new or has recent updates that [Your Company Name] needs to review.
- Approved: Your profile has been reviewed and approved by [Your Company Name].
- Revision Requested: [Your Company Name] has requested changes to your profile. Please review the missing/incorrect information and update it.
Chapter 10: My Documents
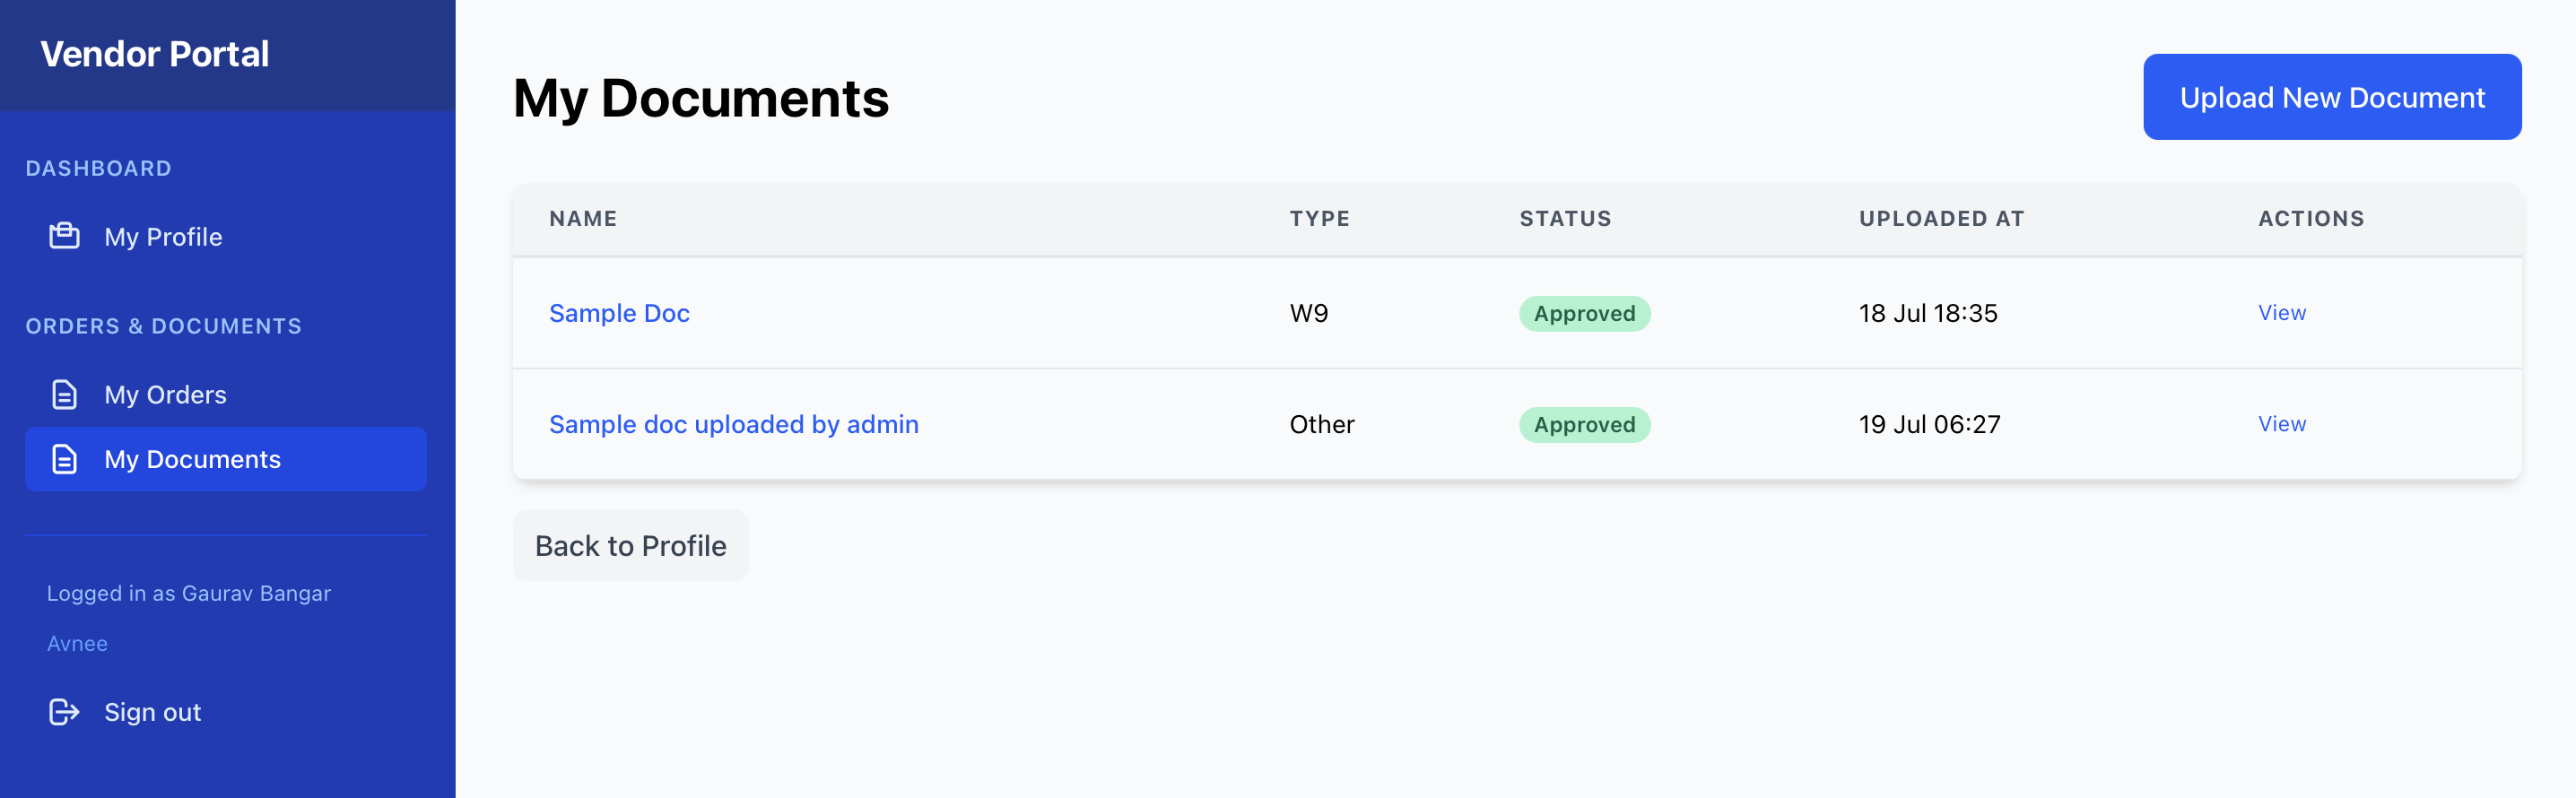
- Document List:
- From the navigation bar, click "My Documents".
- This page lists all documents you have uploaded or that are associated with your company.
- Table Columns: Name, Type, Status, Uploaded At.
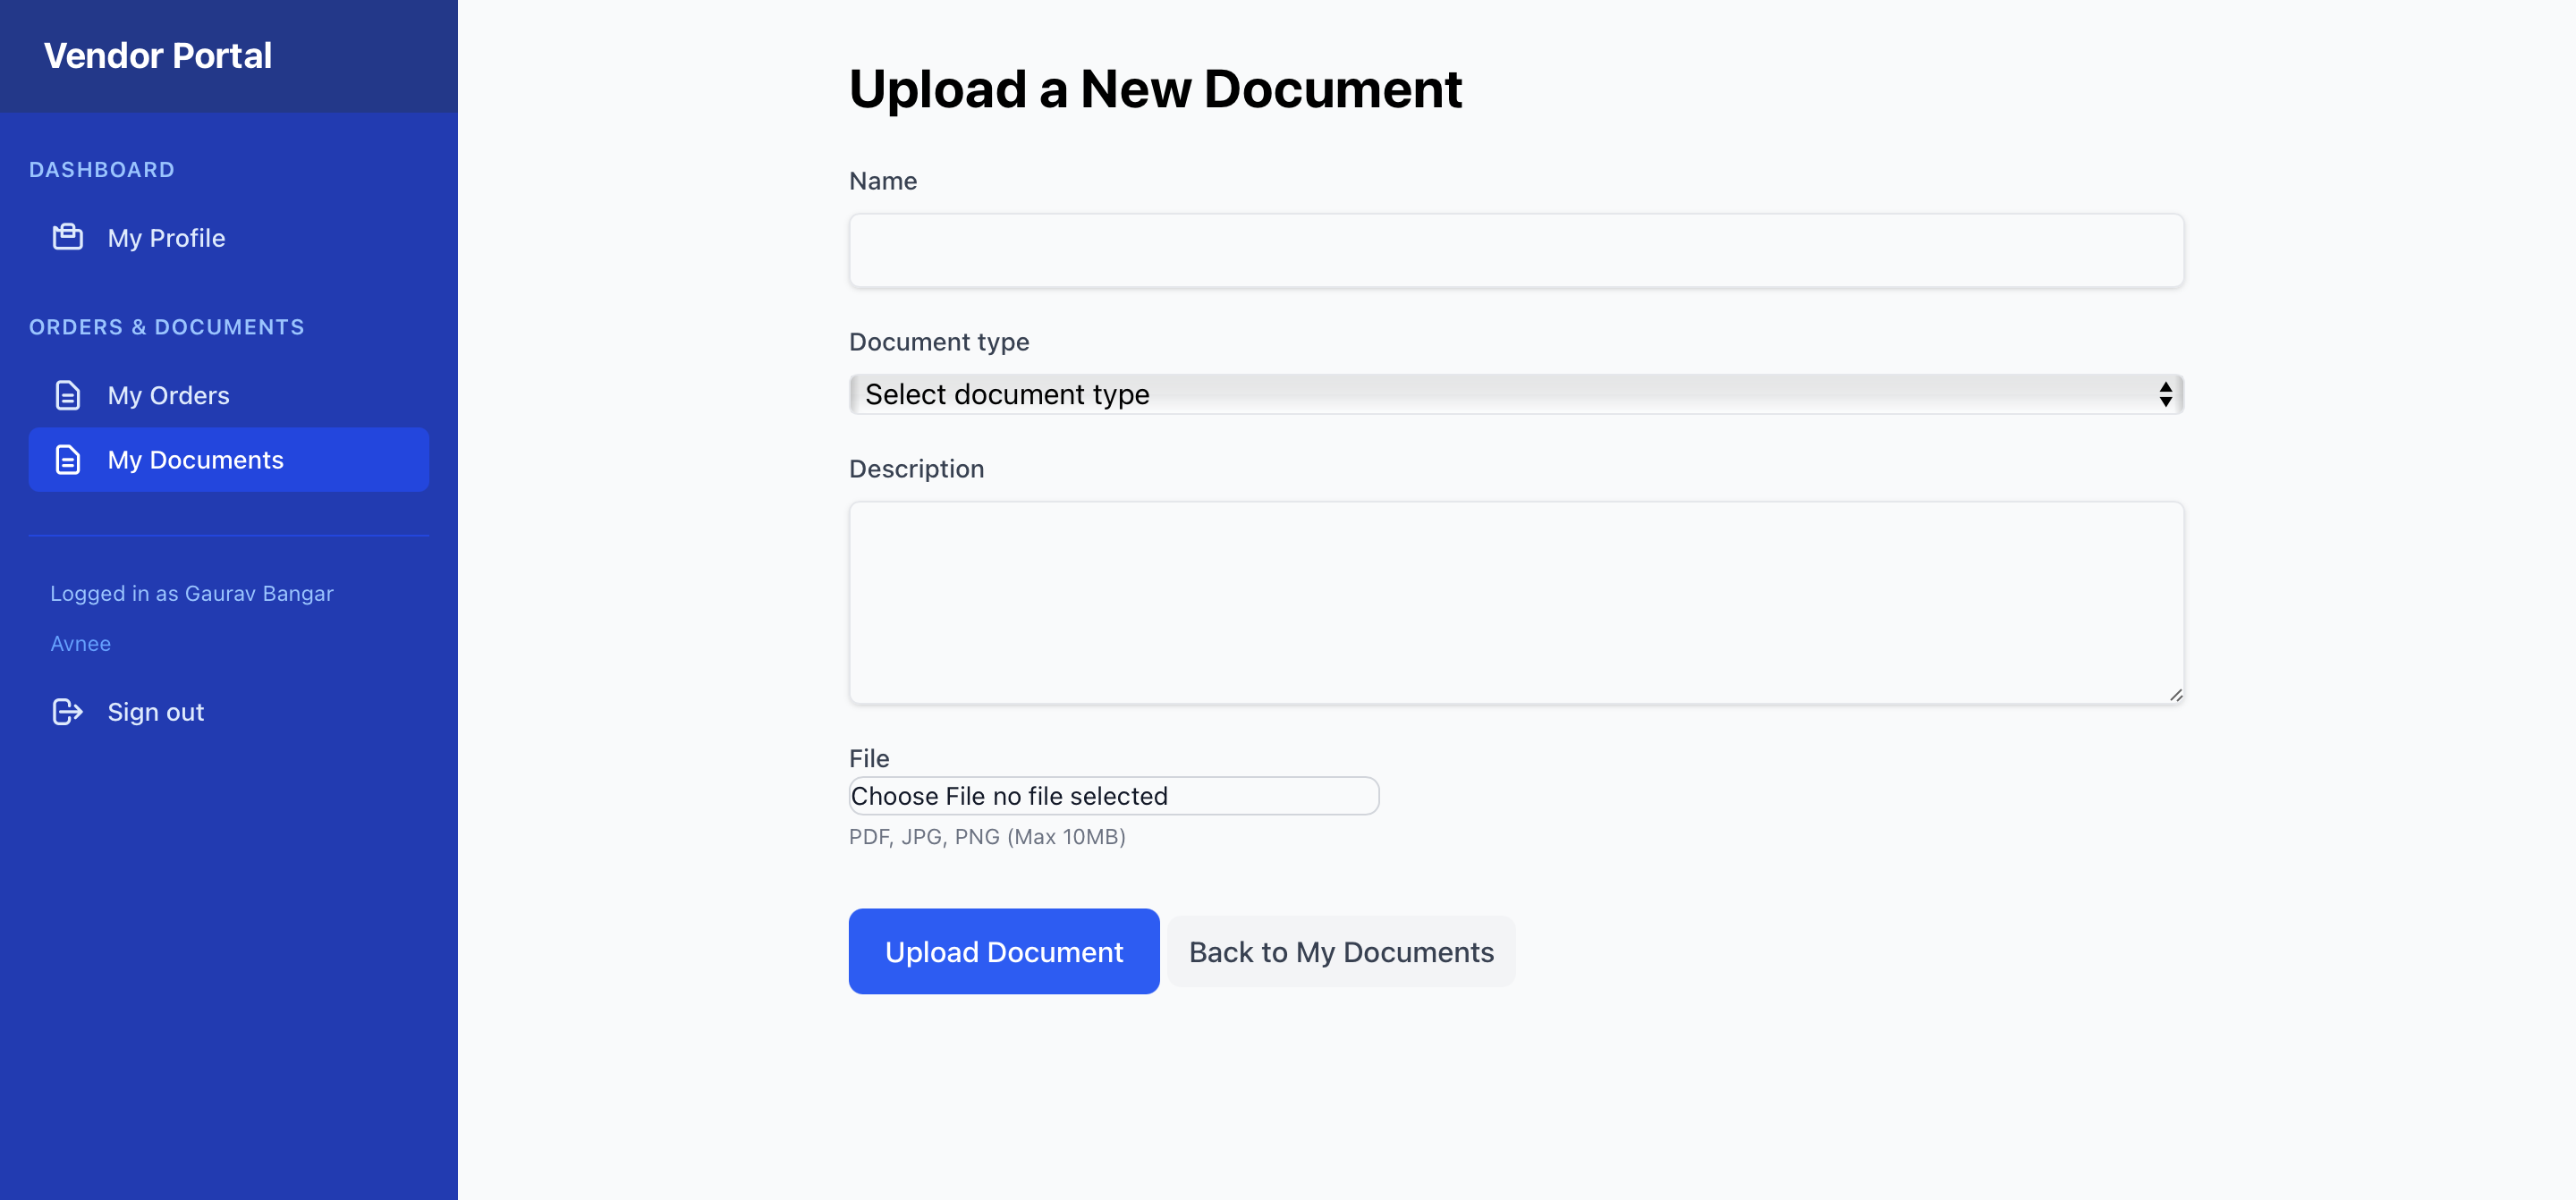
- Uploading New Documents:
- From the "My Documents" list, click the "Upload New Document" button.
- Enter a
Namefor the document (e.g., "Our latest Insurance Certificate"). - Select the
Document Type(e.g., W-9 Form, Insurance Certificate, Other Certification). - Add a
Descriptionif needed. - Click "Choose File" and select the PDF or image file (Max 10MB).
- Click "Upload Document".
- Understanding
Pending ReviewStatus for new uploads: Once uploaded, your document's status will bePending Review. [Your Company Name] will review it.
- Document Details:
- From the Document List, click the
Nameof a document. - This page displays the document's details and allows you to view/download the uploaded file.
- From the Document List, click the
Chapter 11: My Purchase Orders (POs)
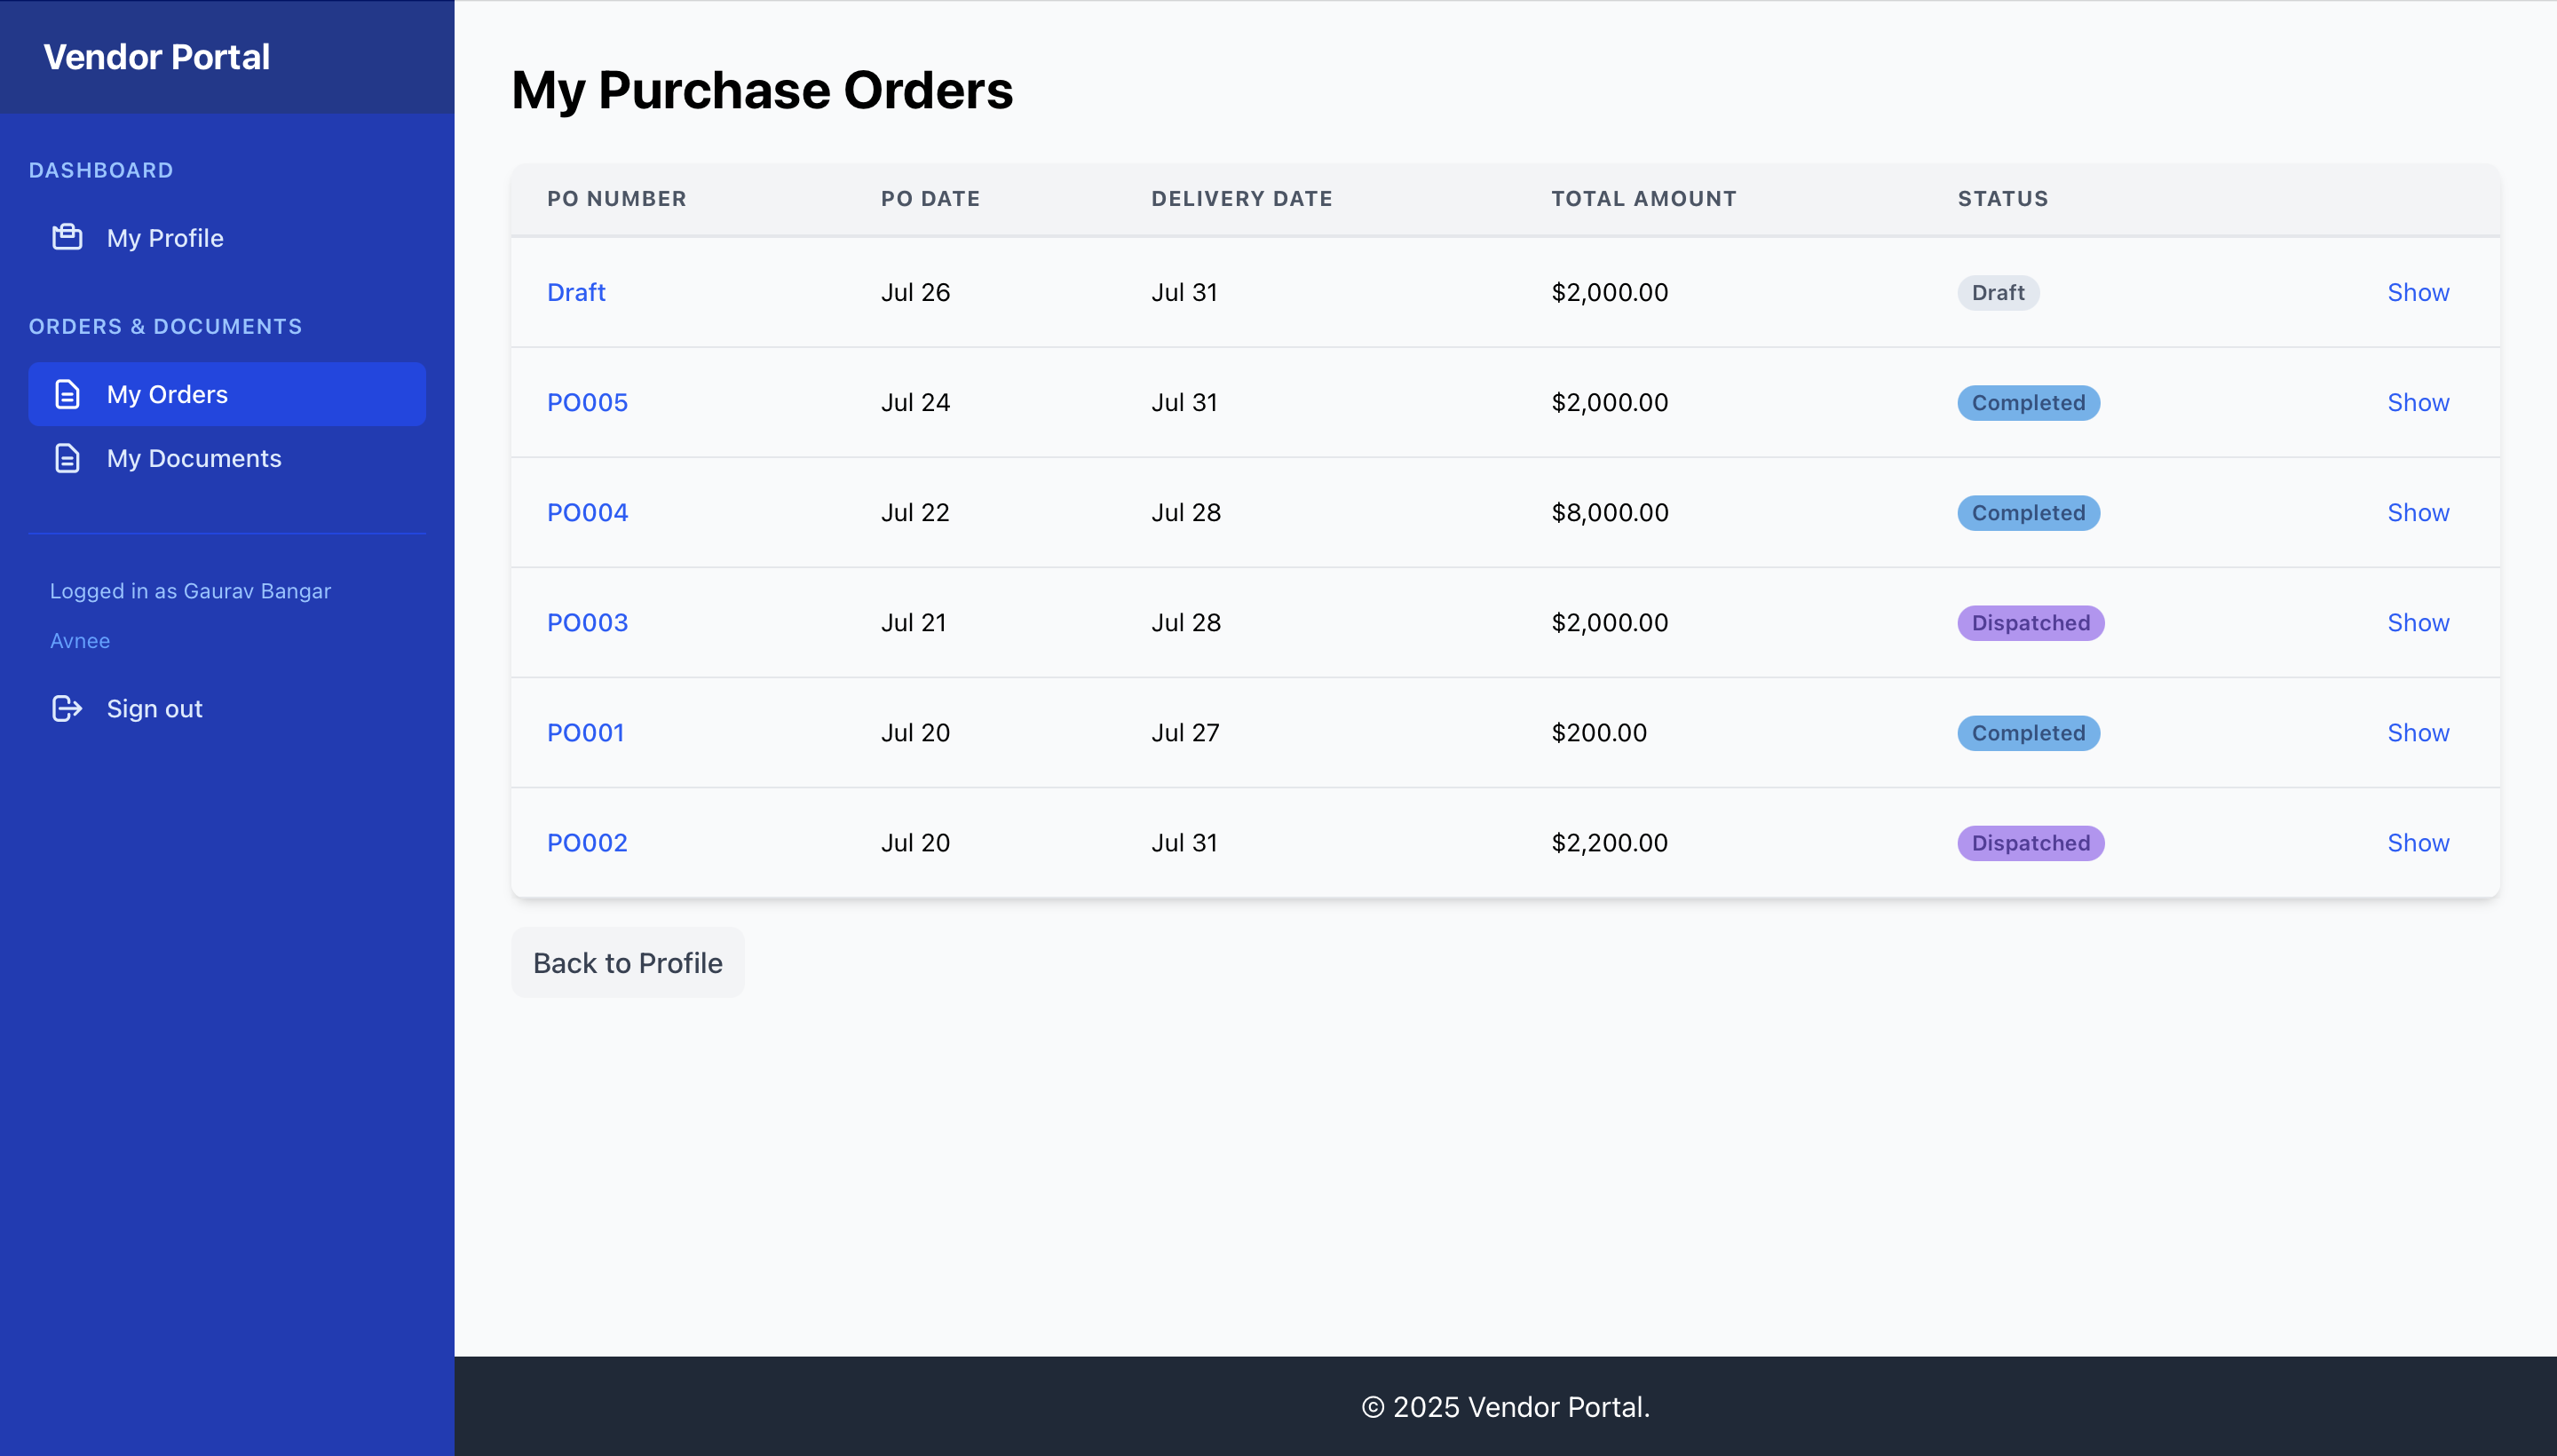
- PO List (Viewing all Purchase Orders):
- From the navigation bar, click "My Orders".
- This page lists all Purchase Orders that [Your Company Name] has issued to your company.
- Table Columns: PO Number, PO Date, Delivery Date, Total Amount, Status.
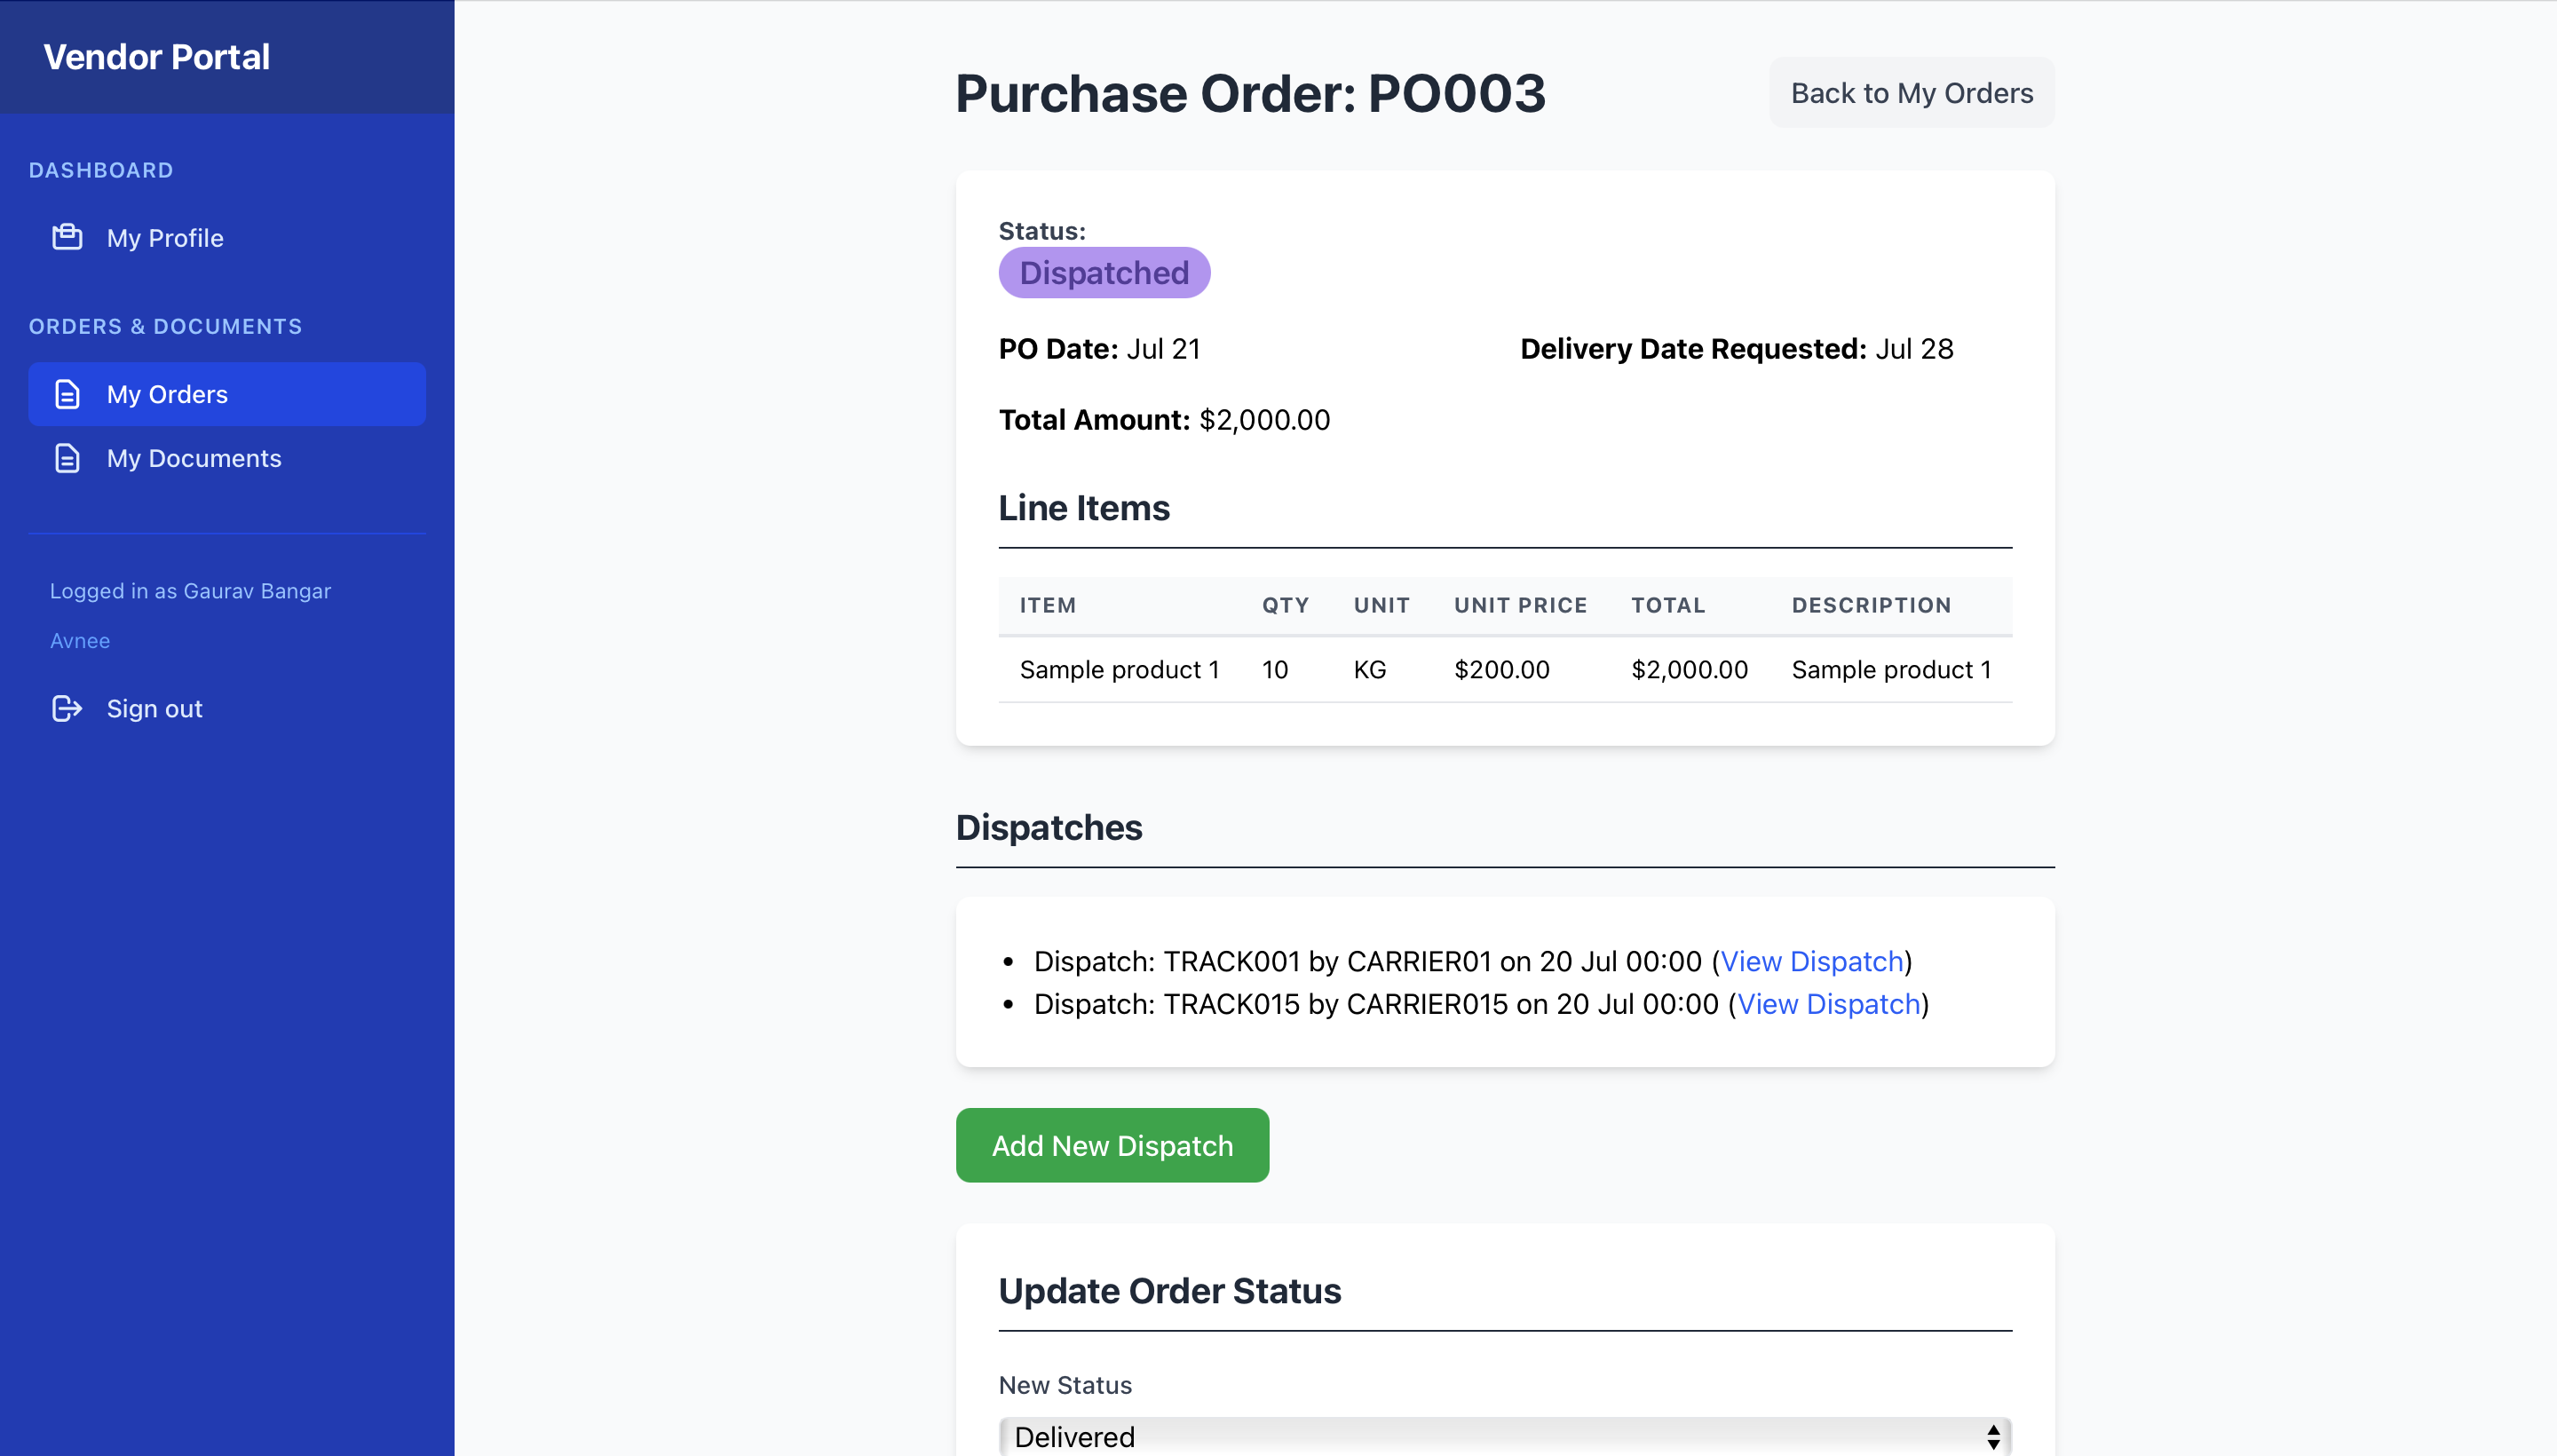
- PO Details:
- From the PO List, click the
PO Number. - This page shows the comprehensive details of the Purchase Order, including all line items.
- From the PO List, click the
- PO Status:
The
Statusof a PO indicates its current stage in the fulfillment process:- Draft: The PO is being prepared by the customer and is not yet visible to you.
- Sent: The PO has been sent to your company and is awaiting your action.
- In Production: You have acknowledged receipt and begun preparing the order.
- Dispatched: One or more shipments (dispatches) have been recorded for this PO.
- Delivered: All items on the PO have been delivered (usually confirmed by final POD or internal receipt).
- Completed: The PO is fully fulfilled, all deliveries and invoices are processed.
- Cancelled: The PO has been cancelled by the customer.
- Dispatching Orders:
- Adding New Dispatch:
- On a PO's "Show" page, if its status is
Sent,In Production, orDispatched(meaning more shipments are possible), you will see an "Add New Dispatch" button. Click it. - Fill in the
Tracking Number,Carrier(e.g., FedEx, UPS, Your Own Truck), andDispatch Date. - You can add
Notesfor this specific dispatch. - Click "Record Dispatch". This will update the PO status to
Dispatchedif it's the first dispatch for that PO.
- On a PO's "Show" page, if its status is
- Adding Proof of Delivery (POD):
- After creating a Dispatch, or for an existing Dispatch, navigate to the Dispatch's show page (by clicking its tracking number on the PO show page).
- On the Dispatch show page, click "Add New Proof of Delivery".
- Enter the
Delivery Dateand anyNotes. - Click "Choose File" and upload the PDF or image file (Max 5MB) of your Proof of Delivery.
- Click "Upload Proof of Delivery". This POD will then be visible to [Your Company Name] for review.
- Viewing Dispatch History and Associated PODs:
- On a PO's "Show" page, you'll see a list of all recorded Dispatches. Click a Dispatch's tracking number to view its details, including any associated PODs.
- Submitting a New Invoice:
- Prerequisite: You can only submit an invoice for a Purchase Order that has a
Completedstatus and does NOT already have an invoice. - Navigate to the
CompletedPurchase Order's "Show" page (Chapter 11). - If the PO meets the criteria, you will see a "Submit Invoice" button. Click it.
- Fill in the invoice details:
Invoice Number: Your unique invoice identifier.Invoice Date: The date on your invoice.Due Date: (Optional) The payment due date.Subtotal Amount,Tax Amount,Total Amount.
- Uploading Invoice PDF: Click "Choose File" and select the PDF file of your official invoice (Max 5MB). This is mandatory.
- Click "Submit Invoice".
- Understanding Invoice Status: Your invoice will initially have a
Submittedstatus. [Your Company Name] will then review it.
- Prerequisite: You can only submit an invoice for a Purchase Order that has a
- Invoice Status:
The
Statusof an invoice indicates its current stage in the payment process:- Submitted: The invoice has been received by [Your Company Name] and is awaiting review.
- Reviewed: [Your Company Name] has reviewed the invoice.
- Approved for Payment: The invoice has been approved and is scheduled for payment.
- Paid: Payment for this invoice has been recorded by [Your Company Name].
- Rejected: The invoice has been rejected by the Customer (e.g., due to discrepancies).
- Payment History:
- On any invoice's "Show" page, scroll down to the "Payment History" section.
- This section lists all payments that the Customer has recorded against this specific invoice, showing the total paid and any remaining balance due.
- Adding New Dispatch:
Part 3: Advanced Topics & Support
Troubleshooting Common Issues
- "Cannot log in":
- Double-check your email and password.
- Ensure you are using the correct portal (Admin vs. Vendor).
- If you forgot your password, use the "Forgot your password?" link on the login page.
- If you are a vendor and haven't received an invitation, contact your account manager at the Customer.
- "Page not found (404)":
- Verify the URL you are trying to access.
- Ensure you are logged in with the correct role to access that section (e.g., Vendor Portal is for vendors, Admin Portal is for internal staff).
- Contact support if the issue persists.
- "You are not authorized to perform this action":
- This means your current user role does not have permission for that specific action.
- If you believe you should have access, contact your administrator (for internal users) or account manager (for vendors).
- Form Submission Errors (red error messages at top of form):
- Review all fields marked with errors (often in red text below the field or in the summary).
- Ensure all required fields are filled.
- Check for formatting issues (e.g., invalid email, non-numeric entry in number fields).
- For unique fields (like PO Number, Invoice Number per Vendor), ensure you're not trying to create a duplicate.
Contact Support
- Internal Users: For technical assistance or account management, please contact support@procuretopay.tech.
- Vendors: For any questions regarding your profile, orders, invoices, or technical issues with the portal, please contact your account manager at the Customer or email sales@procuretopay.tech.
Feedback & Feature Requests
We are continuously improving the VMS! We welcome your feedback and feature requests to make the system even better. Please send your suggestions to product@procuretopay.tech.